E-4
INSTALLATION INSTRUCTIONS
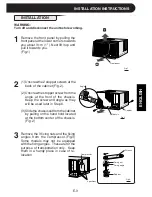
At this step, make sure the cabinet is
inclined approximately 1cm (3/8") to
the back (Fig.7).
If the cabinet is not properly inclined,
the water collected in the bottom tray
during operation will not drain prop-
erly and may flow into the room
where the air conditioner is installed.
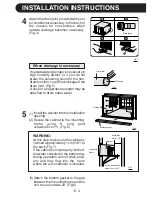
When drainage is necessary
If outside water drainage is necessary in
high humidity district, or if you do not
prefer the splashing sound of the non-
drain function, cut off the blockage of the
drain joint .(Fig.5)
A hose of an appropriate length may be
attached to drain outlet water.
(3)
(1)
5
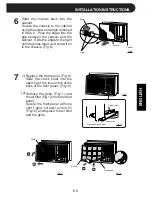
Install the cabinet into the installation
opening.
Secure the cabinet to the mounting
frame using 8 long gold
screws(2.5cm/1"). (Fig.6)
Fig.5
Fig.6
WARNING:
cabinet
mounting
frame
incline backwards
about 1cm (3/8")
Fig.7
Fig.4
Attach the drain joint provided with your
air conditioner accessory to the back of
the chassis for convenience when
outside drainage becomes necessary.
(Fig.4)
4
Drain joint
Cabinet
Blockage
Bottom gasket
(2)
1
2
Drain joint
3
4
Attach the bottom gasket to the gap
between the mounting frame and the
unit to seal outside air. (Fig.6)
More than
40cm (16")
Summary of Contents for AF-A18CE
Page 2: ......

