INSTALLATION AND SERVICE ADJUSTMENTS
INSTALLATION OF
NEW COLOUR TELEVISION
RECEIVER
Adjust the receiver for a black and white picture. Check
the horizontal oscillator adjustment, focus, vertical size
and linearity.
Observe the picture for good
white reproduction over all areas of the screen. No ob-
jectionable
shading should be evident. If shading
is evident, demagnetize the receiver. It is seldom necessary
to go through a complete “set-up” routine when installing
a new
receiver. In the majority of cases a technician
needs only to
the face plate area of the picture
tube and touch up the static convergence.
television receivers leaving the factory are adjusted
by experts who specialize in the set-up of
receivers.
Normally, readjustment of picture tube temperature or
even dynamic convergence should not be required upon
delivery. However, since a receiver or parts of it, may
become magnetized as it is transported from one location
to another, it is very important to demagnetize the picture
tube face plate area once the receiver is set in its final
operating position.
This receiver is equipped with an automatic
coil
which effectively demagnetizes the picture tube each time
the receiver is turned on. The
coil will operate
at any time the set is turned on after having been off for at
least five minutes.
Since this
effect is confined to the picture tube,
should any part of the chassis or cabinet become magnetized,
it will be necessary to
the affected area by means of
a manual
coil. Move the coil slowly around the
parts to be demagnetized, then slowly withdraw for a
distance of six feet before disconnecting the coil from
the
AC
power supply.
Note:
(or
is an important
function in the setting up and installation of
T.V.
receivers.
The receiver should be positioned in its
location before
because of possible loss of
purity due to the
of the receiver.
Because of possible loss of purity caused by the
of the receiver, the cabinet should be positioned in its
final location before
MODULE SERVICE PERCAUTIONS
DO NOT remove or insert module units whilst the set is
switched on.
Semiconductor heat sinks should be regarded as potential
shock hazards when the receiver is operation.
Touch the Channel Selector Button corresponding to
the channel, that you wish to select.
Adjust the Band Selector switch to either of 3
positions
,
as shown below, depending on
what channel you now wish to select.
BAND
. . . . . . . . .
VHF 0 Sch.
. . . . . . . . .
. . . . . . . . .
Note the number on the Channel Selector Button and
relate it to the Preset Tuning knob and Band Selector
switch with corresponding number.
Tune in the desired channel by turning the Preset
Tuning knob clockwise or counterclockwise until the
channel is properly tuned.
Note:
Whenever the ON-OFF switch is turned on, No. 1 program
will always be selected. However, when you want to change
this No. 1 program to another program by depressing the
channel selector button, it sometimes occurs that the
corresponding indicator lamp does not light up this
means that your desired program has not been selected.
In this case, set the ON-OFF switch to “OFF” position and
reverse the polarity of power cord. Then, the unit will
function normally, assuring a proper program selection. The
aforesaid, however, may take place only when the antenna
terminal is grounded or a separate transformer is used as a
power supply source and, therefore, this is out of the
question as long as you operate the unit in a normal
condition.
Preset Channel Table
(at factory setting)
No. 1
Al
No. 3
No. 5
No. 6
No. 7
No. 8
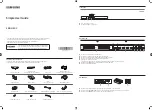
Figure Front Panel Controls
7
Summary of Contents for 8C221
Page 28: ...PRINTED WIRING BOARD ASSEMBLIES I Figure 18 PWB A Component Side 28 ...
Page 29: ...Figure 19 PWBA Wiring Side 29 ...
Page 30: ...Figure 20 FWB B Component Side 30 ...
Page 31: ...Figure 21 PWB B Wiring Side 31 ...
Page 32: ... PWBF0491CE ...
Page 33: ...Figure 26 PWB E Component Side Figure 27 PWB E Wiring Side 33 ...
Page 34: ...Figure 28 PWM A Component Side Figure 29 PWM A Wiring Side 34 ...
Page 40: ... I 8 VPP W 1 2 WXJ H I 3 3 4Vpp H 1 4 6 4Vpp U I I 51 WPP t 0 1 ...
Page 46: ...S H A R P 46 ...