background image

13

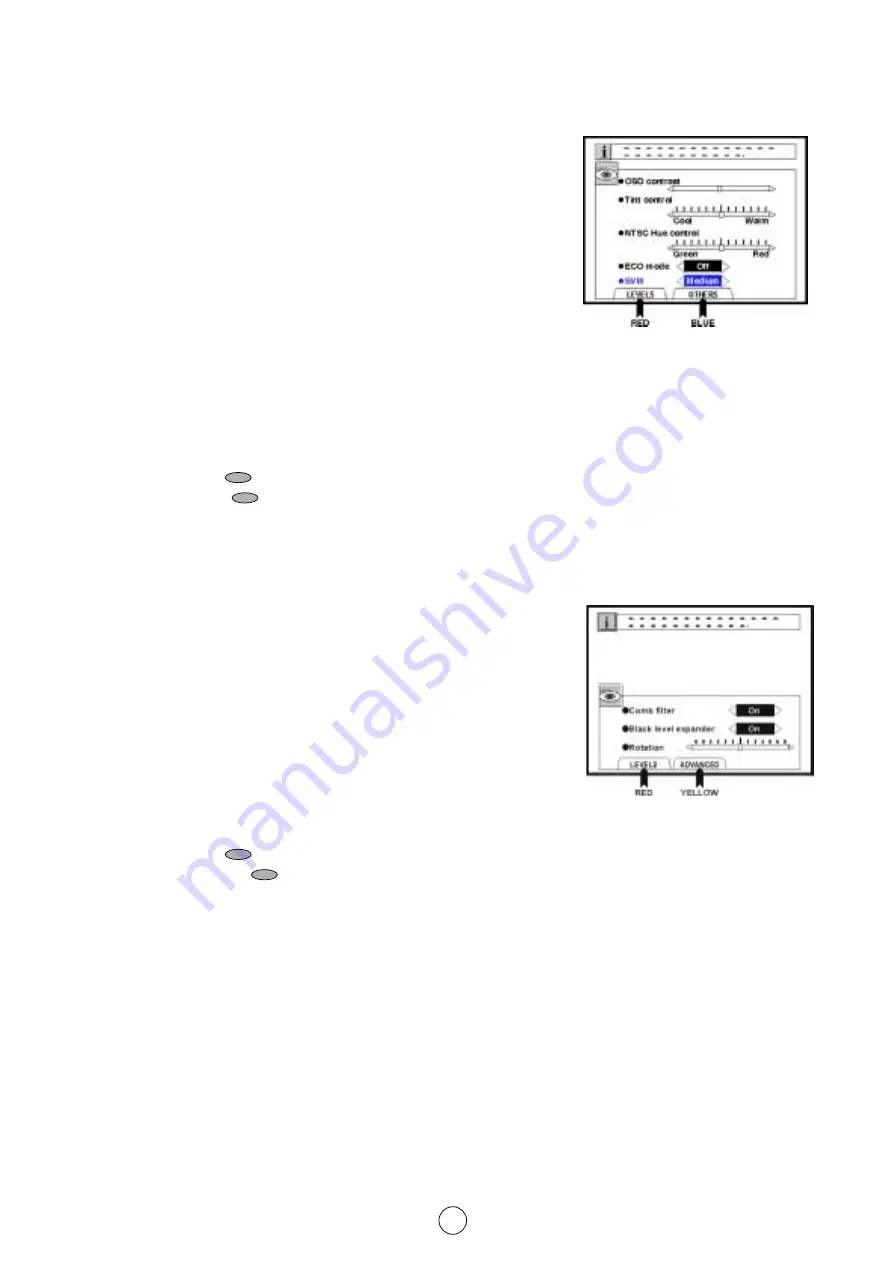
ADVANCED Menu

1.

Press the Cursor UP/DOWN buttons  

E

/  

F

to select

one of the following parameter from the list: OSD contrast, Tint
control, NTSC Hue control, ECO mode or SVM. The red point mark
indicates the selected parameter.

2.

Press the Cursor LEFT/RIGHT buttons  

/

I

to adjust picture

quality to your liking.

Select OSD contrast to adjust the contrast level of the On Screen
Display menus.

Select Tint  control to adjust your desired skin colour (Cool or Warm).

Select NTSC Hue control to adjust the skin colour (Green or Red)
during NTSC signal reception through the external connectors.

Select ECO mode “On” to attenuate the contrast in the excessively
white areas of the picture.

Select SVM (Scan Velocity Modulator) to change the resolution of the
picture (Low, Medium or High). The TV is factory pre-set to ‘Medium’.

In this menu you can switch to the following menus:

Press the RED button 

to return to the LEVELS Menu.

Press the BLUE button 

to see the OTHERS Menu.

3.

Press the MENU button 

to close the ADVANCED Menu.

OTHERS Menu

1.

Press the Cursor UP/DOWN buttons 

E

F

to select:

Comb filter, Black level expander or Rotation. The red point mark
indicates the selected item.

2.

Press the Cursor LEFT/RIGHT buttons  

/

I

to select ON/OFF.

Select Comb filter (ON) to reduce the colour interference in picture
with fine details and the picture gets sharper.

Select Black level expander (ON) to activate the Dynamic
Compensation in the dark area of the picture.

Select Rotation to rotate the picture until the lines are perfectly
horizontal.

In this menu you can switch to the following menus:

Press the RED button 

to return to the LEVELS Menu.

Press the YELLOW button 

to return to the ADVANCED Menu.

3.

Press the MENU button 

to close the OTHERS Menu.

ADVANCED Menu

OTHERS Menu

Summary of Contents for 66FW-54H

Page 1: ...Printed on recycled paper 66FW 54H 76FW 54H COLOUR TELEVISION OPERATION MANUAL ...

Page 2: ...ly to equipment used in the course of a business trade or profession 3 This guarantee does not cover any faults or defects caused by accident misuse fair wear and tear neglect tampering with the equipment or any attempted at adjustment or repair other than by an approved Service Facility 4 In the unlikely even of your equipment requiring repair please contact the Dealer or Supplier from whom it wa...

Page 3: ...posed of in a safe manner Under no circumstances should the cut off plug be inserted elsewhere into a 13A socket outlet as a serious electric shock may occur To fit an appropriate plug to the mains lead follow the instructions below IMPORTANT The wires in the mains lead are coloured in accordance with the following code Blue Neutral Brown Live As the colours of the wires in the mains lead of this ...

Page 4: ...or electrical shock do not use the TV set in an excessively damp place Position the TV set out of direct sunlight and away from heat as high temperatures can damage the cabinet CRT or other electronic parts Do not cover the ventilation holes at the back of the TV set this can cause fire or other serious problems Leave an adequate open space behind the TV set for good ventilation Always disconnect ...

Page 5: ...e the battery cover Digital Comb Filter Auto Installation System ACSS function Auto Channel Sorting System 99 Channel Programming System Cable and Hyperband Teletext TV Guide OSD System On Screen Display Tint Control NTSC Hue Control AI OPC Optical Picture Control ECO mode Wide Mode Function Picture rotation Digital Stereo NICAM AVC Automatic Volume Correction AV SCART Volume DOLBY PRO LOGIC SURRO...

Page 6: ...5 Antenna connections TV set only Antenna connections VCR and TV Note See on Typical connections page 47 for details of further connection possibilities BACK OF TV ...

Page 7: ...olour button yellow 23 Colour button cyan TV 24 Channel UP Cursor control UP 25 Volume UP Cursor control RIGHT 26 Channel DOWN Cursor control DOWN 27 Wide Mode selector TV Teletext 28 Time button TV 29 Sound mode selector Teletext 30 Hold button TV 31 Sound Mute button Teletext 32 Text Mix Picture button 33 Index button Video 34 Channel Up selector 35 Fast forward picture search forward 36 Channel...

Page 8: ...Terminal PAL SECAM NTSC 13 Audio Input Terminal left 14 Audio Input Terminal right REAR TV External speakers 1 Woofer output 2 Rear loudspeaker output RIGHT 3 Rear loudspeaker output LEFT 4 Front loudspeaker output LEFT 5 Front loudspeaker output RIGHT Note See the technically data of external speakers on typical connection page 48 21 pin In Out 6 21 pin Audio Video AV 2 With PAL SECAM NTSC Video ...

Page 9: ...e to turn ON the TV press the Stand by but ton Bl TV on the remote control or one of the four buttons on the TV Va VCH The TV will change from Stand by mode to Programme mode the sound indicator will light a few moments and an image will appear on the screen Press the Stand by button Bl TV again and the TV will return to Stand by mode Blue back off timer If noise appears in TV or VCR mode the scre...

Page 10: ...d and sorts them according to technical criteria from Pr 01 of the TV to a maximum of 99 programmes Notes This tuning process may take several minutes to perform IF THE TV CANNOT BE INSTALLED BY THIS METHOD PLEASE PHONE THE FOLLOWING NUMBER 0990 274277 If you need to repeat the AUTO INSTALLATION please read TV Channel Setting page 32 Stored programmes When the AUTOMATIC SEARCH has been completed t...

Page 11: ...the GREEN button to see the Sorting Menu c 3 Press the Cursor UP DOWN buttons E F to move the channel CH to the required position c 4 Press the GREEN button to finish d Edit this programme Use this option for giving a name made up of four digits to the channels or for changing the one which appears on some channels in the following way d 1 Select the channel using the Cursor UP DOWN buttons E F d ...

Page 12: ...ls Single Double entry selector button 6 This button selects between one or two digit channel number entry 0 9 Digit buttons You can select channels by pressing the 0 9 digit buttons on the remote control For single and double digit entry see section B above Flash back button Press this button to change from the current channel to the channel previously selected Press the button again to switch ba...

Page 13: ...The red point mark indicates the selected parameter 5 Adjust the picture quality to your liking with the Cursor LEFT RIGHT buttons C I 6 Press the GREEN button if you wish to memorize the Personal levels in the Memorized position of PICTURE MODE In this menu you can switch to the following menus Press the YELLOW button to see the ADVANCED Menu Press the BLUE button to see the OTHERS Menu 7 Press t...

Page 14: ...e TV is factory pre set to Medium In this menu you can switch to the following menus Press the RED button to return to the LEVELS Menu Press the BLUE button to see the OTHERS Menu 3 Press the MENU button to close the ADVANCED Menu OTHERS Menu 1 Press the Cursor UP DOWN buttons E F to select Comb filter Black level expander or Rotation The red point mark indicates the selected item 2 Press the Curs...

Page 15: ...CROLL UP DOWN V SIZE menu Press the Cursor LEFT RIGHT buttons C I to adjust the Vertical SIZE LARGE SMALL AUTO mode VPS code The VPS signal is sent by some broadcasting stations with information of the original size When the TV is in AUTO mode and receives the VPS signal it changes the size automatically as indicated below When the TV is receiving VPS code 16 9 the TV selects CINEMA automatically ...

Page 16: ... 16 9 format while also stretching the centre of view This is an advantage for example when watching sports games where there is no real fixed centre of the picture NORMAL You can watch 4 3 programs in 4 3 format by switching to Normal Mode function ZOOM 14 9 Adapts the 14 9 broadcast cinema movies to the 14 9 Mode CINEMA 16 9 Adapts the 16 9 broadcast cinema movies to the 16 9 Mode thereby gettin...

Reviews: