background image

16

1.

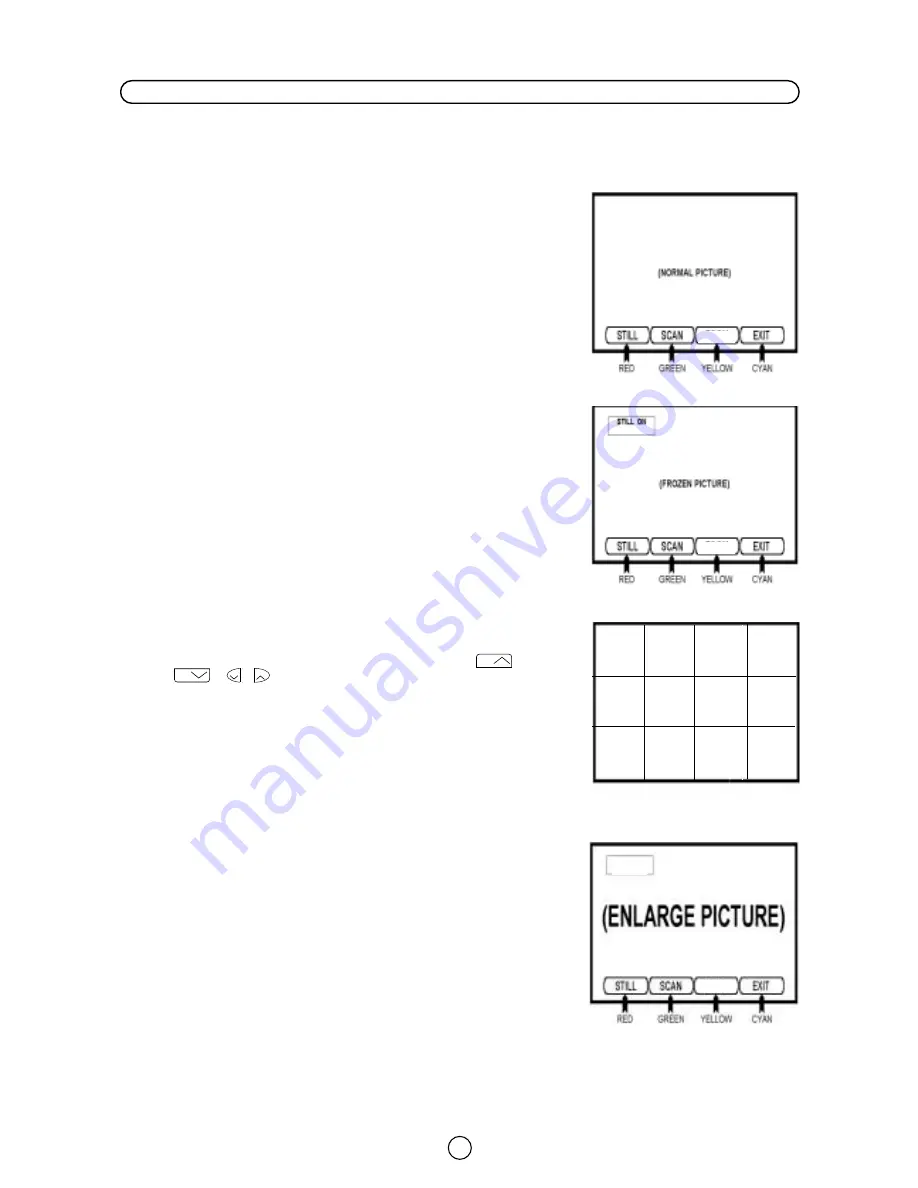
Press a colour button to see 100 Hz  FAST Menu.

2.

Press the corresponding coloured button.

2.1.

Press the RED button «STILL» to frozen picture.

2.2.

Press the GREEN button «SCAN» programmes.

2.3.

Press the YELLOW button «SCOPE» to enlarge picture.

2.4. 

Press the CYAN button «EXIT» to quit the menu.

STILL:

In this mode the TV set frozen the picture.
You can also enter to the following functions:

«STILL» ON/OFF by RED button.
«SCAN» by GREEN button.
«SCOPE» by YELLOW button.
«EXIT» by CYAN button.

SCAN:

In this mode the TV set display 12 programmes simultaneously
in still mode: 6 porgrammes after and 5 programmes before
from the current program, as indicated in the drawing.

Note:

the channels that are in SKIP mode cannot be seen in

SCAN.

Press the GREEN button «SCAN» to stop the SCAN Mode.

SCOPE:

In this mode you can make bigger the picture and moving it by
pressing the Cursor UP/DOWN/LEFT/RIGHT buttons 

/

/

.               

In this mode you can enter to the followings functions:

«STILL» (frozen picture) by RED button.
«SCAN» by GREEN button.
«SCOPE» by YELLOW button.
«EXIT» by CYAN button.

a

a

CH

CH

Pr.03

Pr.03

Pr.04

Pr.05

Pr.06

Pr.10

Pr.14

Pr.13

Pr.12

Pr.11

Pr.09

Pr.08

PROGRAMMA

IN CORSO

Pr.07

100 Hz Menu

Pr.08

ACTUAL

PROGRAM

100 Hz FAST Menu

STILL Mode

SCOPE Mode

SCAN Mode

With this menu you can enter to the following functions: STILL (Frozen picture), SCAN (Scanning programmes) and
SCOPE (Enlarge picture).

SCOPE

SCOPE

SCOPE

SCOPE ON

Summary of Contents for 28HW-57E

Page 1: ...COLOUR TELEVISION OPERATION MANUAL 28HW 57E 32HW 57E ENGLISH ...

Page 2: ...ty precaution 1 Caution 1 Accessories 2 Remote Control Battery Installation 2 Antenna Connections 2 Controls Terminals 5 Auto Installation 6 Switching on 8 Menu Structures 9 TV Operation Channel Selection 11 Picture Adjustments 12 Wide Mode Fast Menu 14 100Hz Fast Menu 16 Audio Adjustments 17 Sound Setting Mode 18 Features Setting Mode ON OFF Timer 21 Child lock Protection 23 TV Channel Setting 26...

Page 3: ... AA Dry Batteries 1 With your thumb nail pull up the slit as indicated by the arrow to remove the back cover 2 Insert two batteries 1 5 V Size AA Be sure to match the bat tery K L terminals with the K L marks inside the compart ment 3 Replace the battery cover COLOUR TELEVISION BAREVNÝ TELEVIZOR SZĺNES TELEVĺZIÓ KOLORWY TELEWIZOR ЦBETHOŇ TEлEBN3OP RECEPTOR DE TELEVIZIUNE ÎN CULORI FAREBNÝ TELEVĺZO...

Page 4: ...s of further connection possibilities AV 1 Connector with AV LINK BACK OF TV BACK OF VCR Aerial Cable Not supplied SCART Lead Not supplied Antenna Not supplied Antenna lead Not supplied Antenna in Audio Video RF out Mains Socket Outlet AC 220 240 V 50Hz Mains Socket Outlet AC 220 240 V 50Hz ...

Page 5: ...n 18 Stop button TV 19 TV VIDEO selector 20 Call button 21 Single Double entry Teletext 22 Colour button yellow 23 Colour button cyan TV 24 Channel Up Cursor control Up 25 Volume Up Cursor control Right 26 Channel Down Cursor control Down 27 Wide Mode Selector TV Teletext 28 Time button TV 29 Sound mode selector Teletext 30 Hold button TV 31 Sound Mute button Teletext 32 Text Mix Picture button 33...

Page 6: ...8 Door Controls Terminals REAR TV 21 pin In Out 1 21 pin Audio Video AV 2 With PAL SECAM NTSC Video Input 2 21 pin Audio Video AV 1 With PAL SECAM NTSC S Video Input AV LINK control signal 3 21 pin Euro SCART RGB with PAL SECAM NTSC Video Input RF Input 4 Aerial terminal 1 3 2 4 5 6 7 8 10 11 12 13 9 Behind the door 9 Headphone Socket 3 5 mm ø 16 600 ohms 10 S Video input terminal 11 Video input T...

Page 7: ... on the screen to start Auto Channel Preset Automatic Channel Sorting System ASS The TV set SEARCHES FOR FRE QUENCIES memorises the channels found and sorts them according to techni cal criteria from Pr 01 of the TV to a maximum of 99 programmes Note This tuning process may take several minutes to perform If you need to repeat the AUTO INSTALLATION read on TV Channel Setting page 26 Stored program...

Page 8: ...ss the GREEN button to see the Sorting Menu c 3 Press the Cursor UP DOWN buttons to move the channel CH to the required position c 2 Press the GREEN button to finish d Edit this programme Use this option for giving a name made up of four digits to the channels or for changing the one which appears on some channels in the following way d 1 Select the channel using the Cursor UP DOWN buttons d 2 Pre...

Page 9: ...el Number terrestrial cable TV Programmes Channel setting is mainly performed using the remote control Please follow the instructions with the remote control in hand Television broadcasting stations have channel numbers assigned to them real channel numbers You can assign your own channel number to a real channel and store it in the programme preset memory CORRESPONDING REAL CHANNEL L L B G I L L ...

Page 10: ... NORM EQUALIZER STEREO Automatic volume correction Short Middle Long Off Current time Programmed switch on Off timer status Help AUDIO MODE Bypass Spatial expander SPEAKER LEVELS Volume Balance Loudness mode HEADPHONES LEVELS Volume Balance Loudness mode Bass Treble EXTERNAL LEVELS SCART volume AV volume Type of protection NONE ALWAYS TIMER Start End Language of the menus Country Auto Channel Pres...

Page 11: ...T MENU STILL SCAN SCOPE EXIT STILL Frozen Picture Normal Picture RED BUTTON SCAN ON SCAN OFF GREEN BUTTON ZOOM ON ZOOM OFF YELLOW BUTTON WIDE FAST MENU MENU FUNCTIONS AUTOMATIC PANORAMA V SCROLL UP DOWN V SIZE LARGE SMALL NORMALIZE FULL NORMAL ZOOM 14 9 V SCROLL UP DOWN V SIZE LARGE SMALL NORMALIZE CINEMA V SCROLL UP DOWN V SIZE LARGE SMALL NORMALIZE ...

Page 12: ...ns Use numerical buttons to display these channels Single Double entry selector button This button selects between one or two digit channel number entry 0 9 Digit buttons You can select channels by pressing the 0 9 digit buttons on the remote control Single digit and double digit entry are available refer to the Single Double entry selector Flash back button Press this button to switch the current...

Page 13: ...ess or Sharpness The red point mark indicate the selected parameter 6 Adjust the picture quality to your liking with the Cursor LEFT RIGHT buttons 7 Press the GREEN button if you wish to memorize the Personal levels in the Memorized position of PICTURE MODE In this menu you can switch to the following menus Press the YELLOW button to see the ADVANCED menu Press the BLUE button to see the 100 Hz me...

Page 14: ... Cursor UP DOWN buttons to select Comb filter Noise reduction Digital scan D Gamma or SVM The red point mark indicate the selected item 2 Press the Cursor LEFT RIGHT buttons to select ON OFF AUTO etc Select Comb filter ON to reduce the colour interference in picture with fine details and the picture gets sharper Select Noise reductor Auto High or Medium to reduce the noise when receiving a weak si...

Page 15: ...ns to adjust the Vertical SIZE LARGE SMALL AUTOMATIC mode VPS code The VPS signal is sent by some broadcasting stations with information of the original wide When the TV is in AUTO mode and receives the VPS signal it changes the wide automatically as indicated below When the TV is receiving VPS code 16 9 the TV selects CINEMA 16 9 automatically When the TV is receiving VPS code 14 9 the TV selects...

Page 16: ... picture 16 9 format while also stretching the centre of view This is an advantage for example when watching sports games where there is no real fixed centre of the picture NORMAL You can watch 4 3 programs in 4 3 format by switching to Normal Mode function ZOOM 14 9 Adapts the 14 9 broadcast cinema movies to the 14 9 Mode CINEMA 16 9 Adapts the 16 9 broadcast cinema movies to the 16 9 Mode thereb...

Page 17: ...s before from the current program as indicated in the drawing Note the channels that are in SKIP mode cannot be seen in SCAN Press the GREEN button SCAN to stop the SCAN Mode SCOPE In this mode you can make bigger the picture and moving it by pressing the Cursor UP DOWN LEFT RIGHT buttons In this mode you can enter to the followings functions STILL frozen picture by RED button SCAN by GREEN button...

Page 18: ...receiving a STEREO programme the TV selects STEREO automatically and you can change STEREO MONO When the TV is receiving a BILINGUAL programme the TV selects DUAL CHANNEL A automatically and you can change DUAL CHANNEL A DUAL CHANNEL B DUAL CHANNEL A B MONO When the TV is receiving a MONO NICAM programme the TV set selects MONO NICAM and you can change MONO NICAM MONO FM When the TV is receiving a...

Page 19: ... MODE Menu 3 Press the Cursor LEFT RIGHT buttons to change the AUDIO MODE Bypass Spatial expander or press the RED button to expand the menu The successive menu depends on the AUDIO MODE Bypass or Spatial expander as indicated below 4 Press the Cursor UP DOWN buttons to select Automatic volume correction or Spatial strength The red point mark indicate the selected parameter 5 Adjust the sound qual...

Page 20: ... 9 Press the RED button to see the EXTERNAL LEVELS menu EXTERNAL LEVELS menu Select SCART AV volume to adjust the sound level output to the external connector SCART AV with the Cursor LEFT RIGHT buttons 10 Press the MENU button M to close the AUDIO LEVELS menu a a a a CH CH a a CH CH Audio Levels menus Loudness increases the volume of low and high frequency signals according to the current volume ...

Page 21: ...rogram 9 Press the MENU button M to close the STEREO menu a a CH CH CH CH a a About Matrix You can select a sound mode to the speakers another to the headphones and another to the external connector AV 1 AV 2 When the TV set is receiving a STEREO programme the TV selects STEREO automatically and you can change STEREO MONO When the TV is receiving a BILINGUAL programme the TV selects DUAL CHANNEL A...

Page 22: ...ct Programmed switch on at The red point mark indicate the selected item 5 Press the Cursor LEFT RIGHT buttons to adjust the switch on To cancel the switch on select 6 Press the MENU button M to close the ON TIMER Menu 7 Press the Stand by button Bl TV on the remote control to put the TV set into Stand by Mode When the preset time is reached the TV set turns ON and a picture appears on the screen ...

Page 23: ...le the mentioned Interactive Help 1 Press the MENU button M to see the Main Menu 2 Press the yellow button twice to see the Help option 3 Press the Cursor UP DOWN buttons to select Help The red point mark indicates the selected item 4 Press the Cursor LEFT RIGHT buttons to activate On or deactivate Off the Interactive Help 5 Press the MENU button M to close the Menu a a CH CH The demonstration fun...

Page 24: ...l be unblocked and you will be able to proceed 5 Select the protection mode LOCK ALL By GREEN button LOCK PROGRAMME By YELLOW button CLEAR LOCK By BLUE button LOCK ALL Menu Select this option for protecting the access to the whole TV If necessary repeat steps 1 5 6 Press the Cursor UP DOWN buttons to select Type of protection The red point mark indicate the selected item 7 Press the Cursor LEFT RI...

Page 25: ... clock must be set at the right time To check the time setting see section Automatic or Manual time adjustment page 21 When you protect one programme all the external entries Euro SCART and AV 1 are protected automatically Access to protected modes LOCK ALL When the TV is protected in this way it will be blocked when switched on and a red box will appear on the screen against a blue background alo...

Page 26: ... 4 digit using the number buttons 10 Press the MENU button M to close the CHILD LOCK Menu Note As a precautionary measure make a note of your new PIN and keep it in a familiar place if your previous PIN is recorded on the last page of this manual change it IF YOU LOSE OR FORGET YOUR PIN CONTACT YOUR TECHNICAL SERVICE OR DEALER Change the PIN Personal Identification Number MAIN Menu YELLOW RED BLUE...

Page 27: ...hannel Sorting System ASS The TV set SEARCHES FOR FREQUENCIES memorises the channels found and sorts them according to technical criteria from Pr 01 of the TV to a maximum of 99 programmes Note This tuning process may take several minutes to perform When the AUTOMATIC SEARCH has been completed the Stored programmes menu will appear on screen and you can change the order of the channels and change ...

Page 28: ...ss the blue button twice to see the TUNE Menu 3 Press the Cursor UP DOWN buttons to select Programme red marked 4 Press the Cursor LEFT RIGHT buttons or 0 9 digit buttons to select the programme channel number you want to preset 5 Press the Cursor UP DOWN buttons to select Channel type red marked 6 Press the Cursor LEFT RIGHT buttons to select Aerial or Cable 7 Press the Cursor UP DOWN buttons to ...

Page 29: ... to see the TUNE Menu 3 Press the Cursor UP DOWN buttons to select Programme red marked 4 Press the Cursor LEFT RIGHT buttons or 0 9 digit buttons to select the programme channel number you want to set 5 Press the Cursor UP DOWN buttons to select Mode red marked 6 Press the Cursor LEFT RIGHT buttons to select TV VCR or SKIP TV If the TV signal is weak the image can shake In this case put it in TV ...

Page 30: ... remote control with the available options a Select the programme to be edited with Cursor UP DOWN buttons b Delete this programme with the YELLOW button c Go to sorting mode with the GREEN button d Edit this programme with the RED button e Exit with the BLUE button 4 Proceed according to the guidance in each mode CH CH Delete Menu Sorting Menu Edit Menu For more explanation please go on to the se...

Page 31: ...ton to see the AV LINK Menu AV LINK Menu Record what you see 5 1 Press the Cursor UP DOWN buttons to select Record what you see The red point mark indicates the selected item 5 2 Press the RED button to start recording 5 3 Press the GREEN button to stop recording Device scan check if a VCR with AV LINK system is connected to the TV through the AV 1 terminal About AV LINK THIS FEATURE CAN ONLY BE U...

Page 32: ... if you want to make additional recordings at the same time each day or week use to select Daily or Weekly Speed to change recording speed between Standard Play SP and Long Play LP by using buttons Standard Play gives the best picture quality Long Play provides the longest recording time 7 Press the YELLOW button PROG VCR to memorize the TIMER PROGRAMMING data 8 Now the VCR should be manually set ...

Page 33: ...NES LEVELS Menu HEADPHONES LEVELS Menu 4 Turn down the volume with the Cursor LEFT button 5 Insert the headphone plug all the way into the headphone jack as indicated on the drawing 6 Adjust the sound quality to your liking with the Cursor LEFT RIGHT buttons 7 Press the MENU button to clear the on screen display Time button f Press the button to display the current time on the screen Note that thi...

Page 34: ...button to fast forward or rewind the cassette Press the STOP button to stop fast forward or rewind Picture Search During playback press the button for forward picture search or the button for reverse search Press the PLAY button to resume normal playback For further details please refer to operation manual of your VCR VCR mode Channel call button I Press the button to display the current programme...

Page 35: ... adjusted to receive 3 Teletext systems namely TOP FLOF and LIST which are automatically identified by the receiver The user can easily identify them by the manner in which they appear on the screen To switch ON and switch OFF the Teletext 1 Select a TV channel which is broadcasting the Teletext programme you would like to watch 2 Press the TEXT MIX PICTURE a b I to select the Teletext mode In the...

Page 36: ...orize the page numbers you require The symbol appears on the screen 7 Press the TV button to exit the teletext mode b Fast Page Selection Select the appropriate programme channel Press the TEXT MIX PICTURE a b I button once to enter the teletext mode To recall a page number displayed in the coloured brackets simply press the corresponding coloured button c 0 9 digit buttons Enter a desired page nu...

Page 37: ...s the button again to cancel the hold mode REVEAL button Press this button to reveal hidden information such as the answer to a quiz Press the button again to hide the information CLOCK button In TV mode When the TV signal with TEXT data is received by pressing this button the real time information will appear on the top left area of the screen In Teletext mode When a selected Teletext page has hi...

Page 38: ...rs This cursor contains a page number and you can select the desired page simply by using the four colours RED button Move cursor down GREEN button Move cursor up YELLOW button Change from current page to selected page BLUE button Go out from RESET Mode INDEX button 1 For the FLOF LIST system Press the Index button to return back to index page 2 For the TOP system To effect a quick and easy search...

Page 39: ...rth 10 AV LINK control 11 Not used 12 Not used 13 Earth 14 Not used 15 Chroma S Video input 16 Not used 17 Earth for video 18 Earth 19 Video output 20 Video input PAL SECAM NTSC S Video input 21 Plug shield 21 pin Audio Video AV 2 1 Audio right output 2 Audio right input 3 Audio left output 4 Common earth for audio 5 Earth 6 Audio left input 7 Not used 8 Audio video control 9 Earth 10 Not used 11 ...

Page 40: ...CR for details Typical connection Videorecorder and TV through the RF terminal and Decoder through the 21 pin Euro SCART Typical connection DVD Decoder and TV through the 21 pin Euro SCART RF in Decoder AV LINK 21 pin Euro SCART TV RF in SCART AV Decoder 21 pin Euro SCART TV RF in SCART AV DVD player Video out Audio out RF out VCR AV LINK ...

Page 41: ...or Front TV Note For further details please refer to operation manual of your Video camera Audio Video lead Not supplied S Video lead Hi 8 Not supplied Audio Input Terminal right Audio Input Terminal left Video Input Terminal S Video Input Terminal Hi 8 FRONT TV Behind the door ...

Page 42: ...k for broken wires Check for local interference 11 2 3 Try a new channel to check for possible station trouble Check for local interference Increase the volume Picture OK sound poor 11 17 19 Try a new channel to check for possible station trouble Antenna not connected to terminal at the back of the TV set If outside antenna is used check for broken wires Check for local interference Adjust COLOUR ...

Page 43: ...x 33 Kg 46 Kg 11 Antenna Input Impedance VHF UHF 75 Ohm Unbalanced 12 Safety CE MARK 13 EMC CE MARK 14 Accessories etc a User Instruction Yes b Remote Control Yes c Battery 2 pcs 15 Other Features Double Scan 100 Hz Line Flicker Reduction Digital Scan Digital Comb Filter Digital Noise Reductor Auto Installation System ASS function Auto Channel Sorting System 99 Channel Programming System Cable and...

Page 44: ...20 Help 22 I Identification audio system 20 L Language of the menus 26 LIST Teletext 34 LOCK ALL 23 LOCK PROGRAMME 24 Loudness 19 M Main power button 8 Manual Channel Preset 27 Matrix 20 Menu Structures 9 Mono programme 17 N Noise reductor 13 NTSC Hue control 13 O OFF Timer 22 ON Timer 21 OSD contrast 13 Other Features 30 P Picture Adjustments 12 PIN Personal Identification Number 23 PIT Picture i...

Page 45: ...44 Notes ...

Reviews: