Sharp 14J1-RU Operation Manual Download Page 7

Example use of front terminals

Connecting to video equipment

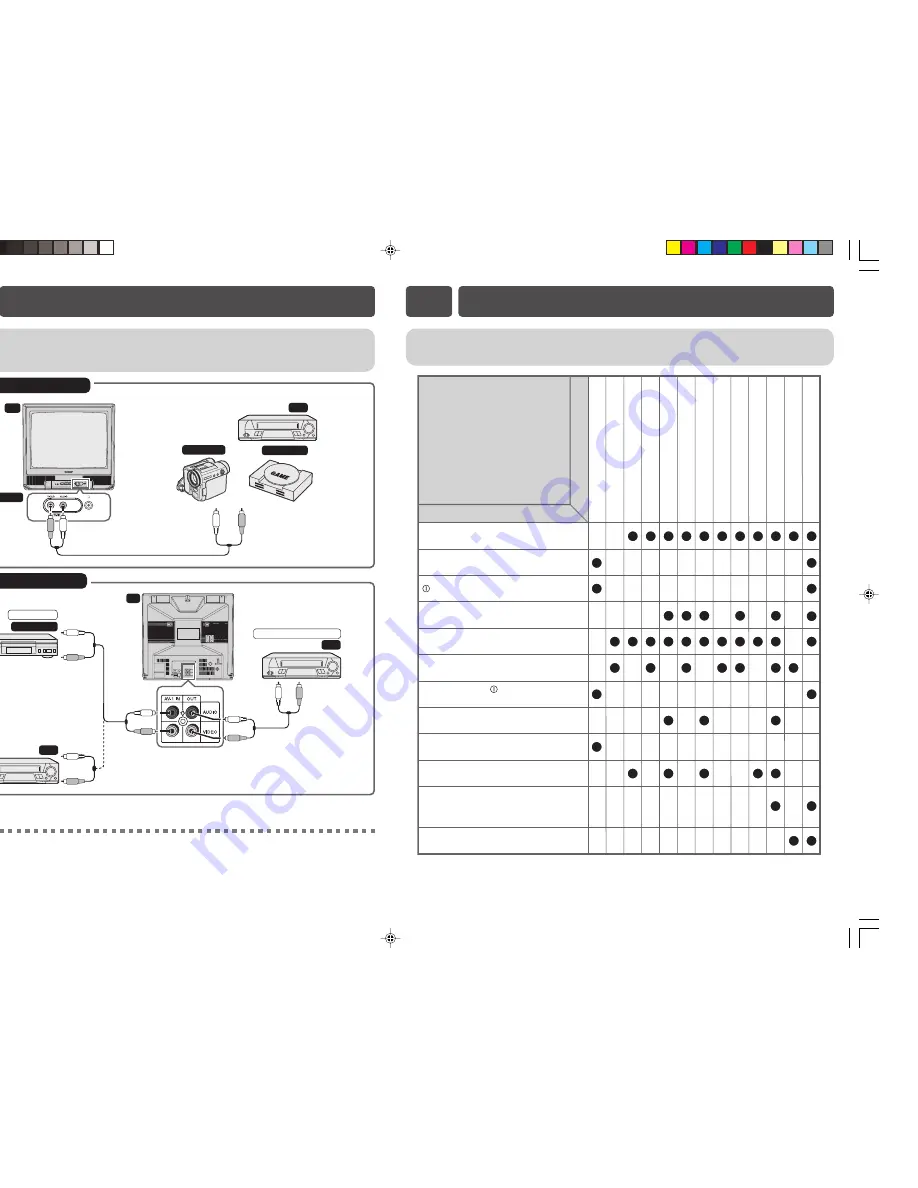
Enjoy playback from a video disc player, VCR or other video equipment by connecting them to
this TV set using the Audio/Video in terminals.

MENU/
PRESET

CH

VIDEO

AUDIO

POWER

AV-2 IN

TV

VCR

Video Game

Camcorder

Bottom

Yellow : To VIDEO
White


: To AUDIO

To Audio/Video
out terminals

Example use of rear terminals

CAUTION : DANGEROUS
VOLTAGE  INSIDE
TO PREVENT ELECTRIC SHOCK.
DO NOT REMOVE COVER.
NO UBER-SERVICEABLE PARTS
INSIDE, REFER SERVICING TO
QUALIFIED SERVICE PERSONAL.

AV-1 IN

OUT

AUDIO

VIDEO

For Playback

DVD Player

For Recording and Editing

VCR

VCR

TV

To Audio/
Video out
terminals

To Audio/
Video out
terminals

To Audio/
Video in 
terminals

Yellow : To VIDEO
White

 : 

To 

AUDIO

• The audiovisual cords required to connect the TV set with video equipment may differ from those shown in the above

diagram. See the operation manual of your video equipment for connection details.

• The above recording and editing connections are for intended solely personal use and not for the illegal copying of

audiovisual material protected by copyright laws.

E11

CONNECTIONS

This unit is equipped with a microprocessor. Its performance could be adversely affected by external
electrical noise or interference. If this should happen, unplug the unit and plug it in again after a few
minutes.

The following problems do not always indicate a hardware failure. Therefore, please use the
troubleshooting guide below before calling for repair service.
If, after following the guide none of the remedies work, unplug the TV set and call for service.

E12

TROUBLESHOOTING

Quick 
Service 
Check List

Try a new channel to check for possible station 
trouble.

TV not plugged in.
Outlet power OFF.

Antenna not connected to terminal at the back 
of the TV set.

If outside antenna is used, check for broken 
wires.

Check for local interference.

Adjust COLOUR control.

Check batteries in the remote control.

Try fine tuning to correct.

Contrast setting in picture mode might be all 
the way to the minus side. Press the 

NORMAL 

button on the remote control to 

correct.

Increase the volume.

Problems

Remote control does not work.

Bars on screen.

Picture distorted.

Picture rolls vertically.

No colour.

Poor reception on some channels.

Picture weak.

Picture lines or streaks.

Picture ghosting.

Picture blurred.

Sound OK, picture poor.

Picture OK, sound poor.

No picture or sound.

Possible Causes/Remedies

     POWER

 switch of TV not ON.

Turn OFF using the      

POWER

 switch, 

then turn ON again after a minute.

(21J1-RU)

21J1-RU[EN]

7/9/05, 11:22 am

7

Summary of Contents for 14J1-RU

Page 1: ...he cabinet This TV set contains dangerous voltage Power cord protection To prevent electrical shock do not subject the AC power cord to damage by bending or twisting it or by placing heavy items on top of it and do not place the AC power cord under the TV set If the AC power cord becomes damaged unplug it from the wall outlet immediately and call your dealer for service Water To prevent fire or el...

Page 2: ...unes or sets the channels Headphone jack Use to listen to the audio with headphone Video input terminal AV 2 IN Connects to a camcorder video game etc Audio input terminal AV 2 IN Connects to a camcorder video game etc Infrared sensor window Receives the infrared wave from the remote control POWER POWER switch Turns on and off the main power CH CH To avoid injuring your hearing do not put on the h...

Page 3: ...conds the language select mode appears Press CH CH to select desired language Pressing MENU PRESET changes the screen as shown below Press MENU PRESET until normal screen appears Adjust volume using The volume bar disappears approximately three seconds after the volume has been adjusted Using CH CH Press CH and channels change as shown below 1 2 98 99 AV1 AV2 0 1 2 Press CH and channels change as ...

Page 4: ...al items changes as follows POSITION The channel position changes to the higher or lower number COLOUR SOUND SKIP ON OFF Channel numbers with a mark on the left are set to SKIP To turn off SKIP press the number buttons to select the desired channel and then set SKIP to OFF FINE The frequency changes to allow fine tuning Press CH SET to return to normal screen When you select AV1 AV2 for the channe...

Page 5: ...Automatically turns power off after a set length of time has passed Press TIMER to call TIMER screen Press CH CH to select ON Press to set time for TV to turn on Maximum time that can be preset is 12 hours and 50 minutes Timer start to count down after setting Press CH CH to select POSITION Press to set the channel Repeat step 4 to 5 above to select and set the VOLUME Press TIMER to return to norm...

Page 6: ...r and sound system appear on the screen Channel Timer display Displays the current channel number the timer and other settings on the screen ON 8 00 OFF 2 30 1 50 5 SECAM D K TV VIDEO TV 0 NORMAL TIMER FEATURE CH SET PICTURE 4 7 2 8 3 6 9 1 5 CH CH Number buttons TV VIDEO Press Press appears on the screen and the sound is silenced Press the volume returns to its previous level Mute will be cancell...

Page 7: ...d by external electrical noise or interference If this should happen unplug the unit and plug it in again after a few minutes The following problems do not always indicate a hardware failure Therefore please use the troubleshooting guide below before calling for repair service If after following the guide none of the remedies work unplug the TV set and call for service E12 TROUBLESHOOTING Quick Se...

Page 8: ...0 Hz SECAM I 6 0 MHz yback SECAM L French SECAM deo in terminals PAL 60 Hz NTSC 3 58 MHz c Player Playback PAL 5 5 MHz 60 Hz F in terminals PAL 6 0 MHz 60 Hz PAL 6 5 MHz 60 Hz hannels VHF E2 E12 ch B G UHF E21 E69 ch VHF C1 C12 ch R1 R12 ch D K K1 UHF C13 C57 ch R21 R69 ch VHF B J ch UHF 21 69 ch Hong Kong S1 S20 ch S21 S41 ch Hyper equency 48 25 MHz 863 25 MHz ing 100 Channel Electronic Tuner wit...

Reviews: