background image


Doc

#    

E169703   V.1.02     


             QS - 2

                      Shark® 250 Meter Quickstart

Electro 

Industries/GaugeTech

The Leader In Power Monitoring and Smart Grid Solutions

Electro 

Industries/GaugeTech

The Leader In Power Monitoring and Smart Grid Solutions

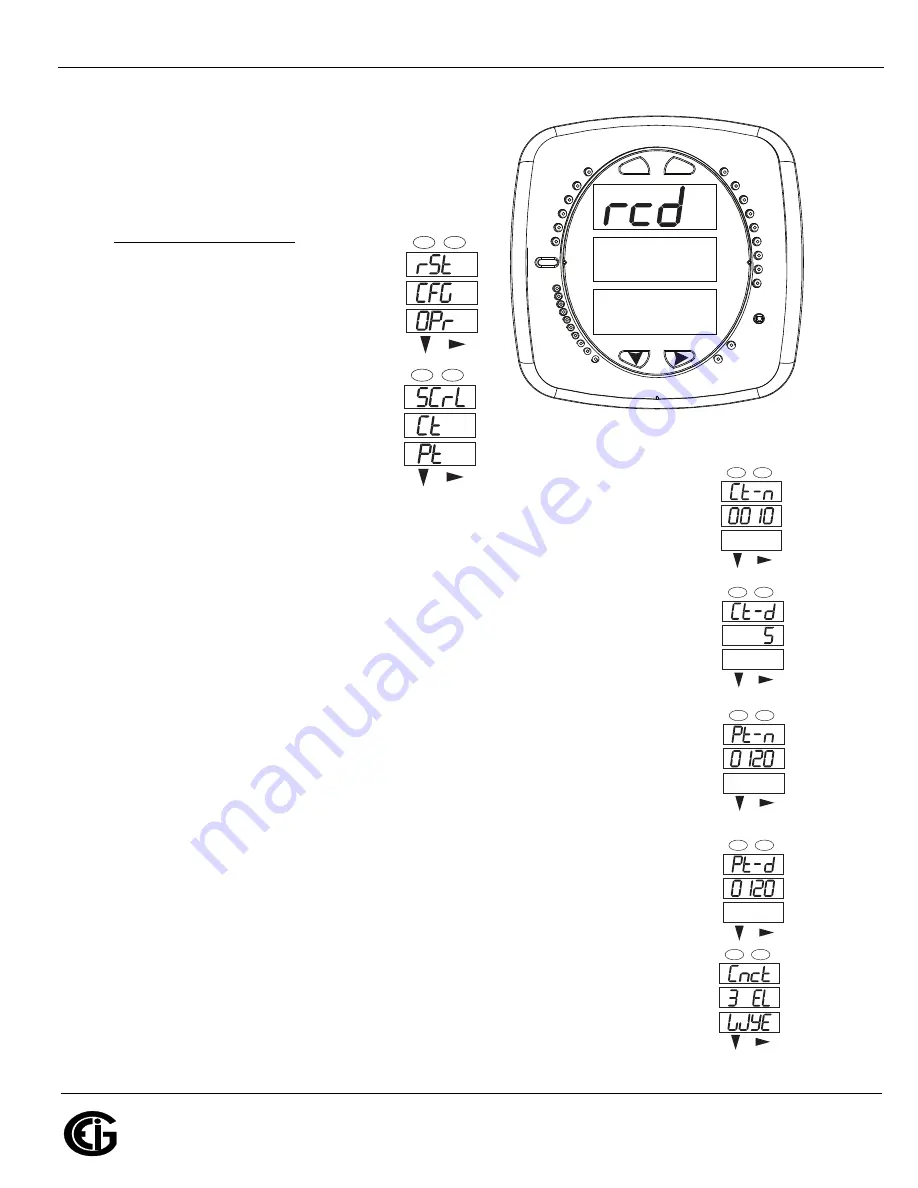
Program Settings Using the Faceplate Buttons: 

(MENU, ENTER, DOWN ARROW, RIGHT ARROW)  

See the figure on the right for the location of the 

faceplate buttons.

Access Configuration Mode: 

1.Push the 

MENU 

button - you will see

    the display on the right; rSt will be 

    blinking.

2.Press the 

DOWN ARROW 

once. 

   CFG (Configuration) moves to the 

   top of the display. 

3.Press the 

ENTER

 button. You will 

   see the Configuration menu, shown 

   on the right. 

4.Press the 

DOWN ARROW 

and then

   press the 

ENTER 

button. You will see the CT numerator setting screen (Ct-n). 

   The current CT numerator is shown in the second line. To change the setting, 

   press the 

DOWN


ARROW

 until the value you want is displayed. Then press the 

   RIGHT ARROW 

to move to the next digit. Repeat until the setting is done. 

5.Press the 

ENTER 

button to go to the CT denominator screen (CT-d). This setting is

   display only - it can’t be changed. 


Example: 

2,000/5 Amps: Set the Ct-n value for 2000.

   NOTE: 

Ct-n is dictated by primary current; Ct-d is secondary current.

6.Press the 

ENTER 

button to go to the PT numerator setting screen (Pt-n).The current

   PT numerator is shown in the second line. To change the setting, press the 

DOWN


   ARROW

 until the value you want is displayed. Then press the 

RIGHT ARROW 

to 

   move to the next digit. Repeat until the setting is done. 

7.Press the 

ENTER 

button to go to the PT-denominator screen (Pt-d). The current

   PT denominator is shown in the second line. To change the setting, press the 

DOWN


   ARROW

 until the value you want is displayed. Then press the 

RIGHT ARROW 

to 

   move to the next digit. Repeat until the setting is done. 


Example: 

277/277 Volts: Pt-n value is 277, Pt-d value is 277.

   NOTE:

 Pt-n is dictated by primary voltage; Pt-d is secondary voltage.

8.Press the 

ENTER 

button to go to the Connection setting screen (Cnct). The current 

   setting is shown in the second line. Press the 

DOWN ARROW

 to choose another 

   value. You can choose 3 EL (element) WYE, 2 Ct del (Delta), or 2.5 EL WYE.

A

B

C

-

-

-

MENU

ENTER

A

B

C

-

-

-

MENU

ENTER

A

B

C

-

-

-

MENU

ENTER

A

B

C

-

-

-

MENU

ENTER

A

B

C

-

-

-

MENU

ENTER

A

B

C

-

-

-

MENU

ENTER

0.659

0000

-
-
-

A

B

C

MENU

ENTER

MAX

MIN

LM1

LM2

%THD

PRG

VOLTS L-N

VOLTS L-L

AMPS

W/VAR/PF

VA/Hz

lrDA

Wh
VARh

VAh

120%-

90%-

60%-

30%-

%LOAD

MEGA

KILO

Wh Pulse

A

B

C

-

-

-

MENU

ENTER

Summary of Contents for 250

Page 1: ...orm lc HI LO lb HI LO la HI LO Earth Ground L Power Supply Connection N L GND N Vref Va Vb Vc LINE LOAD CT Shorting Block FUSES 3 x 0 1A FUSE 3A C C B B A A N N lc HI LO lb HI LO la HI LO Earth Ground Earth Ground L Power Supply Connection N L GND N Vref Va Vb Vc LINE LOAD CT Shorting Block FUSES 3 x 0 1A FUSE 3A C C B B A A N N lc HI LO lb HI LO la HI LO Earth Ground Earth Ground L Power Supply C...

Page 2: ... Amps Set the Ct n value for 2000 NOTE Ct n is dictated by primary current Ct d is secondary current 6 Press the ENTER button to go to the PT numerator setting screen Pt n The current PT numerator is shown in the second line To change the setting press the DOWN ARROW until the value you want is displayed Then press the RIGHT ARROW to move to the next digit Repeat until the setting is done 7 Press ...

Page 3: ...s the ENTER button For additional programming instructions for the faceplate buttons see Chapter 2 in the Shark 250 250T Meter Installation and Operation Manual on the enclosed CD and on EIG s website www electroind com Connect to the Meter through the USB Port The Shark 250 meter has a standard USB port that makes connection between the meter and a laptop PC very simple Follow these steps 1 Conne...

Page 4: ...k Connect 5 The Device Status screen opens displaying information about the meter 6 Click OK to close the Device Status screen and then click the Profile icon in the Icon Bar 7 The meter s Device Profile screen opens giving you access to the programmable settings for the meter NOTE A few basic settings are explained here Refer to the Shark 250 Meter Installation and Opera tion Manual and the Commu...

Page 5: ...items in the list to redisplay this screen a CT Ratio enter Primary CT Numerator 1 9999 Secondary CT Denominator 5 or 1 Amp b PT Ratio enter Primary PT Numerator 1 9999 Secondary PT Denominator 1 9999 Example Settings For a CT of 2000 5 A set the following CT Ratios in the entry fields CT Numerator Primary 2000 CT Denominator Secondary 5 The Current Full Scale field will read 2000 For a system tha...

Page 6: ...eld to configure when the meter will start reading values above 0 voltage e Total Demand Distortion TDD Setting This setting of the Device Profile allows you to set the maximum value for current which is used for the TDD Total Demand Distortion calculation TDD is an index used to measure harmonics In this field enter the maximum load current for TDD To disable TDD enter 0 in the field f CT Reversa...

Page 7: ...ore responding to queries Parity Odd Even or None Program Meter Time The meter is preset to Eastern time To change the meter time 1 From the Main screen s Title bar click Tools Set Device Time 2 You can either enter the time in the Time fields or click Use PC Time to set the time using your PC s time 3 Click Send NOTE The meter offers multiple Time Synchronization methods See Chapter 28 Section 28...

Page 8: ...me is used to name the log databases when logs are downloaded MPORTANT When you have made changes to the meter s Device Profile click Update Device at the top left of the Device Profile screen s Icon Bar to send the new settings to the meter The meter will reboot and then you can reconnect to it Shark is a registered trademark of Electro Industries GaugeTech The distinctive shape style and overall...

Reviews: