background image


based on the device port.   


HTTP port: 

The default port is 80, suggest modifying it. This port is for login NVR by IE, input NVR 

IP address or domain name, you need to add colon and HTTP port number. 


Example: 

As the screenshot above, when you want to access NVR by IE in LAN, first, please add 

2  forwarding  rules  in  the  router,  the  IP  address  is  192.168.1.188,  the  forwarding  ports  are 

5050-5053,  80.  Please  input 

http://192.168.1.188:80

  at  IE  browser  and  download  ActiveX,  then 

close  the  IE  before  install  the  ActiveX.  After  installing  successfully,  then  reopen  IE  with 

http://192.168.1.188:80

, it will show login menu, input device port: 5050, user name: admin, leave 

password in blank, you can access NVR. 
If need access NVR by IE in WAN, please use static IP or dynamic domain name

the operation is 

same as LAN. 
 

Note:   

If  you  want  to  enable  Wi-Fi,  please  plug  a  3G  dongle  into  the 
device.


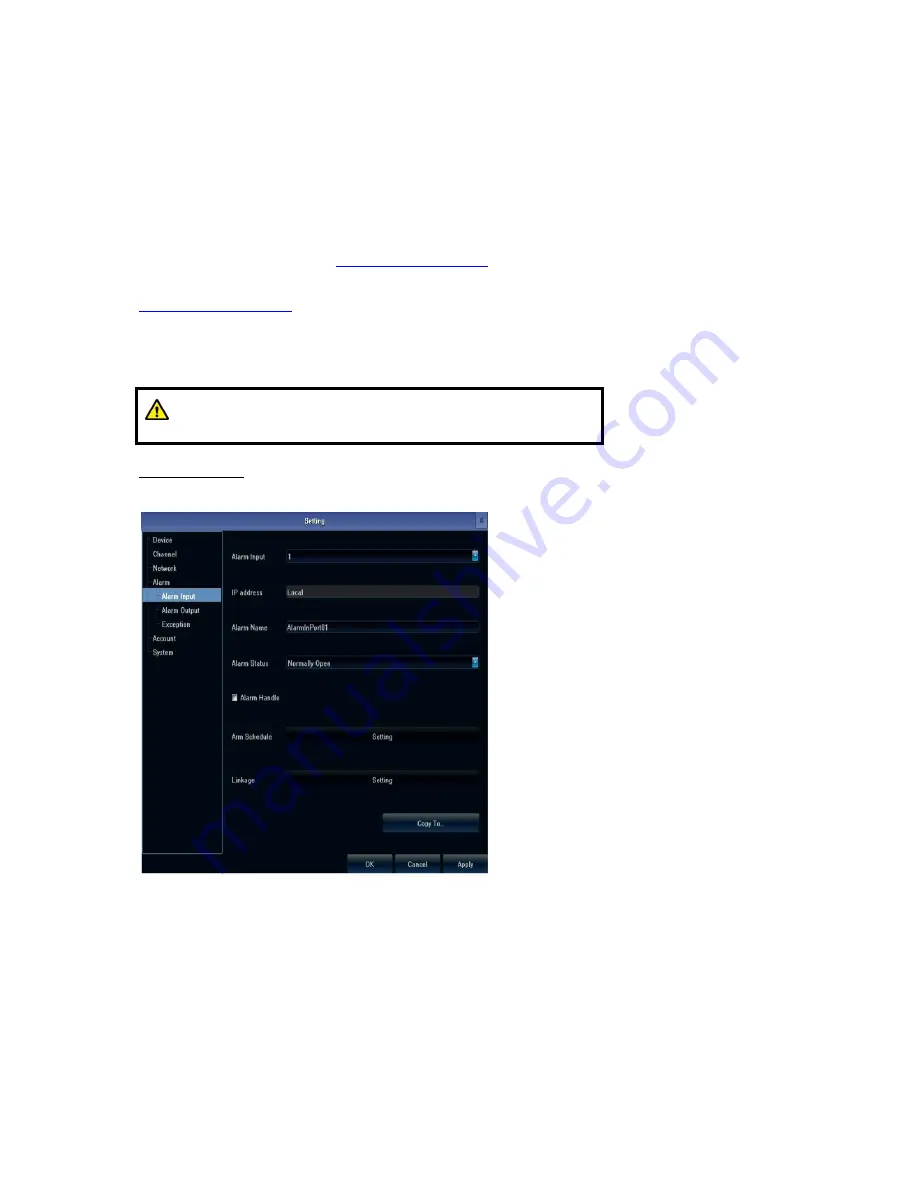
4. Alarm Setting 
There are three sub options for 

Alarm

 Setting: Alarm Input, Alarm Output, and Exception. 


Use 

Alarm Input

 to set alarm trigger settings. 

Alarm Schedule

 and 

Linkage

 are not 

adjustable if Alarm Handle checkbox was not enabled. 
 

Summary of Contents for SNVR-8004ST-1

Page 1: ...Network Video Recorder SNVR 8004ST 1 Thanks for purchasing our product Before operating the unit please read the instructions carefully and keep this manual for future reference...

Page 2: ...that the host and the chassis have grounded to avoid the video audio signal being disturbed and to avoid NVR being damaged by static electricity 3 The device does not include hard disk Hard disk shou...

Page 3: ...ackup 26 4 6 Record 27 4 7 Alarm 27 4 8 Capture 27 4 9 File Manager 28 4 10 IP Channel Setting 29 5 Preview 31 5 1 Drag and Drop the Image 31 5 2 Drag to Change Channel Sequence 31 6 IE Viewing 32 6 1...

Page 4: ...Hard Disk Installation Steps 1 Remove four screws on the side of 2 Connect the hard disk data and power chassis and remove the top cover supply cable 3 Fix the HDD on the bottom plate 4 Put the cover...

Page 5: ...l the USB ports in front and bottom of the two ports in back as the structural diagram show above share the same channel If you plug two USB devices into these two ports at the same time they would no...

Page 6: ...ost side main screen If you are not login the system toolbar would show in gray and the toolbar icons are not selectable If the booting time is within the record setting time period the system will au...

Page 7: ...You can select the language of the User Guide Select the video format and resolution Setting up the network...

Page 8: ...avoid damaging the device from power failure by accident Note Before changing the HDD operation please shutdown the device and disconnect the power supply 3 Reboot Click this button to reboot the devi...

Page 9: ...me 3 TV Adjust Adjust the display position 4 Display Set monitor Brightness Contrast Saturation Hue and Transparency 5 Resolution The default resolution is 1024x768 please select the best resolution a...

Page 10: ...Brightness Contrast Saturation Hue and Transparency Note You can also right click in the main screen to access the system toolbar Please note the menu order is different from the toolbar in the main...

Page 11: ...s and Focus Setting the cruise time and speed Tips Digital Zooming During image preview and playback roll mouse roller to do digital zooming it zoom the image as mouse pointer as the center The max ca...

Page 12: ...es click this icon it can change to PTZ control 4 3 Setting Click Setting icon to enter the setting menu There are six main setting options Device Channel Network Alarm Account and System 1 Device Set...

Page 13: ...System Version You can check the system version here When do software update you need to check version first to avoid updating failure and damage the device PTZ Setting PTZ Pan Tilt Zoon settings...

Page 14: ...ly the settings to other channel DST Setting Setting Daylight Saving Time 2 Channel Setting There are six sub options for Channel Setting Display Setting Video Parameters Schedule Record Motion Video...

Page 15: ...Main Stream Event for selection Main Stream The channel using main stream could be double clicked to show as single or full screen image and for recording playback Sub Stream 9 16 25 36 screens displa...

Page 16: ...nstant bit rate CBR 5 Bitrate Set the bit rate upper limit for coding Main stream are 1080P 6000kbps 720P 4000kbps set the bit rate upper limit for coding sub stream is 512 1024kbps 6 Frame Rate Sugge...

Page 17: ...y setting for Motion Alarm schedule are the same with Record And they would all display in the Schedule Record menu You can set Pre and Post Record time Motion If you want to set video lost please che...

Page 18: ...on detection area left click and drag the area size right click and drag an area bigger than left click and drag area to cancel it Setting Linkage in other words the action to take when detecting the...

Page 19: ...Video Lost If you want to set video lost please check Enable Video Lost first Setting Linkage the action to take when video lost...

Page 20: ...Video Mask If you want to set video mask please check Enable Video Mask first then click Setting of Area settings Left click to drag the mask size and cancel it by right clicking...

Page 21: ...IP address subnet mask gateway and so on Then use PC terminal to run ping command to check NVR s IP has connected with LAN Note IP address might conflict with each other please set the gateway correct...

Page 22: ...d ActiveX then close the IE before install the ActiveX After installing successfully then reopen IE with http 192 168 1 188 80 it will show login menu input device port 5050 user name admin leave pass...

Page 23: ...In Output Alarm menu you can set Alarm Schedule and Delay period Setting exception for alarm event For example if HDD Full then Alarm On Monitor...

Page 24: ...ccount Setting There are two sub options for Account Setting Account Setting and User Online You can add delete modify user and set user privilege You can set the action a user can take in User Privil...

Page 25: ...eck the online user status 6 System Setting There are six sub options for System Setting Device Log Stream Info HDD Setting Update Auto Reboot and Recovery Configuration Device Log You can check the D...

Page 26: ...You can export the log to the external storage Stream Info You can view the stream information HDD Setting...

Page 27: ...D Update You can update the device through the upgrade file on the external storage Upgrade include firmware upgrade boot screen image upgrade and patch upgrade Except USB memory upgrade it also suppo...

Page 28: ...will fail to enter the system and have to be send back to factory for repairing After upgrading please reboot the device Auto Reboot You can disable auto reboot or set auto reboot every day every wee...

Page 29: ...or in calendar Date Select Select the playback date Playback The split screens will show on A AREA first choose channel on B AREA then choose dates shown on C AREA to play the video during specific ti...

Page 30: ...te the alarm or deactivate it by clicking the Defence Off button 4 8 Capture Click Capture icon it supports all channels manually capturing After capture there is information to hint capturing is succ...

Page 31: ...tart 4 9 File Manager Click File Manager icon the back up file of external storage device and local captured picture will list in the folder 1 Check photo in the hard disk Select date on calendar if t...

Page 32: ...A Area is cameras IP address searching area click Search to get the camera IP addresses in LAN B Area is camera IP address modification area double click IP camera in A area B area will show camera ne...

Page 33: ...etting Auto If the IP camera has private protocol with NVR NVR will assign IP address to the camera automatically after finish the searching it will connect the image automatically Camera IP addresses...

Page 34: ...y but the channel physical address will keep the same 5 2 Drag to Change Channel Sequence Right click to select IP Channel Setting Drag to change channel sequence then drag the image IP camera will re...

Page 35: ...ystem is as below MEYE_SB_S60_3rd sisx mobile surveillance client of the 3rd version of Symbian S60 system MEYE_SB_S60_5rd sisx mobile surveillance client of the 5th version of Symbian S60 system MEYE...

Page 36: ...s of the programme Name Enter name of device in order to distinguish other more devices Address The IP address or DDNS of DVR NVR Port The server port of DVR NVR User ID Same as set up on IE Password...

Page 37: ...will be found click to installation and the program icon will arise as below 2 Click vMEye program icon and the initial interface after running appears as right...

Page 38: ...VR s upgrading wrong program leads to the damage of system software 2 NVR encounters power or board faults please contact the supplier for repair 3 HDD error please replace the HDD 4 Panel program wro...

Page 39: ...ack the video Please check whether your IPC is 1080p if yes then click on the Settings device parameters pattern and see if you can use 1080 pattern 1080p videos can only display sub stream under the...

Reviews: