Carburetor Setting and Run-In Procedure
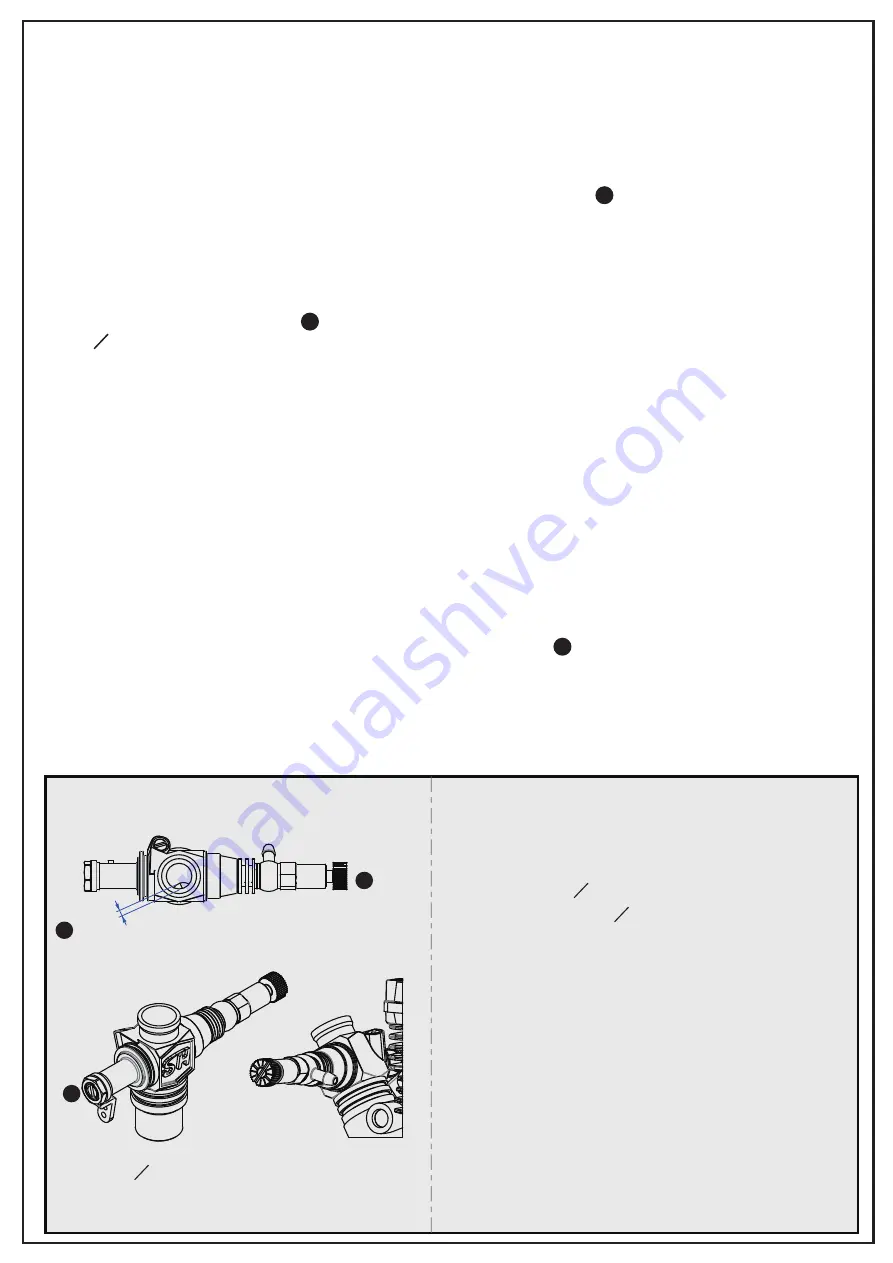
Following setting all based on the factory standard; comply with the propeller size of 10”x6” as setting.
If replace others muffler, the main speed needle need to adjust at 4 1/2 turns to 5 turns from the bottom and
make slight adjustments accordingly to the condition. If use propellers size smaller than 10”X6”, the main
speed needle need to turns much more at rich condition to avoiding any damages to engine due to high RPM
or too lean condition.
1. First, adjust the idling screw to the position showed in figure (2) of mark , fully closed from the bottom
and
open approx. 2.0mm
. Then add the 28.5:1 fuel/oil mixture into the fuel tank. For needle adjustments,
image the slot in the needle is the hour band on a clock and only adjust the needle from 1-2 hour increments
each change.
2. First stage of run-in:
The main needle and low speed needle are preset from the factory. Please turn the main needle see back
side attached figure (2) of mark , Set the main needle at 4 turns from the bottom and low speed needle
at 1 3
4 turns from the bottom. After that, open the carburetor about half position. block the carburetor inlet by
hand and spin the engine counter-clockwise direction to help push fuel into the carburetorand inside the
engine. Connect the plug igniter and apply an electric starter to start the engine; keeping the engine staying
in mid-range running, and then you can remove the plug igniter.
3. Engine RPM observation:
You can turn the main speed needle counter clockwise 2 hours if the engine reaches
over more than 5000
RPM’s
. Adjust in 2 hour increments at a time until the engine is running rich. You can turn the main needle
clockwise 2 hours if the engine is too rich and stops running. Adjust in 2 hour increments at a time, until
the engine returns to a rich and smooth-running condition.
At this stage roughly required 500cc of
fuel running through
3
1
※
The exhaust should emit lots of dark blue smoke, indicating that the engine is in
rich condition.
4. Low speed needle adjustment:
Adjust the idling screw to the position showed in figure (2) of mark , fully closed from the bottom and
open approx. 2.0mm.If the engine idle speed is high and continues to increase and not slow down, it’s too
lean, and the low speed needle needs to be turned counter clockwise 2 hours until idle is stable.If the
engine at idle speed is too low and leads to stalling, it’s too rich and the low speed needle needs to be
turned clockwise about 2 hours until the idle is stable. Stay at 3000 RPM for best idle speed of this time.
(RPM going a little lower is normal once you remove the plug igniter during idling)
3
1
2
3
→
→
→
→
Idling screw
set the main speed
needle at 4 turns
from the bottom
Set the low speed
needle at
1 3
4
turns
from the bottom
set the low speed needle
at 2mm from the bottom
Fuel inlet mounted
angle
(no excess to the horizontal
line to avoid any air flow bubble
stock into the fuel line caused
unsmooth running or stalling.
figure(2)
In Figure (2) the needle position showed is only for
the new engine during the run-in, comply with
propeller size of 10”x6” as suggestion. Once the
run-in is completed, we suggest setting the
main needle at
2
1
2 turn from the bottom,
low speed needle at 1 3
4 turn from the bottom.
Make slight needle adjustments according to the
condition after the engine warms up. Please check
if the idle hole is too small and set the throttle
allowance about 2mm by radio when at idling
condition but stalls easily. Also open the throttle
fully and maintain around 10,000 RPM when the
aircraft model is on a flat surface. Make main speed
needle adjustments 1 hour increments each time
after each flight. The main speed needle will need
to be adjusted when switching to a different size
propeller due to the loading difference or will cause
the damages to the engine.


