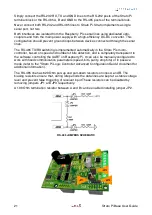
Hardware Installation
Strato Pi Base board
The Strato Pi Base board is supplied with all connectors pre-installed. No soldering is
required. You should connect Strato Pi to Raspberry Pi through the GPIO connector. Use
appropriate turrets/spacers to firmly bolt the two boards together, ensuring that no
conductive part of one board touches any part of the other board.
Be particularly careful to ensure there is enough clearance between the Ethernet and USB
connectors and the bottom of Strato Pi’s circuit board.
The GPIO connector of the Strato Pi Base board must be perfectly aligned to the
Raspberry Pi's GPIO pins. Turning on the Raspberry Pi and/or the Strato Pi Base board
with the GPIO not correctly connected will damage both the Raspberry Pi and Strato Pi
Base.
Strato Pi Base server
The Strato Pi Base server comes pre-assembled with a Raspberry Pi 3 Model B or B+ or
Raspberry Pi 4 Model B board, in a plastic standard DIN-rail case.
There is no need to open the case, unless a change in the RS-485 termination resistors is
required (see below).
The Micro SD card (not provided) can be inserted through a small opening on the side of
the case. Use a small pen or paper clip to gently push the card in its slot.
Replacing the RTC backup battery
Strato Pi Base has a hardware real time clock with a dedicated long-life non-rechargeable
back-up battery.
Strato Pi Base is shipped with a
CR1025
Lithium / Manganese Dioxide (Li/MnO2) battery
installed.
The battery is only used to power the RTC chip when the main power is not available
(when the Raspberry Pi is off). Depending on operating conditions it should last up to two
years if the Strato Pi board is not powered, more if the Strato Pi Base receives external
power.
Improper handling of lithium batteries can result in an explosion of the batteries and/or
release of harmful substances.
NOTICE
WARNING
10
Strato Pi Base User Guide


