


3
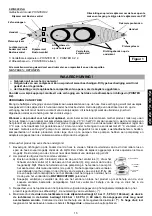
(1) Valve cap
(2) Valve
insert
(3) Valve
base
FITTINGS
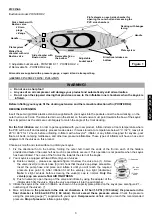
Illustration model: POINTER K2
1/ Adjustable bucket seats - POINTER K1: 1; POINTER K2: 2.
2/ Removable fin - POINTER K2 only;
All models are supplied with a pressure gauge, a repair kit and a transport bag.
ASSEMBLY INSTRUCTIONS / INFLATION
WARNING!
Do not use a sharp tool !
Any use of an air compressor will damage your product and automatically void all warranties.
Do not open the zippered closing that provides access to the inflatable inner chambers when the kayak is
inflated.
Before inflating your kayak, fit the decking extension and the removable directional fin (POINTER K2).
DECKING EXTENSION
Insert the semi-rigid black plastic extension supplied with your kayak into the pockets under the bow decking, on the
outer hull on each side. The small red arrow on the sticker on the extension must point towards the bow of the kayak;
this is important, as the ends are cut obliquely to match the angle of the front decking.
For the first inflation
and in order to get acquainted with your new product, inflate indoors at room temperature where
the PVC will be soft and assembly process made easier. If it was stored at a temperature below 0°C / 32°F, leave it at
20°C / 68°F for 12 hours before unfolding. Inflate it with a Sevylor
®
inflator or any inflator designed for kayaks, pool
floats, air beds, camping mattresses, and other low pressure inflatables. These types of inflators will have a hose and
adapters to fit the valves on this product.
Choose a smooth and clean surface to unfold your kayak.
1. Fix the directional fin to the bottom, folding the outer hull. Insert the ends of the fin into each of the holders
provided and tauten the outer hull as much as possible to secure it. This operation is not possible when the kayak
has been inflated. The curve of the fin must be towards the stern of the kayak.
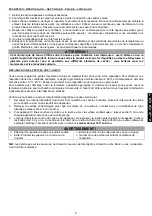
2. Your kayak is equipped with two different types of valves:
a) Boston valve(s) – please see opposite figure: Unscrew the valve cap (1). Screw
the valve insert (2) onto its base (3) and check that the valve cap stays accessible.
Insert the pump hose end piece and inflate it until you will reach the required
pressure (see point 3). After inflation fit all the valve(s) cap tight (clockwise).
Note:
A slight air-leak before screwing the valve(s) cap is normal.
Only the
valve(s) cap can ensure final AIR TIGHTNESS
.
b) Push-in valve(s): open the cap of the valve and inflate by using the adapter of the
inflator which fits the valve. Close the valve and press it into the air chamber.
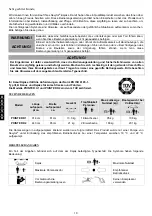
3. Inflate the kayak in the order of inflation as shown on the capacity plate printed on the kayak (see also figure # 1 –
numbering of the valves). (*)
4. Max. air pressure:
the pressure in the side air chambers is 0.1 bar/1.5 PSI (= 100 mbar); the pressure in the
floor chamber is 0.06 bar/0.9 PSI (= 60 mbar). Do not exceed these pressure values.
Check the pressure
using the pressure gauge (**) supplied with your kayak.
Overpressure:
deflate until you reach the recommended
pressure.
Drop of pressure:
inflate again slightly.
E
N
G
L
I
S
H
Zip fasteners on each side chamber for
opening the outer hull and accessing the
PVC side chambers
Walled floor
chamber with mini
Boston valve
Decking with bungee
lacing
Adjustable
bucket seats
1
2 Drain
plugs
vidange
Side chamber with
Boston valve
Side chamber with
Boston valve
1
2
1
Directional strakes on
bottom
Handle
Removable fin on
the bottom
2
Plate system
Plate system
Handle
Figure 1
Summary of Contents for POINTER K1
Page 76: ...76 1 C 4 mbar 0 06 PSI POINTER K2 1 2 K1 K2 300...
Page 77: ...77 1 2 3 4 5 6 60 18 C 25 C 1 5 cm 2 5 3 3 5 4 12...
Page 88: ...88 3 1 4 0 06 60 SEVYTEST 1 Sevytest 1 Sevytest 1 C 4 POINTERTM K2 1 2 K1 K2 2 A C K...
Page 89: ...89 300 1 2 3 4 5 6 60 18 C 25 C 1 5 2 5 3 3 5 4 12 A C K...
Page 90: ...90...
Page 93: ...93 N B 1 C 4 0 06 PSI POINTER K2 1 2 K1 K2 N B 300...
Page 94: ...94 1 2 3 4 5 6 60 18 C 25 C 1 5 2 5 3 3 5 4 12...
Page 95: ...95...
Page 96: ......