


13
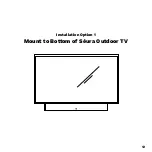
Step 1: Prep for Installation
a. Lay the TV face down on a soft, clean surface.
Position the soundbar face down along the bottom
edge of the TV. Take caution not to lay the TV on a
surface that will scratch or damage the screen.
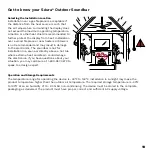
WARNING:
Ensure the Séura display is properly
supported on a flat surface at least as large as
the display. Pressure on the front of the panel may
damage the unit.
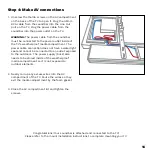
b.
The Very High Bond (VHB) adhesive strips provide
additional stability between the soundbar and the
TV. This bond is permanent and optional to use. On
both VHB strips, remove the backing from one side
and attach the tape to the bottom of the television.
Each strip should be placed on the thin bottom
edge of the TV and positioned a few inches from
the side of the TV.
c. Included in each of the four VESA holes on the
back of the TV are factory screws. Use a Philips #2
screwdriver to remove these screws.
Note:
The VESA screws on Full Sun Series TVs are
not long enough to attach the soundbar brackets
(in step 2). If mounting the TV with a Séura
Outdoor Mount, then use the screws provided with
the mount and you can save these VESA screws for
a future project as you won’t need them for this
installation.
Optical
Digital
Audio Input
Aux In
Power
Input
Micro
USB
adhesiv
e!
push
Optical
Digital
Audio Input
Aux In
Power
Input
Micro
USB
adhesiv
e!
push
Optical
Digital
Audio Input
Aux In
Power
Input
Micro
USB
adhesiv
e!
push