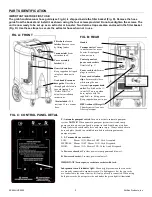
WARNING
: The power cords of the HVE3000 should be
plugged into separate GFCI-protected 115 volt outlets
rated for at least 15
amps. Always plug the cord firmly
into the base of the unit first and secure the cord into the
cord clip.
NOTICE:
Connect to two separate 15A circuits ONLY. A
bright green light indicates correct connections. No light
will show when using only one cord.
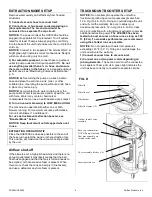
3) Connect pumpout hose to pump outlet and turn
pump switch ON.
For maximum pumpout performance,
we recommend using the unit with a 1½ in outlet hose.
See “Maximizing pumpout performance” below.
4) Attach vacuum hose to truckmount via vacuum
outlet.
5) Turn on vacuum blower(s) to LOW, MED or HIGH.
The machine can operate with either one or both
blowers running. For maximum vacuum pressure, turn
on both Blower 1 and Blower 2.
TRUCKMOUNT BOOSTER OPERATION TIP
Place the HVE3000 as close as possible to the end of
the hose run nearest the wand or other extraction tool.
This position will maximize the vacuum boost provided
by the unit.
Maximizing pumpout performance
The sump pump outlet of HVE3000 is equipped with a
1½ in. barbed hose fitting for use with a 1½ in. drain
hose (hose purchased separately). Because the internal
pumpout system is plumbed with 1½ in. lines, use of a
large-diameter drain hose will help to ensure maximum
pumpout performance.
The HVE3000 may also be used with a standard garden
hose. Simply replace the 1½ in. fitting with the ¾ in.
reducer fitting supplied with your unit and attach the
garden hose.
NOTICE:
Before turning the pump on, attach a drain
hose and place the end into a sink, toilet, or other
suitable drain. Operating the pump without a drain hose
in place may cause injury.
NOTICE:
Avoid contact with water draining from the
pump outlet. Water is pressurized and may exit the unit
with force. Water may contain chemicals or
contaminants that can be a health hazard upon contact.
Airflow shut-off
The HVE3000 will automatically shut off airflow to the
blowers when the recovery tank is full. This prevents
water and debris from entering the motors. When the
recovery tank becomes excessively dirty, or if there is
too much foam in the tank, the float may not function
properly. When the blowers emit a high-pitched whine
and there is no vacuum generated, it most likely means
that the ball float has engaged and that the tank is full
and needs to be emptied, or that excessive foam is
present. When this occurs, check the tank and empty it
if necessary, and use a defoamer any time foam is
present.
MAINTENANCE
WARNING! ELECTRIC SHOCK HAZARD.
Unplug the
unit before performing any maintenance.
Before each use
Inspect the electrical cord for damage.
Look for
fraying, cuts, etc. Do not use the unit if you find any
damage. Call 800-932-3030 to locate the nearest service
center.
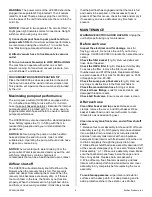
Check the filter basket
(Fig. D).
Remove debris and
rinse clean if needed.
Check the HEPA filter
(Fig. D).
Replace if visibly dirty.
To access the filter, remove the filter cover plate
thumbscrews and lift off the plate. Replacement filters
are sold in packs of four. Ask for Dri-Eaz part no. F503
or Sapphire part no. 20-045.
Check the sump pump float valve
(Fig. D).
Remove
any clogs or obstructions to the float mechanism.
Check the manual drain hose
for clogs or kinks.
Check all hose fittings.
Look for cracks, debris, and
damaged threads or seals.
Check ball float valve.
Ensure cover screen is clean.
After each use
Clean filter basket and top cover.
Release cover
clamps, remove the cover, and lift out basket. Rinse
basket, basket basin, and cover with water to clean.
(Clean also as needed during use.)
Clean recovery tank, float valve, and airflow shutoff
valve.
1. Release four cover assembly latches and lift off cover
assembly (see Fig. D). With gravity drain hose directed
into a suitable drain, remove any accumulated debris
and wash recovery tank interior with an all-purpose
detergent. Rinse interior with fresh water. Allow the unit
to drain completely through the gravity drain hose.
2. Slide airflow shutoff ball valve assembly downward off
of the vacuum standpipe (Fig. D; see also “Remove float
ball assembly,” p. 7). Rinse valve assembly clean. Make
sure the float ball moves freely inside the cage and is
free of any debris. Replace ball valve assembly.
3. Wipe off pump, float, float arm assembly and tank
interior with a damp cloth. Allow tank interior and cover
assembly to dry completely before replacing the cover
assembly.
To maintain appearance
, wipe interior and exterior
surfaces with a damp cloth. For deep cleaning and to
add a protective shine to the exterior, use Dri-Eaz
SP004 HVE3000
5
Dri-Eaz Products, Inc.


