background image

Installation     13 

4.


Attach the Motherboard Cable that was routed through the 
chassis to the Power port on the Dell™ PowerEdge™ 750 
Adapter, as shown in Figure 14.   


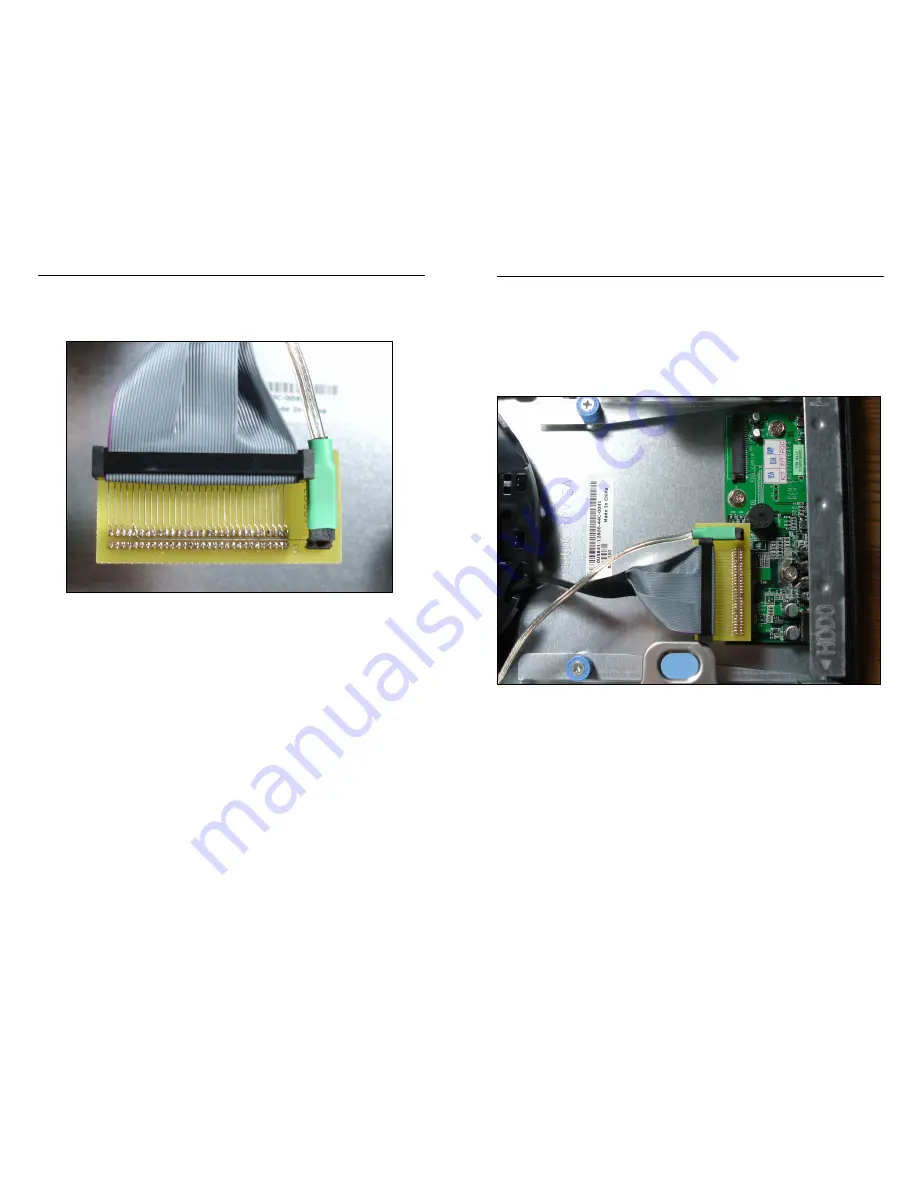
Figure 14 – Connecting the Motherboard Cable to the Adapter Board 

14     Installation 

5.


Align the Dell™ PowerEdge™ 750 Adapter with the pins on the 
front panel connector,. Be extremely careful to not misalign 
the pins.  
Gently insert the board. 
 

6.


Your Dell™ PowerEdge™ 750 Adapter installation should 
resemble Figure 15. 


Figure 15 – Completed Adapter Board Installation Detail 

7.


Using a flashlight, ensure that the adapter has been properly 
connected to the front panel board by viewing the small space 
between the adapter’s socket and the front panel board pins as 
highlighted in Figure 16. Also check the other side of the 
connector. In a proper install, there will be no unattached pins 
on either side. 

Summary of Contents for DPE750

Page 1: ...Dell PowerEdge 750 Adapter Installation Guide This adapter allows you to connect your WebReboot to the Dell PowerEdge 750 server which does not contain standard power switch pins Part DPE750...

Page 2: ...WebReboot Dell PowerEdge 750 Adapter Installation Guide Copyright 2006 Servprise International Inc All rights reserved Dell PowerEdge and Dell PowerEdge are trademarks of Dell Inc...

Page 3: ...ilure to abide by static safe practices and the maintenance instructions associated with your equipment significantly increases the chance of damage to your equipment Check with your computer manufact...

Page 4: ...s are available Installation using a PCI slot Installation without using a PCI slot An overview of each type of installation is provided on the following two pages 4 Installation Option 1 Installation...

Page 5: ...ure 2 Installation Without Using a PCI Slot 6 Installation Installation With PCI Slot 1 This installation requires the following parts as shown below in Figure 3 WebReboot Cable External PCI Slot Cove...

Page 6: ...e 4 Now that the External PCI Slot Cover Adapter installation is complete you may continue installation of the Dell PowerEdge 750 Adapter on page 10 8 Installation Installation Without PCI Slot 1 This...

Page 7: ...rect Motherboard Cable Top View 5 Now that the Direct Motherboard Cable installation is complete you may continue installation of the Dell PowerEdge 750 Adapter on page 10 10 Installation Installation...

Page 8: ...owerEdge 750 Adapter as shown in Figure 12 and Figure 13 Be very careful to properly align the pins when connecting the adapter to the ribbon cable and ensure that the notch on the ribbon cable is fac...

Page 9: ...e extremely careful to not misalign the pins Gently insert the board 6 Your Dell PowerEdge 750 Adapter installation should resemble Figure 15 Figure 15 Completed Adapter Board Installation Detail 7 Us...

Page 10: ...pter and ribbon cable are safely WITHIN CLEARANCE of the lid Failure to do so could cause the adapter and ribbon cable to become snagged on the closing the lid the force of which may break your server...

Page 11: ...the WebReboot connects the pins together for a brief amount of time and then releases the pins which causes the computer to reboot For a Power switch connection the WebReboot must first connect the pi...

Page 12: ...Servprise International Inc 447 Rawson Street Leicester MA 01524 USA MANDPE75001...

Reviews: