background image


www.SereneLifeHome.com

12

CARE, MAINTENANCE & TROUBLESHOOTING GUIDE

WARNING:

 To prevent electrical shock, please turn off and unplug the treadmill before cleaning or 

performing routine maintenance.

WARNING:

 Always check the wear and tear components like foot lock latch tube and running belt to 

prevent injury.

CLEANING

After each exercise, ensure that the unit is wiped down and any sweat is removed from the unit.

The treadmill can be cleaned with a soft cloth and mild detergent. Do not use abrasives or solvents. 
Be careful not to get excessive moisture on the display panel as this might damage the unit and create an 
electrical hazard. Please keep the treadmill, especially the computer console, out of direct sunlight to
prevent damage to the screen.

STORAGE

Store the treadmill in a clean and dry indoor environment. Never leave or use the unit outdoors. 
Ensure the master power switch is off and the power cord is un-plugged from wall outlet.

TROUBLESHOOTING GUIDE

PROBLEM

Treadmill will not

start

POTENTIAL CAUSES

CORRECTIONS

1. Treadmill not plugged in.
2. Safety Tether Key is not
     correctly installed.
3. Circuit breaker in the
    house has been tripped.
4. Treadmill circuit breaker
    has been tripped.

1. Plug the power cord into a wall outlet.
2. Reinstall the Safety Tether Key.
3. Reset the circuit breaker, or call an
    electrician to replace the circuit breaker.
4. Wait 5 minutes and then try to restart
    the treadmill.

Belt slips

Belt not tight enough

Adjust belt tension

Belt hesitates when

stepped on

1. Not enough lubrication
    applied onto the running
    deck.
2. Belt is too tight

1. Apply lubricant.
2. Adjust belt tension

Belt is not centred

Running belt tension not 
even across the rear roller

Center the belt

Summary of Contents for SLFTRD418

Page 1: ...Folding Treadmill Electric Motorized Running Machine SLFTRD418 36 Pre set Program Digital Smart Treadmill with 3 Selectable Incline Levels...

Page 2: ...d or plug or if it is not working properly If it has been dropped or damaged or been exposed to water return the appliance to a service center for examination and repair Do not attempt any maintenance...

Page 3: ...he treadmill while in use Do not use the treadmill on a carpet that is greater than 1 3 cm in height Before using the treadmill check that the belt is aligned and centered on the running deck and all...

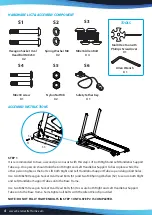
Page 4: ...0 Hexagon Socket Oval Head Bolts S1 and two M8 Spring Washers S2 to secure both Right and Left Handlebar Support Tubes onto the Base Frame Use two M8x16 Hexagon Socket Oval Head Bolts S3 to secure bot...

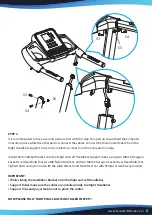
Page 5: ...e Right and Left Handlebar Support Tubes using two M8x16 Hexagon Socket Oval Head Bolts S3 two M8 Nylon Nuts S5 and two M8x30 Hexagon Socket Oval Head Bolts S4 Tighten bolts and nylon nuts with the Al...

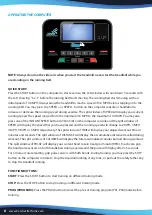
Page 6: ...the speed that you have pressed and the running speed will change to 2 MPH 3 MPH 4 MPH 5 MPH or 6 MPH respectively The split window of TIME will display your elapsed workout time in minutes and secon...

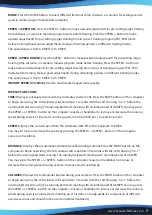
Page 7: ...he running belt starts moving The running belt starts moving with an initial speed of 0 6MPH You may press the SPEED or SPEED button on the computer console or handlebar to increase or decrease the ru...

Page 8: ...sole until you see the window of DISTANCE begin blinking Press the SPEED or SPEED button on the computer console to change the setting The pre set target distance range is from 0 6 40 4 mile the defau...

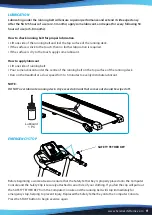
Page 9: ...some lubricant under the centre of the running belt on the top surface of the running deck Run on the treadmill at a slow speed for 3 to 5 minutes to evenly distribute lubricant NOTE DO NOT over lubri...

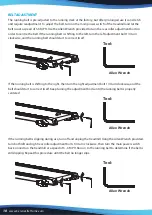
Page 10: ...should start to correct itself If the running belt is shifting to the right then turn the right adjustment bolt 1 4 turn clockwise and the belt should start to correct itself Keep turning the adjustme...

Page 11: ...vices 4 Choose the shown device from the list to pair it Once the device is paired you can start using the application in different categories Quick Run Map Mode Target Mode Please understand that we...

Page 12: ...STORAGE Store the treadmill in a clean and dry indoor environment Never leave or use the unit outdoors Ensure the master power switch is off and the power cord is un plugged from wall outlet TROUBLESH...

Page 13: ...ts resting state at the end of each exercise session A proper cool down slowly lowers your heart rate and allows blood to return to the heart HEAD ROLLS Rotate your head to the right for one count you...

Page 14: ...lowly bend forward from your waist letting your back and shoulders relax as you stretch toward your toes Reach as far as you can and hold for 15 counts HAMSTRING STRETCHES Extend your right leg Rest t...

Page 15: ...ter and Connect via Your Favorite Device Works with Smartphones Tablets Laptops etc Free to Download via Your Smartphone Multifunctional Sports App Connect to the Treadmill via Smart BTM Wireless BT A...

Page 16: ...Questions Issues We are here to help Phone 1 718 535 1800 Email support pyleusa com...

Reviews: