Sequentix P3 SEQUENCER Operation Manual Download Page 114

Sequentix Music Systems 


P3 Sequencer User Manual 

Page 114 


Record Page 2 –  


The second record page looks like this: 
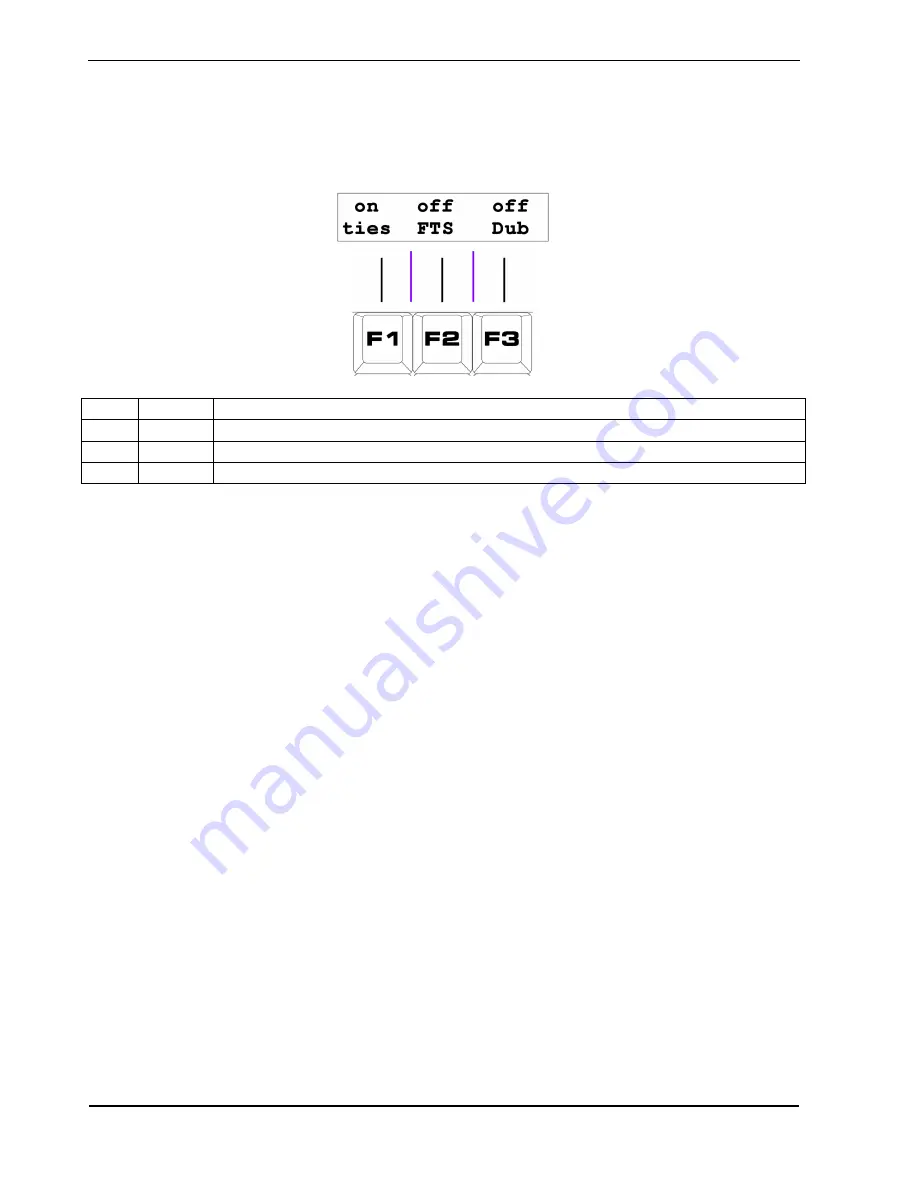


Key 

Label  Function 

F1 

ties 

Toggles setting of 

tie

 where recorded notes overlap steps 

F2 

FTS 

Toggles Force-To-Scale of recorded notes 

F3 

Dub 

Selects special record modes 


F1 – Ties 


Soft-key 

F1

 toggles the record ties option. 


With the “

ties

” option enabled, when a recorded note is held over more than one pattern step, or if the 

note overlaps the next note, the steps will have the 

tie

 setting turned on. 


With “

ties

” off, holding a single note over multiple steps will record a repeating pattern of single notes 

on every step, and overlapped notes will be recorded with a gap between them. 


F2 - FTS 


The “

FTS

” option selects whether notes being recorded into a pattern should be forced to the current 

scale before they are written to the pattern. 


Note that even if FTS is turned off, notes will still be FTS’d according to the current settings. 

The difference is that they will be recorded into the pattern with their original note values. 


Summary of Contents for P3 SEQUENCER

Page 1: ...SEQUENTIX MUSIC SYSTEMS Ltd P3 SEQUENCER OPERATION MANUAL V3 1 006 2006...

Page 2: ......

Page 3: ...t Functions 33 Page 5 MIDI Config 35 Page 6 Bank functions 40 Page 7 Sysex User Config 42 Other Play Mode Features 45 Play Mode Knob Use 45 Fine Tempo Adjust 45 Status LED Displays 46 GBar Pos and Pla...

Page 4: ...onger Playlist 95 Leaving Playlist Edit 97 Some More Editing 98 Playlist Views 98 Back To The Playlist 102 Step Repeats 102 Step Transpose 103 Step Sync 105 Other Features Of Playlist Edit 109 Short c...

Page 5: ...lation 139 Accumulator Configuration 140 The Other Two 144 Auxiliary Value Scaling 145 The Accumulator Events 146 Accumulator Mask Events 147 Knob Mask Events 147 Knob Grab Events 148 Set Step Value E...

Page 6: ...uitry would pass a voltage output from each knob or slider to a common CV output stepping through each one in turn under the control of a master clock With the CV output driving a synthesizer s oscill...

Page 7: ...atic functions per step The unique programmatic functions called auxiliary events allow the simple creation of patterns that can dynamically grab values fromthe patterns on other tracks randomize step...

Page 8: ...kets are SYNC output which carries both a clock only MIDI signal and DIN Sync 24 four parallel MIDI outputs all carry the same signal it s a built in thru box MIDI input Power supply input The MIDI an...

Page 9: ...Sequentix Music Systems P3 Sequencer User Manual Page 9 P3 Sequencer front panel control diagram...

Page 10: ...hree different modes of operation each of which use the front panel controls in a different way The default mode at power on is play mode Play mode allows the muting and un muting of tracks selection...

Page 11: ...in pattern edit editing the pattern on track 1 To confirm this there will be an inverse video E character in the top right of the alphanumeric display The display should look like this All of the ste...

Page 12: ...atus values for each step in a pattern but the most important is gate When you first enter pattern edit the step keys are assigned to gate as shown by the status LED just above the STEP MODE button la...

Page 13: ...l play notes by setting gates and select different notes with the knobs let s look at the upper row of knobs Setting Velocity Values On entering pattern edit the UPPER knobs are assigned to edit the M...

Page 14: ...soft keys is used The soft keys are labelled F1 F2 and F3 and are found on the top row of the keypad just below the display When you exit pattern edit a special page appears that allows you to decide...

Page 15: ...f equipment doing something as soon as possible let s look in more depth at the full feature set P3 has three modes of operation These are Play mode for control of track mutes part selection etc Patte...

Page 16: ...only active tracks play notes Each track is able to play one pattern at a time from a set of patterns unique to that track Normally there are 8 patterns for each track a total of 64 patterns per bank...

Page 17: ...s are selected using the part keys the rightmost eight step keys which are labelled PART 1 to 8 on the panel The currently selected part is indicated by a red LED above the part number To select a new...

Page 18: ...7 7 7 7 7 7 7 8 8 8 8 8 8 8 8 8 Pattern numbers This makes it seem very much like parts are just patterns each part being made up of a pattern for each track While you familiarise yourself with P3 it...

Page 19: ...loops back to the first part at the end This is similar to having a multi step playlist on each track but is considerably easier to set up and understand though not as flexible Selecting A Part Chain...

Page 20: ...Sequentix Music Systems P3 Sequencer User Manual Page 20 For the example above the LEDs should look like this To clear a pattern chain just select another single part with one key press...

Page 21: ...t to edit the currently playing pattern For example to edit the current pattern on track 1 Playlist Edit Playlist edit is best left until you have a good understanding of play mode and pattern edit bu...

Page 22: ...r commonly used bank selection and part functions Pages 5 6 and 7 are for less commonly used configuration options Page 4 is reserved for future expansion that s why there s a gap Selecting Pages To s...

Page 23: ...lay showing you are in play mode page 1 Bank FTS Tune page 5 MIDI Config page 2 Part Settings page 6 Bank Functions page 3 Part Functions page 7 Sysex User Config Page 1 Bank FTS Tune Page 1 is the de...

Page 24: ...Each bank holds a separate set of patterns and parts as well as some configuration settings To select another bank hold the bank soft key F1 All of the step LEDs will go out except the one above the...

Page 25: ...effect of FTS let s say you have a pattern with 12 notes in a rising chromatic scale Step 1 2 3 4 5 6 7 8 9 10 11 12 Note C C D D E F F G G A A B With FTS set to a root note of C and the Major scale t...

Page 26: ...root note and scale The step LEDs will also show the current root note the LED above the step key for the root note will be amber Selecting the FTS Root Note The step key numbers correspond to the ro...

Page 27: ...for each part and also determines how note names will be shown in pattern edit Selecting the FTS Scale To change the FTS scale use the DATA knob to scroll through the available options There are 23 pr...

Page 28: ...mode F2 exit Return to play mode with the modified scale active but not saved F3 lose Restore the previous scale In FTS Scale Edit the step LEDs will show the notes in the scale For example the Major...

Page 29: ...two below two above three below etc until it finds a note in the FTS scale There are three ways to leave the FTS Scale Edit page via the soft keys press save F1 to store the scale definition and retur...

Page 30: ...part along with the track mutes just before a new part is selected TIP Holding FUNC while selecting a new part will switch to the new part without saving recently changed settings in the current part...

Page 31: ...ep The part chain repeats count only takes effect when a part chain is active Each part in a chain will repeat the number of times set in its PCRep value before moving on to the next part in the chain...

Page 32: ...that is playing a C major arpeggio You want to transpose that pattern and all the other patterns in your part to E major Your FTS setting is currently C Major If you use part transpose to shift the pa...

Page 33: ...ight tracks When a new part is selected the mute status at the time that part was last active is recalled The mute hold function allows you to over ride this behaviour If you select a new part while h...

Page 34: ...rt copy active function may be more commonly used as this allows you to create a new part with some tracks playing the same patterns as before but other tracks playing new patterns over the backing of...

Page 35: ...thru and record channel settings F3 MIDI chan Configure the MIDI channels for tracks F1 MIDI Clock The first option mclk toggles the sending of MIDI clock at P3 s main MIDI outputs If you don t have...

Page 36: ...ething like this Only soft key F3 is active in this page to cancel the channel selection page trk n on the bottom left of the display confirms the number of the track you are changing The LED above th...

Page 37: ...each bank using the Mchans per bank user config option User config options are described in the section on play mode page 7 Special Channels As well as the MIDI channel settings for each track there a...

Page 38: ...e this Key Label Function F1 thru Configure soft thru channelisation F2 recrd Configure the real time record channel F3 exit Return to play mode F1 Soft Thru Channelisation The first option thru is th...

Page 39: ...ed All other channels will pass through according to the soft thru setting A setting of trk means the record input channel will automatically switch to the outputMIDI channel of the track being record...

Page 40: ...ompletely wipe all the patterns and parts in the currently selected bank To ensure it is not used by accident after pressing the soft key the following display will be shown IMPORTANT In order to conf...

Page 41: ...ge The BPgm option allows you to set a program number tobe sent in a MIDI program change message when a bank is selected The message is sent on the pgm channel described in the previous section on ass...

Page 42: ...started Changing the BTempo value is a similar process as for initial program change number TIP Bank tempo will normally be over ridden if the TEMPO knob is adjusted There is a user config option Loc...

Page 43: ...ecksum validation As blocks can be received in any order P3 does not know when a complete dump has been received Status messages indicate reception of each data block Any errors detected in a dump wil...

Page 44: ...on or off F2 next Step through the config option list F3 exit Return to play mode You can step though a number of options with the option description shown on the top line of the display The soft keys...

Page 45: ...on on P3 will send MIDI volume and pan controller messages from the knobs above the part keys The NOTE knobs will send volume the UPPER knobs pan The messages are sent on the MIDI channels assigned to...

Page 46: ...countdown to the end of the current global bar is shown as a collapsing pattern really just the number in binary Track gates each of the eight status LEDs shows the gate status for a track with track...

Page 47: ...n a P3 pattern has a number of different values such as the gate note and velocity values you used in the getting started section The set of 16 of each value in a pattern is called a row Some of the r...

Page 48: ...knobs for editing velocity in the getting started section These knobs can also be assigned to any of the other numeric rows in a P3 pattern The UPPER knobs are assigned using the UPPER MODEbutton Bel...

Page 49: ...ort note A setting of 12 means there will be no gap at all between the note on one step and a note on the following step Since gate length is a proportion of the step time it varies according to the p...

Page 50: ...ch P3 pattern has four auxiliary rows However there is only one UPPER MODE status LED labelled AUX The explanation for this is that each of the four numeric auxiliary rows has a matching status row Se...

Page 51: ...uldn t gauge their position with absolute accuracy if they did you can view the numeric values for each pattern step as follows hold down the FUNCkey press the step key for the step you want to inspec...

Page 52: ...shown on the LEDs above each step key The default assignment for the step keys when you enter pattern edit is the gate row STEP LED Colours P3 s step LEDs are tri colour types Inside each LED there is...

Page 53: ...l see the three different colours for each combination of tie and gate Once you understand how the values will be displayed let s look at the rest of the status rows The full complement of status rows...

Page 54: ...ast from the start of the first step until the end of the second stepset by its length value If tie is used on a step where the next step has a different note value then the first note will over lap t...

Page 55: ...ge the apparent length of the pattern To alter the rhythmic feel without altering the underlying length of a pattern use skip with the global bar sync feature see the playlist edit section for details...

Page 56: ...knobs to edit an auxiliary row press the UPPER MODE button until the AUX LED is lit The letters for each of the auxes A B C and D are labelled on the left side of the STEP MODE LEDs linked to the AUX...

Page 57: ...er or event you want to use To do this you need to enter the aux config page With UPPER MODE set to AUX hold the FUNC key press the STEP MODE button TIP As a shortcut if you are not already in AUX upp...

Page 58: ...ough the list of available functions F3 lose Restore the previous assignment and return The top line of the aux config page shows the event name or controller number assigned to the current aux Select...

Page 59: ...Sequentix Music Systems P3 Sequencer User Manual Page 59 This chart shows the groups assigned to each of the step keys while in the aux config page...

Page 60: ...aux at the same time you can use the STEP MODE key to advance to the next aux while in the aux config page Note that this will also save any changed assignment for the current aux For example let s a...

Page 61: ...rocessed if the aux status is active TIP By default when you edit the value of an aux if the step is not active it will be turned on automatically This feature can be disabled with the aux edit sets o...

Page 62: ...roller this display will look something like this The display of aux values may vary when an auxiliary event has been assigned This will be explained in the later section Using Auxiliary Events Viewin...

Page 63: ...erstand If the aux status is set on for a given step the numeric value for that step will be sent as a MIDI controller message on the MIDI channel for the track The same is true for the MIDI Send func...

Page 64: ...soft keys to access pattern modifying functions and configuration options There are eight pages in total Selecting Pages To select a pattern edit page hold the PAGE key at the right hand side of the k...

Page 65: ...t they all do The following table summarises all eight pages Note the inverse video E in the top right of the display showing you are in pattern edit page 1 Timebase Sync page 5 Note Randomize page 2...

Page 66: ...T 2T The default timebase is 16 Each number is essentially the number of steps that will fit in the space of one 4 4 bar at the current tempo For example timebase 16 means each step lasts for one 16th...

Page 67: ...edited to its start position This is useful if you get a pattern out of step with the other tracks perhaps by changingto a triplet timebase or altering the last step A second function of the sync soft...

Page 68: ...e starting from step 1 and looping back to the last step after step 1 reverse B The pattern will play in reverse starting from the last step and looping back to the last step after step 1 alternate Th...

Page 69: ...the first step Ignoring the effect of skip last step determines the pattern length To set the last step hold the last soft key F3 The step LEDs will go out except for one flashing amber LED indicatin...

Page 70: ...ear soft key is used to initialise a pattern After clearing all steps will have gate tie and skip turned off all note values will be set according to the first NOTE knob all velocity values will be se...

Page 71: ...The display will show select the first step to be copied using the step keys or press F3 to cancel Once the first step is selected the display will show select the last step to be copied using the st...

Page 72: ...ter Data Pasted notes note velocity length delay gate tie skip and Xd rows auxes aux A B C and D numeric and status rows both all pattern rows auxcf only the aux assignments for the pattern all all of...

Page 73: ...ight If the last step in a pattern is before step 16 step a modified function can be used rotate to last hold the FUNC key press either rotate left F1 or rotate right F2 With FUNC held only the steps...

Page 74: ...step in a pattern odd steps have their delay set to zero even steps have their delay set to a number chosen with the step keys To apply a shuffle setting hold the Shf soft key F3 press one of the ste...

Page 75: ...o a pattern as it plays useful for adding a touch of chaos or just for finding random snippets of melody that might trigger other ideas To randomize the note values ensure the sequencer is running hol...

Page 76: ...F1 to store the new selection OR press lose F3 to restore the previous value A range of 0 does not impose any limit the random notes may be anything from the configured lowest note to the highest pos...

Page 77: ...on lets you enter random values into the row currently selected for editing by UPPER MODE To randomize the selected upper values ensure the sequencer is running hold the upper soft key F1 as the steps...

Page 78: ...key F1 to store the new selection OR press lose F3 to restore the previous value A range of 0 does not impose any limit the random values may be anything from the configured lowest value to the maxim...

Page 79: ...PPER MODE value F3 tap Turn on the gate on the current step F1 Sculpt Note F2 Sculpt Upper The Sculpt functions allow you to record the movement of the DATA knob into any of the numeric values in a pa...

Page 80: ...d will be written into the step value at the start of each step You can leave DATA in one place if you want to write the same value to every step If you want to see what value will be written before y...

Page 81: ...accumulator settings for patterns using advanced auxiliary events These options are described in the later section Using Auxiliary Events F2 Note Range This option sets the range over which the NOTE e...

Page 82: ...ual Page 82 F3 Apply FTS The Apply FTS function permanently applies the current FTS settings to the note values in the pattern This is useful if you want to mix different scales across different track...

Page 83: ...ct the required operation THEN press the apply soft key F1 to perform the selected operation OR press the cancel soft key F3 to return to pattern edit Quick Mute Access While using pattern edit if you...

Page 84: ...ern and return to play mode F2 back I didn t mean to press PLAY EDIT return to pattern edit F3 lose Lose any changes to the edited pattern and return to play mode F1 Save If you want to save changes t...

Page 85: ...age 85 F2 Back The back soft key F2 returns you to play mode handy if you pressed PLAY EDIT by accident or just changed your mind F3 Lose The lose option F3 will restore the pattern as it was beforeyo...

Page 86: ...chain you would need to copy the single patterns to three other locations used by the other parts time consuming and wasteful of space Or you may want to transpose the samepattern to a number of diffe...

Page 87: ...rts in each P3 bank Each part stores some common values Force to Scale settings Gbar PCReps PXPos and the track mute status to recall when that part is selected Each part also holds a playlist for eve...

Page 88: ...mean When you start P3 running or select a new part each track loads up its own playlist and starts at playlist step 1 From there Each track plays the pattern number in the currentplaylist step for th...

Page 89: ...Transpose and sync default values have no effect here so you can ignore them for now In an initialised bank if you select part 1 then pattern 1 plays on every track if you select part 2 then pattern 2...

Page 90: ...e Playlists control which patterns play but if there is nothing in the patterns there won t be anything to hear So let s make sure you have a couple of patterns to use with your soon to be created pla...

Page 91: ...start again from the top of this section If you re happy that you ve got two patterns to play with select part 1 by itself leave P3 running and let s get on with playlist edit Changing To Playlist Ed...

Page 92: ...ontrols take on the functions shown here Playlist Edit Display The playlist edit display will look like the diagram below The labels indicate where the playlist step values are shown Just ignore the V...

Page 93: ...ys Right now the LEDs will look like this In playlist edit the pattern number for the current step is shown by a red LED above the PATTERN keys The red LED here shows pattern 1 is playing on this step...

Page 94: ...2 The LEDs should now look like this The red LED above PATTERN key 2 shows that pattern 2 is now selected for this step Note that P3 won t switch to the pattern 2 until pattern 1 has finished its cur...

Page 95: ...n 2 To set the length of a playlist hold the leng soft key F3 press the PLAYLIST STEP key for the last step in the playlist In our example you ll use PLAYLIST STEPkey 2 to set the length to 2 like thi...

Page 96: ...ious playlist edit example You edited the playlist to find pattern 1 was on playlist step 1 the default playlist for a blank part 1 The reason you have found pattern 2 on playlist step 2 is because a...

Page 97: ...following options on the soft keys Key Label Function F1 save Store the edited playlist and return to play mode F2 back I didn t mean to press FUNC return to playlist edit F3 lose Lose any changes to...

Page 98: ...ay have a problem You change the pattern on a step by pressing the PATTERN key for the pattern number you want But what if the playlist advances just as you reach for the PATTERN key You could end up...

Page 99: ...one step on each beat Edit View In Edit view you can select any playlist step directly in order to edit it or just to view the values of repeats transpose and sync without having to wait for that step...

Page 100: ...confirm that you are Editing step 2 The colour of the PLAYLIST STEP LED also shows this but probably needs a little more explanation LED Colours Revisited When you select a playlist step for Edit vie...

Page 101: ...To summarise the various colours of PLAYLIST STEP LEDs LED Colour Meaning green this step is within the current playlist length flashing green this step is the current playlist step being played ambe...

Page 102: ...n pattern 2 in turn once through each pattern The UPPER knobs above each PLAYLIST STEPkey are used to adjust the repeats value on each step Turn the repeats knob above PLAYLIST STEP 2 now until the to...

Page 103: ...teps pattern 1 on step 1 and pattern 2 on step 2 Follow these steps use the repeats knob above PLAYLIST STEP 1 to set repeats back to 1 on step 1 use F1 PLAYLIST STEPkey 2 to select edit view for step...

Page 104: ...g pattern 1 on a couple of steps In playlist edit the NOTE knobs above each PLAYLIST STEP are used to set the transpose values Turn the transpose knob above PLAYLIST STEP 1 now until the top line of t...

Page 105: ...ld have a playlist that looks like this Step 1 2 3 4 Pattern 1 1 1 2 Repeats 1 1 1 1 Transpose 12 7 0 0 It may be a little different but as long as you have the right patterns on the 4 steps it ll be...

Page 106: ...dit pattern 1 like this In pattern edit set the last step of the pattern to step 6 If you don t know how to do that revisit the chapter on pattern edit Save the pattern and as you leave pattern edit y...

Page 107: ...it view The sync value is shown above soft key F2 and this key is used to toggle the value Press F2 now and the display should change to this The sync value on step 1 is now set to GBar for global bar...

Page 108: ...teresting use of GBar sync is where you are editing a pattern and skippingsome pattern steps With the pattern locked to the global bar length it keeps in time with the other patterns but the rhythm ca...

Page 109: ...equential patterns hold the pattern key for the pattern you want the playlist to start on press the pattern key for the pattern you want to end on When you do this the playlist will be configured with...

Page 110: ...ill normally indicate green for each track By pressing a track key the advance of the playlist on that track is suspended and the LED shows red Another press of the track key will return the track to...

Page 111: ...ote value in the pattern and any other notes being written into available auxes Differences Between Play Mode Playlist Edit and Pattern Edit Pattern Edit In pattern edit notes will be recorded only in...

Page 112: ...y This will activate recording on the current trackin playlist edit Once record is active the normal soft keys and pages are replaced by the record pages In play mode and playlist edit there is one mo...

Page 113: ...y notes will be recorded or before using the del soft key F2 MIDI Thru When record is activated incoming notes to be recorded are received on the record MIDI channel configured using the Thru conf opt...

Page 114: ...rn step or if the note overlaps the next note the steps will have the tie setting turned on With ties off holding a single note over multiple steps will record a repeating pattern of single notes on e...

Page 115: ...paces in the existing pattern If there is already a note on a step it will be left intact This is useful for building up patterns of increasing complexity while maintaining the notes already present R...

Page 116: ...are not used the same way in play mode the soft key label is used to show which value will be sculpted You still select from the possible options using the UPPER MODE button just as in pattern edit Us...

Page 117: ...creased to include newly added steps For example if you play a 4 note chord each of the 4 notes will be written into 4 contiguous steps of the pattern and the length of the pattern will be increased t...

Page 118: ...ars the pattern as if you pressed F1 just before playing each new group of notes This makes arpeggio capture behave more like a traditional arpeggiator If you play a chord each note in the chord is wr...

Page 119: ...ft key is really only useful where rong is turned off for step time input Pressing tie will cause the most recently entered note to be copied to the next step and the two steps tied for a longer note...

Page 120: ...track selection for real time record and record options In this way you can use P3 as a hands free MIDI looper The table below shows the MIDI controllers available for UI control CC Remote Function Da...

Page 121: ...e ready option Remote Part Transpose PXPos With remote control receive enabled incoming notemessages on the remote MIDI channel will temporarily over ride the current PXPos setting This allows you to...

Page 122: ...mple of the sort of thing you can do quite easily before looking at some of the trickier stuff Randomizing Pattern Values The aux events are divided into a number of different event groups one of whic...

Page 123: ...r event in the group you could either scroll through the group members by using the DATA knob or step through them one at a time using the next soft key F2 to confirm the assignment of the Rndmz note...

Page 124: ...on are also read from the pattern but you should get the idea You can enable and set a different value for aux A on whichever steps you like and a different random number will be generated and added t...

Page 125: ...ctive when the mask event is applied When a pattern step with the Rnd mask gate event enabled is played 1 the note value is read from the pattern 2 the gate status is read from the pattern 3 the aux B...

Page 126: ...tern Bear in mind that you will need to trigger a sound that makes changes to the pattern values audible there s not much point randomizing the length of a note if the sound has a long release time th...

Page 127: ...the current track Let s work through an example to explain what these events can do Before you can move data between tracks you will need patterns to work with on two tracks so let s set them up now S...

Page 128: ...EP MODE enter the Aux Config page usingFUNC STEP MODE press step key 2 to select the Inter Track event group As with the Randomize group the event you want to use in this example grab is the first eve...

Page 129: ...NC key is held the UPPER knobs allow you to scroll through all the possible target values on the top line of the display The target tracknumbers will continue to change too but you have much finer con...

Page 130: ...of them This is one use for note grabbing Another interesting use is to grab notes from a pattern with a different length Return to the example grab patterns go into pattern edit for pattern B on trac...

Page 131: ...etween these events quickly by re assigning the auxes in your example patterns The pairs of step values for one event will work for the others Here is the full list of target values that can be acted...

Page 132: ...A enabled Pattern B Note C5 D5 E5 F5 G5 A5 B5 C6 D6 E6 F6 G6 A6 B6 C7 D7 Track 1 Plays C4 C4 C4 C4 G4 C4 C4 C4 D5 C4 C4 C4 A5 C4 C4 C4 On step 1 track 1 plays the original note from the pattern This...

Page 133: ...And this will continue for all 16 steps of pattern B giving you a means to sequence 16 repeats of pattern A each one with a different transposition Plus P The xpose by trk n p event is much the same a...

Page 134: ...te name The relative events take a number value that is an offset from the main pattern note The xF versions of the events send the extra notes without applying any Force To Scale settings Note that n...

Page 135: ...e aux note abs event The difference with the relative events is that you can now transpose all the notes in the chord just by changing the main note value on the step Chord Memory It is possible to us...

Page 136: ...are typically used in P3 this is exactly what they do There are three accumulators for each track note accumulator velocity accumulator aux D accumulator What they do is very simple The three accumul...

Page 137: ...the last step to 4 Example pattern Step 1 2 3 4 Note C5 E5 G5 C6 Velocity 64 64 64 64 Length 6 6 6 6 Gate on on on on Enter the pattern and start it playing and you should hear a simple rising arpegg...

Page 138: ...t doesn t matter that the pattern reaches its last step and repeats the accumulator value will remain As an experiment with the pattern still playing change the value for aux A in step 1 You will hear...

Page 139: ...ason for this behaviour is because the offset note rel event is relative The aux value is added to the current accumulator value For the example pattern this is the result Step 1 2 3 4 1 2 3 4 1 2 3 4...

Page 140: ...gives a result that is out of range for that value The accumulator configuration pages are accessed from pattern edit using the Acc Conf soft key F1 on pattern edit page 8 Go into pattern edit then h...

Page 141: ...pose it is cleared The default limit of 36 gives you 3 octaves range on the note accumulator the limit is given in semitones You can set the limit anywhere between 0 and 127 Limit Behaviour The limit...

Page 142: ...octaves up then is reset to zero To change the limit behaviour press the soft key below it on the display F1 Each press of F1 advances to the next option so if you press F1 twice it will step fromrtz...

Page 143: ...rs may be simpler to understand with a diagram If you have a pattern with an offset event which adds 1 to the accumulator on each pass the accumulator value will change as shown for each of the four l...

Page 144: ...e more and you will see the aux D settings One further press of PAGE takes you to an extra page with the last two accumulator configuration settings The page looks like this These last two settings ar...

Page 145: ...y events where the event has a smaller range of values than the maximum possible for an aux are scaled down For example the event xpose by trk n takes a value from 1 to 8 If this event were assigned t...

Page 146: ...re another set of events which take no value but simply prevent each accumulator from affecting specific steps on which the event is set active The accumulators are not reset and any offset events on...

Page 147: ...gradual modification of a pattern as it plays Knob Mask Events The Knob Mask event group use the current positions of the front panel knobs to control masking of gate tie the aux statuses and accumul...

Page 148: ...e 0 127 Mask auxD Kn n defeat aux D unless knob is near n range 0 127 Mask auxD Kn n defeat aux D unless knob is n range 0 127 Mask nAcc Kn n defeat note accumulator unless knob is n range 0 127 Mask...

Page 149: ...ts The Repeat event group used to create repeats of notes within the same step They are useful where you may want the occasional double speed note without having to use a faster tbase setting or for t...

Page 150: ...ng repeat time set rep n note set repeat note offset for rep n range 63 set rep n velo set repeat velocity offset for rep n range 63 Redirect Aux Events The Redirect Aux event group allow you to tempo...

Page 151: ...base to one of the standard settings 1 2 4 8 16 32 64 set trplt tbase set tbase to one of the triplet settings 2T 4T 8T 16T 32T 64T set direction set direction always reset to stored value at the end...

Page 152: ...Sequentix Music Systems P3 Sequencer User Manual Page 152...

Page 153: ...lues 1 blu CDD FF GAA 7 pentatonic pen CDEGA 8 mixolydian mix CC EF GAA 9 lyd dim lyd CDD F GAB 10 blues 2 bl2 CDD EGA 11 major aug aug CD EGG B 12 arabian arb CDEFF G A 13 balinese bli CDD GG 14 hung...

Page 154: ...Sequentix Music Systems P3 Sequencer User Manual Page 154...

Page 155: ...ord mode incoming MIDI notes on the record channel are re routed to the MIDI channel of the track being recorded Controller messages still pass according to the normal soft thru setting With this opti...

Page 156: ...Sequentix Music Systems P3 Sequencer User Manual Page 156...

Page 157: ...er banks will be available The memory organisation can be changed by holding down the PAGEkey during power on After the initial LED cycle this will present the following menu The desired option is sel...

Page 158: ...STEP selection for edit view must be performed by holding the step soft key F1 pressing the PLAYLIST STEP key for the step to be edited This use of the step key for playlist step selection means that...

Page 159: ...ld F1 and step key 7 then power on P3 Continue holding the keys until the display shows Press both F1 and F2 to confirm you want to completely wipe the sequencer memory or F3 to cancel the initialisat...

Page 160: ...IDfile The P3Tools program includes a firmware upgrade utility that takes advantage of hand shaking messages returned by P3 to optimise the transfer process and provide error detection and is highly r...

Page 161: ...27 note knobs 13 note quantize 25 nudge 67 numeric rows 47 part chain 19 155 part chain repeats PCRep 31 part copy 33 part keys 17 part transpose PXPos 31 parts 17 pattern length 69 pitch bend 56 play...

Reviews: