5.2. CONFIGURING THE ASTERX-U MARINE FG NTRIP CASTER
Click on
New mount point
as indicated in Figure 5-6. Select ‘
Yes
’ to enable the mount
point and give it a name. This is the name that will appear in the caster source table. Up to
3 mount points can be de
fi
ned each with a different name. You can also select the type of
Client authentication
for the mount point:
none
- any client can connect without logging
in or,
basic
- clients have to login with a username and password.
To select a correction stream from the NTRIP server of the AsteRx-U MARINE Fg, select
‘
No
’
in the
‘
Allow external server
’ fi
eld
Click on the
‘
Local Server ...
’
button to enable the local NTRIP server of the AsteRx-U MARINE
Fg and to select the individual messages you want to broadcast. By default, correction
messages necessary for RTK are pre-selected. Click
Ok
to apply the settings.
Step 2: Define a new user
If you selected
basic
client authentication when con
fi
guring the mount point in the previous
step, you will need to de
fi
ne at least one user. The user name and password are the
credentials needed for the NTRIP client (rover) to access the correction stream.
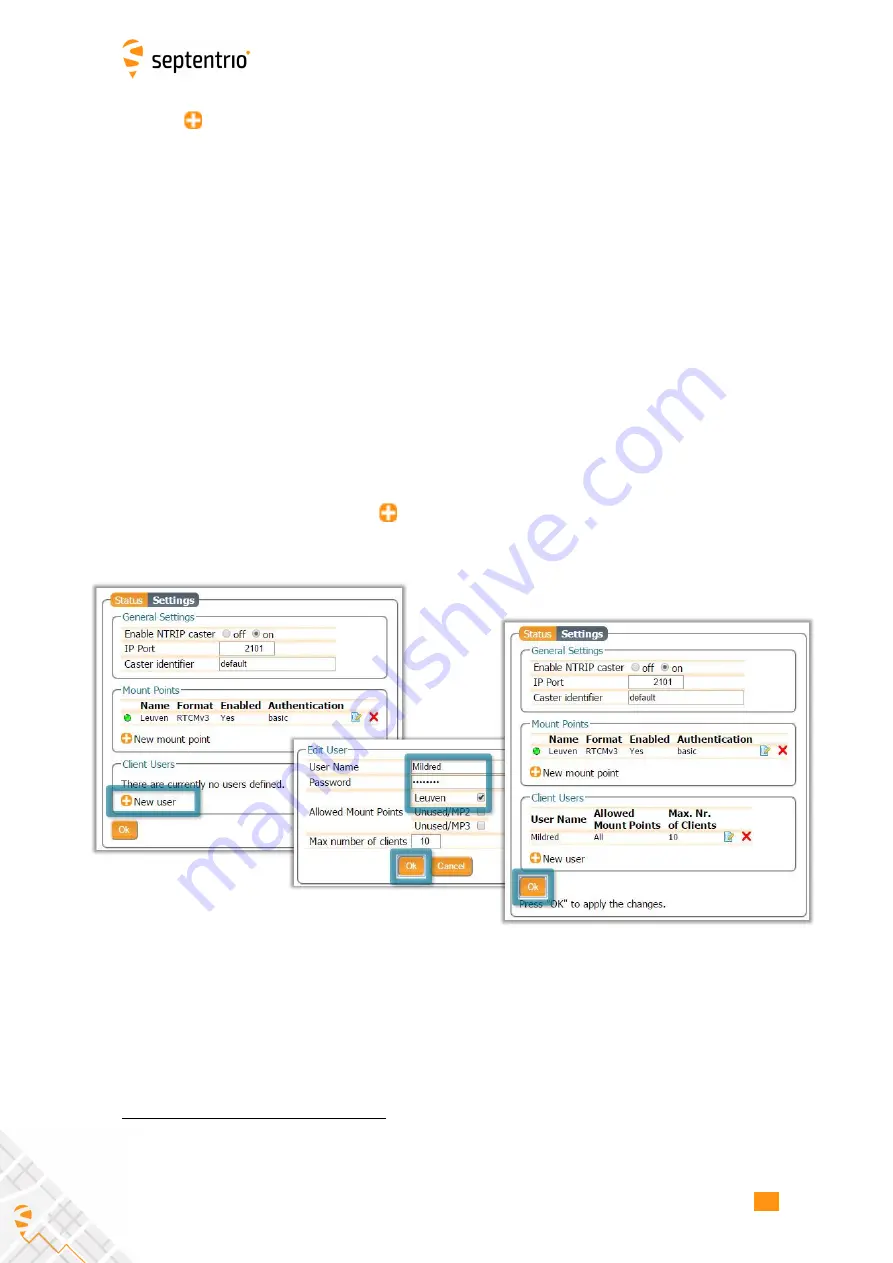
In the
‘
Client Users
’
section, click on
New User
as shown in Figure 5-7. Enter a User Name
and Password for the user and select the mount points that they will have access to. Up to
10 NTRIP clients can log in as a particular user. Click
Ok
to apply the settings.
Figure 5-7:
Con
fi
guring the login credentials for a user
Step 3: Is the NTRIP Caster working?
In the
‘
Status
’
tab of the NTRIP Caster window, you can see a summary of the NTRIP Caster
to make sure that it has been properly con
fi
gured. In the example shown in Figure 5-8, a
rover client is connected to the mount point named
Leuven
as user
Mildred
.
2
By setting
Allow external server
to
Yes
the mount point can receive a stream from a remote NTRIP server
60


