background image

6

7

English

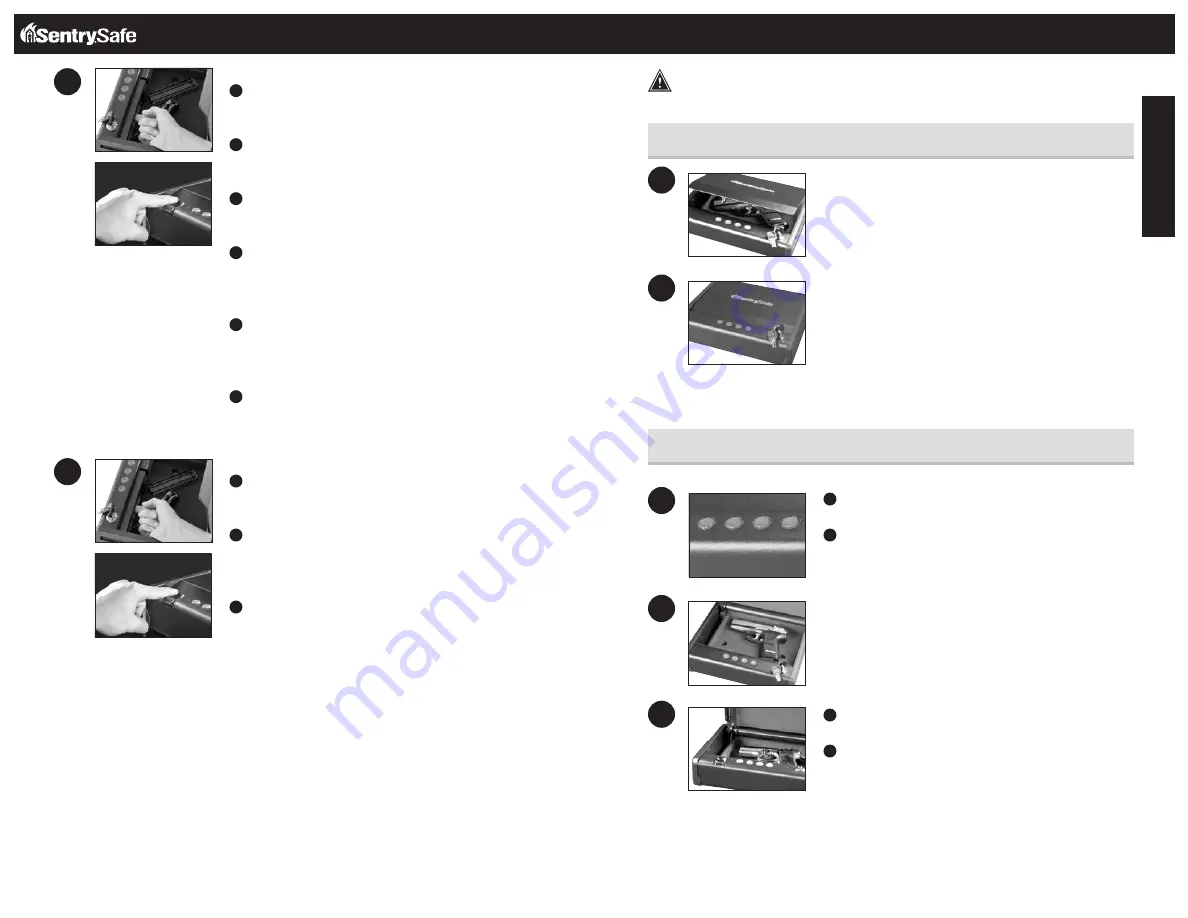
To Program Secondary User Fingerprints  

A

   Press and hold the Reset button until the keypad flashes 3 

times. The LEDs remain on to indicate it is ready to accept 
a new Primary User fingerprint.   

B

   Press and hold the Reset button again, until the Green LED 

and the keypad flash 3 times. The LEDs remain on to indi-
cate it is ready to accept a new Secondary User fingerprint. 

C

   Swipe the first finger across fingerprint scanner. You will 

need to swipe this finger multiple times. The LED light will 
flash green once for each valid scan.   

D

   When the enough valid scans have been done (usually 

5-10 scans) the LED light will flash green three times. 
There is a slight delay before the fingerprint is enrolled and 
the LED flashes green 3 times. 

E

   After enrolling your first finger, immediately swipe your 

second finger across the fingerprint scanner. You will need 
to swipe this finger multiple times. The LED light will flash 
green once for each valid scan.

D

   When the enough valid scans have been done (usually 

5-10 scans) the LED light will flash green three times.

To Erase Secondary User Fingerprints  

A


Press and hold the Reset button until the keypad flashes 3 
times. The LEDs remain on to indicate it is ready to accept a 
new Primary User fingerprint.   

B


Press and hold the Reset button again, until the Green 
LED and the keypad flash 3 times. The LEDs remain on 
to indicate it is ready to accept a new Secondary User 
fingerprint.  

C


Swipe a finger across fingerprint scanner only once, then 
wait 10 seconds.  The Red LED will flash 3 times to indicate 
the Secondary User fingerprints have been erased.   

NOTE:

 • 


The user code or fingerprint programed will not be erased when the battery power is 
removed.

 • 


If you program a four or five digit user code, then you will need to wait 10 seconds until 
your code is accepted. This is only valid during the setup of your safe. If you program a six 
digit user code, then the light will immediately turn green. 

 • 


If the red LED flashes 3 times, programming failed. 

 • 

 For Select Models with Biometric Lock Only:

 Up to two fingerprints can be 

programmed. 

 • 


When you are finished programming your safe, replace the battery pack cover.

Locking And Unlocking Your Safe

Programmable Electronic Lock

 WARNING

Test your code several times before putting valuables inside.  

Close the lid. Once the lid is closed, the safe is securely locked.

NOTE:


The override key needs to be in the locked position. 
Remove and store in a secure location

NOTE:  

When not in use – the safe will go into standby mode. This is a lower power mode. 
Pressing a button or touching the fingerprint scanner will end the standby mode.

A

   Press any button once to bring the safe out of  

standby mode.

B

  Put in your programmed user code. 

 –OR–

Use the override key to gain access to your safe.

 –OR–

For Select Biometric Lock Models Only:

A


Press any button once or touch the fingerprint scanner to 
bring the safe out of standby mode.

B


Swipe a programmed finger.

Locking your safe

Unlocking your safe


1


1


2


2


3


1


2

Summary of Contents for QAP1BE

Page 1: ...Quick Access Pistol Owner s Manual QAP1E QAP1BE...

Page 2: ...ations issued thereunder REGISTRATION www sentrysafe com customercare register_your_product Reasons to register By registering your SentrySafe Product you can easily retrieve forgotten codes and combi...

Page 3: ...ady to accept a new fingerprint B Swipe a finger across fingerprint scanner only once then wait 10 seconds The Red LED will flash 3 times to indicate the Primary User fingerprints have been erased Wri...

Page 4: ...o accept a new Secondary User fingerprint C Swipe a finger across fingerprint scanner only once then wait 10 seconds The Red LED will flash 3 times to indicate the Secondary User fingerprints have bee...

Page 5: ...own Instructions Bolt down kit contents 2 Lag screws 2 Washers Tools needed to bolt safe to a surface Drill Wrench 9 32 7 2 mm drill bit for drilling into wood 3 8 9 5 mm drill bit for drilling into m...

Page 6: ...turday or Sunday However those orders will not be processed until the following business day Our Customer Service center is open Monday through Friday 8 00 a m until 6 00 p m E S T Customer Service ho...

Page 7: ...12 Manuel du propri taire Coffre de s curit acc s rapide pour armes feu Fran ais QAP1E QAP1BE...

Page 8: ...REGISTREMENT www sentrysafe com customercare register_your_product Raisons pour enregistrer le produit En enregistrant votre produit SentrySafe vous pourrez facilement r cup rer vos combinaisons oubli...

Page 9: ...jusqu ce que le clavier clignote 3 fois Les t moins DEL restent allum s pour indiquer que le syst me est pr t accepter une nouvelle empreinte digitale B Faites glisser votre doigt sur le lecteur d emp...

Page 10: ...votre combinaison de l utilisateur Pour programmer des empreintes digitales secondaires A Appuyez sur le bouton de r initialisation et tenez le en fonc jusqu ce que le clavier clignote 3 fois Les t mo...

Page 11: ...ur des trous d pendent du mat riel utilis et de la surface A R installez le coffre fort au dessus des trous que vous venez de percer B Mettez les vis et les rondelles comme necissit s AVERTISSEMENT Se...

Page 12: ...es ne seront cependant pas trait es avant le jour ouvrable suivant Notre centre du service la client le est ouvert du lundi au vendredi de 8 h 18 h heure normale de l Est Les horaires du service la cl...

Page 13: ...24 R pido acceso seguro Pistola manual del due o Espa ol QAP1E QAP1BE...

Page 14: ...emitidas en virtud del mismo Gracias por su compra de un producto SentrySafe SentrySafe tiene el compromiso de asegurar organizar y proteger sus documentos art culos de valor y recuerdos m s valiosos...

Page 15: ...e 3 veces Las luces LED permanecen encendidas para indicar que est listo para aceptar una nueva huella dactilar B Pase el dedo por el escaner de huellas dactilares solo una vez luego espere 10 segundo...

Page 16: ..._your_ product para almacenar su c digo de usuario Para programar huellas dactilares de usuario secundario A Presione y mantenga el bot n de reincio hasta que el teclado parpadee 3 veces Las luces LED...

Page 17: ...agujeros marcados en la superficie Taladrar los agujeros en la superficie con el di metro apropiado y profundidad para el tipo de hardware y montaje en superficie que se utiliza A Sustituya la caja fu...

Page 18: ...tante esos pedidos no se procesar n sino hasta el siguiente d a h bil Nuestro Servicio de Atenci n al Cliente est abierto de lunes a de 8 00 a m a 6 00 p m hora del este Los horarios de atenci n al cl...

Page 19: ...r 585 381 2940 Tel fono 585 381 4900 Servicio a clientes 1 800 828 1438 8 00 am 6 00 pm hora del Este lun vier Fax 585 381 2940 Model No Mod le N Modelo No Serial No N de s rie No de serie Dial Combin...

Reviews: