“INTERCONNCT” (orange) wire.
If doing so, it will damage the detector.
7. Line up the slot of the bracket and the detector. Push the detector onto the
mounting bracket and turn it clockwise to fix it into place. Pull outward on
the detector to make sure it is securely attached to the mounting bracket.
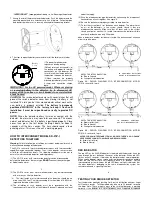
8. The steps to open the battery cover and to install the battery are listed as
follows:
(1)To power Smoke detector
requires an alkaline battery.
(2)Match terminals on the end(s) of
the battery with opposite terminal
connections on the detector. Be
sure to insert the alkaline battery in
the position shown on the detector.
(3)
When terminals are properly
matched, push battery firmly in until
it snaps and cannot be shaken
loose.
IMPORTANT: For the AC powered model- Whenever placing
or removing battery in the detector, try to disconnect AC
power at the fuse box or circuit breaker to avoid electrical
shock hazard.
CAUTION:
This smoke detector comes with cover latches that will
prevent the smoke detector cover from closing if battery is not
installed. This tells you that the smoke detector will not work until a
new battery is properly installed.
The battery is purposely
positioned WRONGLY in the factory to keep it fresh until
installation. It must be re-positioned correctly to provide DC
power.
NOTE:
When the detector battery first makes contact with the
detector, the alarm horn may sound for one second. This means
normal and indicates that the battery is positioned properly. Close
cover, then press the test button, holding it down for about 5
seconds until the horn sounds. The horn should sound a loud,
pulsating alarm. This means the unit is working properly.
HOW TO INTERCONNECT MODEL SD-218*-I
DETECTORS TOGETHER
Warning:
Failure to follow the installation instructions below could result in
malfunction and damage to the detector.
The SD-218 series with I mark smoke detectors means with "interconnection"
capability may be connected together. Then, if one detector senses smoke,
all of them will sound their alarms. The following conditions must be met to
ensure the interconnected detectors working properly:
(1) The SD-218 series with I mark smoke detector can be interconnected
only to other detectors of the same type.
DO NOT
connect to any other type
or model smoke alarm.
5
(2) The SD-218 series with I mark smoke detectors may be interconnected
with as many as 38 other detectors.
(3)
The total length of wire interconnecting the detectors should be no
more than 1000 feet. The interconnecting wire should be #18 AWG or
larger and be rated at least 300V.
(4) The installation of such detector must be in accordance with the
requirements of Article 760 of the National Electrical Code and any local
codes that apply.
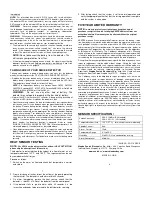
(5) Wire the interconnection type detectors by connecting the interconnect
connectors on all units together. See figure 9.
(6) Be sure the batteries are properly installed for each detector.
(7) To test the system, push test button on each detector. The alarm horns
on all of the detectors in the system should sound if they are
interconnected correctly. Make sure that all other units in the system
sound an alarm as each unit is tested. Interconnect the detectors within
one family residence area only. Otherwise,
when a detector in another residence is tested, the occurrence of nuisance
alarms may take place.
Figure 9.A: WIRING DIAGRAM FOR INTERCONNECTION MODEL
SD-218 series with I mark
Figure 9.B: WIRING DIAGRAM FOR INTERCONNECTION MODEL
SD-218-A series with I mark
RED INDICATOR
The red LED, as the ALARM indicator, is featured with the detector. It can be
seen through the test button on the cover of the detector. When red LED
flashes once 32 seconds, it indicates the detector under normal operation.
When smoke detector senses smoke and simultaneously sounds an audible
alarm, the red LED will flash very frequently, once 0.67 seconds. For the
interconnected system, whereas the red LED does not light, it indicates that
the other detector(s) belonging to the same interconnection system has
sensed smoke and is signaling the alarm.
6
TESTING YOUR SMOKE DETECTOR
Test the detector weekly by pushing firmly on the test button with your finger
until the horn sounds. Testing method may take up to 20 seconds to sound
the alarm horn. These are only ways to be sure that detector is working
correctly. If the detector fails to test properly, have it repaired or replaced
TO ADDITIONAL DETECTORS
MAX. OF 38 INTERCONNECTED
Battery
Cover
NOTES FOR INTERCONNECTION:
Brown to Hot (Live)
Blue to Neutral
Orange to Interconnection
NOTES FOR NON-INTERCONNECTION AC MODELS, THERE’S NO “ORANGE”
WIRE, PLEASE CONNECT ONLY BLUE AND BROWN WIRES.
Brown to Hot (Live)
Blue to Neutral
NOTES FOR INTERCONNECTION:
Blue to Ground
Orange to Interconnection
TO ADDITIONAL DETECTORS
MAX. OF 38 INTERCONNECTED


