Tools and Preferences
87
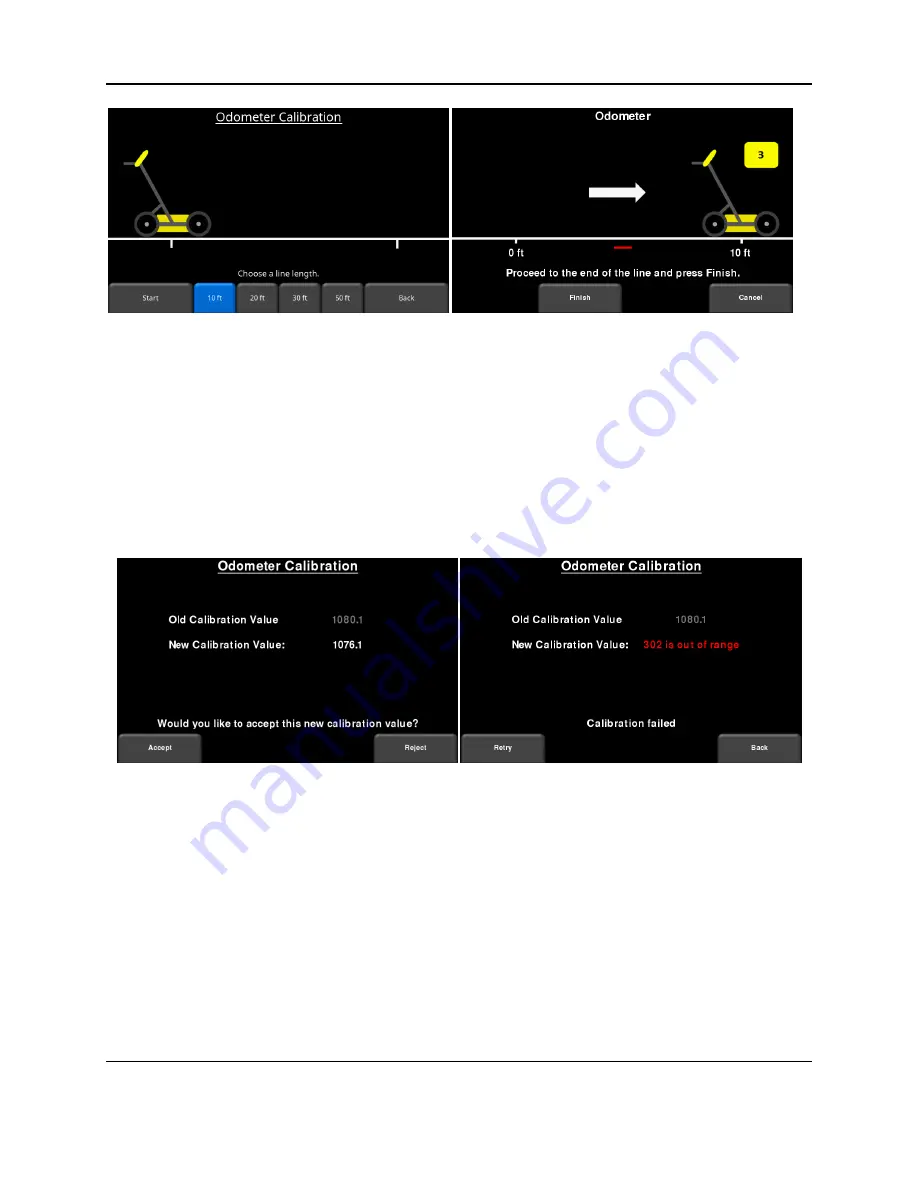
Figure 5-25: Odometer Calibration. Image on the left shows the screen where the user must select a distance. The
image on the right instructs you to move that distance then press Finish.
Upon completion, it will display one of the screens shown in Figure 5-26. The new
calibration value is shown, along with a message asking if you would like to accept this
new value. Press
Accept
to save it, or
Reject
to revert to the old value.
If the value is very different from the expected value, the calibration will fail, and it will
display an error message in red. You then have the option to
Retry
or exit by pressing
Back
. If you exit this menu, the old calibration value is maintained.
Figure 5-26: Results of Odometer Calibration. Image on right shows a failure, as calibration is way out of range
•
Manual
– Pressing this button changes the bottom menu, allowing you to manually
insert a calibration value. This can be done using the buttons along the bottom of the
screen to increase or decrease the calibration value (Figure 5-27).
Summary of Contents for pulseEKKO
Page 1: ...2005 00040 09 ...
Page 2: ...ii ...
Page 4: ...Warranty Confirmation iv ...
Page 10: ...x ...
Page 14: ...Introduction 2 ...
Page 72: ...Assembling Full Configurations 60 ...
Page 80: ...Getting Started 68 ...
Page 116: ...Tools and Preferences 104 ...
Page 180: ...Collecting Data 168 ...
Page 190: ...Map View 178 ...
Page 198: ...Managing Data 186 ...
Page 221: ...Care Maintenance 209 ...
Page 222: ...Care Maintenance 210 ...
Page 226: ...Technical Specifications 214 ...
Page 228: ...Appendix A 216 ...
Page 234: ...Appendix B 222 ...
Page 236: ...Appendix C 224 ...
Page 238: ...Appendix D 226 ...
Page 246: ...Appendix E 234 ...
Page 248: ...Appendix F 236 ...
Page 250: ...Appendix G 238 ...