background image

1

1

2

2
3

Note

:

1.

2.

3.


When inserts the disk into CD player or takes out the disk, it is necessary to let CD player insert disk and return 

   automatically. It is prohibited to push or take out the disk by hand before the disk completely return from CD player, 
   thus will cause the machine to be broken down and unable to operate normally.

When using the remote controller, the remote controller shall be appointed to the receiving hole of face plate.  The 

   optimal receiving distance is 3 meters.  (the available distance is

 5 

meters

.)  

The


batteries

 ( 

model


CR

2025 3

V

shall


   be


put


into


the


remote


controller

.

Battery


installation of remove controller. 

        Press and hold the tenon located on lower left-hand corner of the rear remote  controller, pull out the battery set by 
        the slot at the right.
        Place the battery

positive electrode faces upwards

according to its correct  polarity.

        Push the battery compartment back to the fixed position.

USB

1.

2.

SD/MMC CARD

1.

2.

Insert USB


into the insert hole of USB


in


the


face


plate

If don't need to use USB, may take it off directly.

Press SD / USB / CD or SD / USB / CD on the remote controller. Selects USB


then


press


PLAY / PAUSE 

    or          on the remote controller to playing.   
    As for other playing operation way, please refer to the operation way in 


PLAYING 


and 


THE FUNCTIONS RESPECTIVELY ON THE REMOTE CONTROLLER

.

Insert SD Card or MMC Card into the insert hole of SD/MMC CARD in the face plate.  Pull the card to get 

    stuck with the tenon.  It then finished the assembly.  When taking out the card, please push the card to the 

    bottom and then release to shout it out.  Please don

'

t use the force to pull it out.  If so, it will damage the card 

    and the machine.

Press SD / USB / CD or SD / USB / CD on the remote controller. Selects SD then press PLAY / PAUSE or


on


the


remote


controller


to playing.


    As for other playing operation way, please


refer


to


the


operation


way


in


PLAYING 


and


  THE FUNCTIONS RESPECTIVELY ON THE REMOTE CONTROLLER

.


RAN

RAN”

REP

REP”

      :
      :
      :
       

“A

B”

“A

B”

“A

B” 

              “A

B” 

“A

B”


A random selection is played from alive labile tracks

Press

  "


and LCD it


shows


SHUFFLE. 

           Then press            or            can selection from alive labile tracks.

Repeat mode. 

1

Play the ordinary CD ROM

Press


once


LCD


it


shows


REPEAT


ALL

 : 

Repeat


by


the


songs


in


all

 Press


again


LCD


    it


shows


REPEAT

 1 : 

Repeat


by


the


song


in


the


folder

Press the 3rd time, LCD display will eliminate the word 

     REPEAT

and


cancel Repeat Playing function.

2) 

To play MP3 form

Press each “


key a time

it


will


change


to “REPEAT


ALL

“REPEAT FOLDER”

    “REPEAT


1

"

the last to cancel


Repeat Playing function.


“REPEAT FOLDER”

Repeat all the songs in the folder.

To next track.
Skip to the former track.
ON / OFF Mute.

confirmation

Execution.

It is the zone memory function. During Playing State

press


A point will start to memorize.  Press 


again to memorize B point, and stop memorizing at the same time, and start repeating playing point 


Memory Zone. Press again to cancel  

 Function.

", 

18

19

20
21

22

23

24

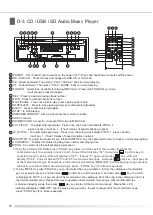
D-3. CD / USB 


Player

/ SD Audio Music


POWER


SD / USB / CD

FB

F.F

FOLDER 

REV

F.WD

PLAY/PAUSE

STOP/EJECT

EJECT

STOP

.

SD/MMC CARD


LO

 ( 

PITCH

 )

HI 

PITCH

 )

NOR/PITCH :
LCD

PROG

PROG”

PROG”


2

)

PROG”

PROG”

ON 

Press


Power


to switch


on


the


power

OFF

 / 

Press and hold Power


to switch off the power

.

Press this key will changed to USB, SD or CD mode.

Select backward.


Then


press

 “ 

PLAY

 / 

PAUSE 

“ 

back


to


normal


playing

.

Select forward.


Then


press

 “ 

PLAY

 / 

PAUSE 

“ 

back


to


normal


playing

.

Select


files

Available for playing DM3 format

Press each FOLDER


key


a


time

                    it


will


change


to


next catalogue.

Press to desired previous track number.

Press to desired next track number.

Press once stat to play, press again pause to stop.

Press to stop playing and press to disk ejected gradually.

press to disk ejected gradually.

to stop playing

INFRARED WINDOW

Pick up signal from the remote controller.

USB Connector.

Connector

Accepts


SD


Card


and


MMC


Card

.

To adjust slow-speed play.


Press


once

the


screen


will


indicate


PITCH

: -1, 

                     press


one


time

,

 it


will


be

 -1.  

It


has

 10 

steps


of


speed


variation. (option)

To adjust high speed play. 


Press


once, the screen will indicate PITCH: 1, press one time,

                        it will be +1.  It has 10 steps of speed variation. (option)

To adjust the speed to zero. Press NOR/PITCH key, the speed will be zero to back to normal play.(option)

 DISPLAY

Display CD status including track number and playing time.

Can memorize the self-set playing procedure.  

1

Play the ordinary CD ROM, press

 "


key a time, and then select the number 0~9 from the 

     combination key, for example: press 2 and 3, then LCD will display "23", then press 


Confirm


key to 

     complete memory setup

LCD


will


display "23:01".  If press

 "5" 

again

and


press


key, LCD will 

     display "05:02", and so it has set "23" and "05" as memorized songs.  And press 


play


key, it will play all 

     of the memorized songs.  Meanwhile, LCD indicator will display "MEMORY" and the


playing song numbers.  

     If want to cancel all of the memorized songs, press 

 "


key for 2


times


repeatedly

.

To play MP3 form, press 

"


key once, and select the song numbers 0~9 from the catalogue of combination 

    key, for example: press 2 and then press 


Confirm


key

and


then


press 3, and then press    


key, then LCD 

    will display 02 03:01", so it has set up 02 as memorized in the catalogue, 03 is the song in the catalogue and 01 is 

    the first memorized song.  Repeat this way to operate and


memorized


more


songs

.  

After


confirmation


the


   memorized


playing songs, then press 


play


key


to


play


all


the


memorized


songs

.  

Meanwhile

LCD


   indicator


will


display

 "

MEMORY

and


the playing song number.  If want to cancel all of the memorized songs, 

    press 

"


key for 2


times


repeatedly

1

1
2

2

3

4
5

6
7
8
9

9a

9b

10

11

12

13

14

15
16


S

H

U

F

F

L

E

R

E

P

E

A

T

C

D

M

P

3

A

L

L

1 F

O

L

D

E

R

B

A

P

R

O

G

R

A

M

1 2 3 4 5

6 7 8 9

10

11

12

13

14

15

16

17


2

3
4

5

8

9a

9b

13

14

15

18
19

20
21

22

23

24

17

09

08

Multipurpose Wireless Microphone Digital Class-D PA Speaker System

Summary of Contents for EP-2001G series

Page 1: ...al Class D PA Speaker System EP 700 EP 800 EP 810 EP 900 EP 2001G Series Owner s Manual S H U F F L E R E P E A T C D M P 3 A L L 1 F O L D E R B A P R O G R A M R E P E A T A L L 1 B A AC V 100 240 OFF ON FOLDER STOP EJ POWER REP SHU disc ...

Page 2: ......

Page 3: ...ntroduction Thank you for choosing Multipurpose Wireless Portable PA Amplifier System In order to perform at its best before operating the unit please read this manual thoroughly and retain it for future reference Please save this manual The unit has an elegant design with a rugged and durable case reliable performance water resistance with fiber material unusual PCB device clear and powerful soun...

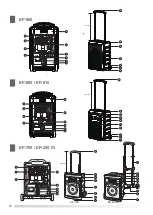
Page 4: ...R REP SHU disc EP 800 EP 810 S H U F F L E R E P E A T C D M P 3 A L L 1 F O L D E R B A P R O G R A M R E P E A T A L L 1 B A D 13 14 10 11 12 D 13 14 10 11 12 S H U F F L E R E P E A T C D M P 3 A L L 1 F O L D E R B A P R O G R A M R E P E A T A L L 1 B A 55cm H 6 3 6C 6B EP 700 EP 2001G 6A 3 ...

Page 5: ...t For tripod stand and rotation 360 degree to enhance the acoustic fidelity 10 Power On Off On power start 0 Off power off please turn off electricity when no use 11 AC Power Input Meet with international voltage 90v 264v 12 Lead Acid Battery Instruction For changing Battery To take out 2 pieces of screws and remove batteries plates from main panel board and take batteries out Please note to follo...

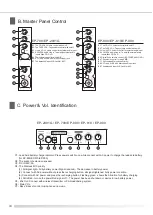
Page 6: ...d The decrease in battery power 2 Connect with AC power without press the recharging button all signal lightened Fully power condition 3 Connect with AC power and press the recharging button Flashing green shows the Situation for battery charging 4 Solid Red turn on the power Red signal off The power has been shut down or device in low battery power C5 Mix Out Connect with wireless transmitter or ...

Page 7: ...i clockwise to reduce volume and switch off For EP 700 800 810 900 Multipurpose Wireless Microphone Digital Class D PA Speaker System T 2 Tape Location of Controls T1 EJECT MODE To slot TAPE or draw it out T2 DIGITAL COUNTER 4digit LCD counter with back light T3 RESET MODE Reset the 4 digit counter T4 SPEED ADJUSTMENT Fast to play mode T5 PLAY MODE SELECTOR T6 FAST FORWARD PLAY MODE F WD Fast forw...

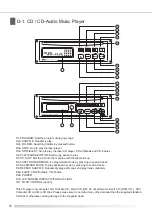
Page 8: ...D6 FAST FORWARD MODE To play forward mode by pressing to search tracks D7 BACKWARD MODE To play backward mode by pressing to search tracks D8 REPEAT SHUFFLE Repeatedly play edit songs and play tracks randomly D9a EJECT CD Withdraws CD inhales D9b POWER D10 LCD SCREEN DISPLAY WITH BACK LIGHT D11 PITCH CONTROL option This CD player only accepts 12cm Disk like CD_R and CD_RW Do not attempt to insert ...

Page 9: ... Digital Audio Recorder Player System 07 Enter n 12 Multipurpose Wireless Microphone Digital Class D PA Speaker System Above specifications fit with upcoming new products and may be changed without notice ...

Page 10: ...y CD status including track number and playing time Can memorize the self set playing procedure 1 Play the ordinary CD ROM press key a time and then select the number 0 9 from the combination key for example press 2 and 3 then LCD will display 23 then press Confirm key to complete memory setup LCD will display 23 01 If press 5 again and press key LCD will display 05 02 and so it has set 23 and 05 ...

Page 11: ... CARD in the face plate Pull the card to get stuck with the tenon It then finished the assembly When taking out the card please push the card to the bottom and then release to shout it out Please don t use the force to pull it out If so it will damage the card and the machine Press SD USB CD or SD USB CD on the remote controller Selects SD then press PLAY PAUSE or on the remote controller to playi...

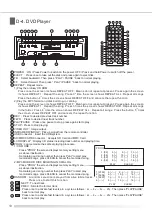
Page 12: ...Press to stop playing Image output INFRARED WINDOW Pick up signal from the remote controller Connector Insert the USB system Connector Accepts SD Card and MMC Card DISPLAY Display CD status including track number and playing time can memorize the self set playing procedure CD MODE Press the screen displays memory setting menu as above illustraction Set catalog and song number then press PLAY to st...

Page 13: ...r VCD disk Swap Channels Left Right Channel and Mono selection 21 31 25 22 32 26 35 23 33 27 37 24 34 28 29 30 11 Multipurpose Wireless Microphone Digital Class D PA Speaker System 1 1 2 2 3 Note 1 2 3 When inserts the disk into CD player or takes out the disk it is necessary to let CD player insert disk and return automatically It is prohibited to push or take out the disk by hand before the disk...

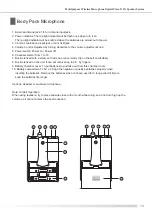
Page 14: ...2 piece or 1 2 x 2 piece H4 Channel switch from 1 to 16 H5 Battery indicator This red light indicator flashing when the batteries are almost out of power H6 Power switch on off Control microphone power Note Remove the batteries if you do not plan to use the unit for a long period of time Please turn it to off Body Pack Microphone A Lavaliere microphone B Headset microphone H1 H2 H3 H4 H5 H6 ...

Page 15: ...le is fixed with a screw so that is can conveniently clip on the belt comfortably 8 Buckle is fixed on the unit It can set revolved up to 90 by fingers 9 Battery chamber cover To put batteries in and take out from this chamber cover 10 Battery compartment 1 5V x 2 Align the negative or positive polarities properly when inserting the batteries Remove the batteries when not been used for a long peri...

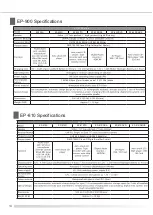
Page 16: ...S 150W Class D Digital Amplifer Syster High Efficiency 2 EP 810 Specifications EP 810A EP 810D EP 810 TD EP 810 DRA EP 810 DVD EP 810 DMUS EP 810 Series 2 UHF 600 960MHz UHF863 865MHz 12V 5Ah 2pcs for microphone as 1 2V 1 3Ah x4pcs UHF 600 960MHz UHF863 865MHz RMS 120W Class D Digital Amplifer Syster ...

Page 17: ...2001G Series EP 700A EP 2001GA EP 700D EP 2001GD EP 700TDM EP 2001GTDM EP 700DAR EP 2001GDAR EP 700DVD EP 2001GDV EP 700DMUS EP 2001GDMUS 2 EP 800 Specifications EP 800DVD 2 UHF 600 960MHz UHF863 865MHz RMS 100W Class D Digital Amplifer Syster UHF 600 960MHz UHF863 865MHz RMS 100W Class D Digital Amplifer Syster ...

Page 18: ...e Note on Unit 1 No altering or remodeling this can cause malfunctioning 2 No dropping or strong impacts this may damage the unit 3 Do not leave the unit exposed to direct sunlight for long periods of time 4 Do not use trolley on the ragged ground and avoid any damage Technical service www ecen com tw Troubleshooting And Maintenance Guide Chanel Specifications Micphone Specifications Frequency ran...

Page 19: ...er or peripheral devices Warning Explanation Of Graphical Symbols The lightning flash with arrowhead symbol within an equilateral triangle is intended to alert the user to the presence of uninsulated dangerous voltage within the products enclosure that may be of sufficient magnitude to constitute a risk of electric shock to humans The exclamation point within an equilateral triangle is intended to...

Page 20: ...LECTRONICS CO LTD SENRUN ELECTOINICS CO LTD No 26 13 1 Fongle Road Beitun District Taichung City 40673 TAIWAN TEL 886 4 2422 3369 FAX 886 4 2422 4360 e mail ecen ms8 hinet net http www ecen com tw Distributor ...

Reviews: