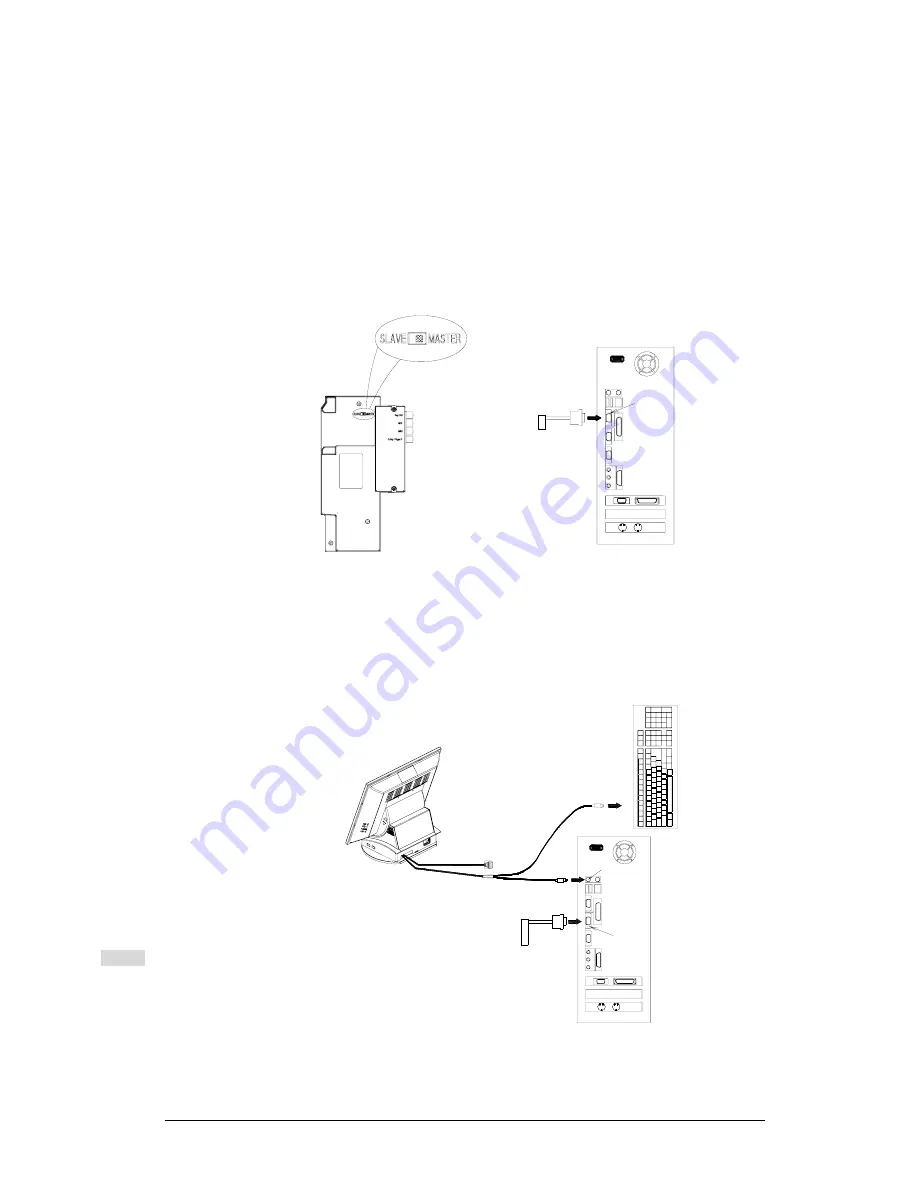
background image

 13 


(5) If


any of i-Button, MSR, 40 Key Keypad are incorporated in the 4-1 

Modular Device, then a keyboard wedge Y cable will be supplied. 
The Keyboard Wedge Y cable provides the option to connect an 
external PC standard keyboard. 


If you do NOT wish to connect an external keyboard, set your 40 
Key Keypad as MASTER. Then connect the other end of PS2 K/B 
cable directly to the PC’s PS2 Keyboard port and disregard the 
Keyboard Wedge Y Cable.   


VF
D

RS232 PORT


If you wish to connect an external PC standard keyboard, set the 
40 Key Keypad as SLAVE and use the Keyboard Wedge Y cable. 
Connect one end of Keyboard Wedge Y cable to the PC’s PS2 
Keyboard port and the other end of Keyboard Wedge Y cable to 
the external PC standard keyboard. 


IC CA

RD

PS/KB

RS232 PORT


NOTE: Please make sure that the 

40 Key Keypad is set to 
SLAVE when you wish to 
connect the AMON with 
an external keyboard.


Summary of Contents for AMON-15E

Page 1: ...A AM MO ON N 15 LCD MONITOR User s Manual...

Page 2: ...the user s authority to operate the product Do not attempt to disassemble or modify this product all servicing should be carried out by qualified personnel and should conform to all local codes Do not...

Page 3: ...apter 12V 3A do not use any other type of adapter to operate the product only use the manufacturer s supplied adapter Regularly check that power and data cables are undamaged and all connections are f...

Page 4: ...al Mounting Power Connection 7 3 3 LCD viewing angle adjustment 8 3 4 Power On 8 3 5 On Screen Display Setting 9 4 Installation of Optional Devices 10 4 1 VFD customer display 10 4 2 4 1 Modular Devic...

Page 5: ...rd Reader MSR Smart Card Reader IC Card iButton Dallars Key Finger Print Sensor RFID Keypads and other I O Devices The AMON s distinctive and clever design is suited to a wide range of applications su...

Page 6: ...5 Optional devices such as VESA standard mounting bracket or arm Customer Display Magnetic Card Reader Smart Card Reader iButton Finger Print Sensor RFID Keypads and other I O Devices are available...

Page 7: ...er Switch LCD Panel 2 2 Rear View 1 With Base and I O cables OSD LCD UP DOWN SW I O CABLE AC Inlet 2 3 Rear View 2 Base removed showing locations of plugs and sockets IC CARD DC INPUT VFD Touch Finger...

Page 8: ...Optional Mounting Power Connection 1 Unscrew the two screws behind the LCD panel 2 Separate the LCD panel from the base unit by lifting the LCD panel 3 Connect all AMON I O Cables to PC 4 Connect the...

Page 9: ...as required until the optimum viewing angle is found or the LCD reaches its maximum or minimum limit 3 4 Power On The Power Switch is located at the mid bottom of front panel where the logo is To tur...

Page 10: ...n or similar to depress the buttons DO NOT USE A PENCIL OSD secured button functions AUTO LCD will automatically adjust to optimal settings Up movement and increase adjustment for the selected paramet...

Page 11: ...VFD position the VFD over the LCD so that he VFD RJ45 plug mates with the RJ45 socket on the LCD After the VFD has been placed properly use two M3 10 screws to secure it to the AMON 3 Connect VFD cab...

Page 12: ...sembly Steps 1 Remove the 4 1 Modular Device blank from the side user s right hand side of LCD panel to reveal four RJ 45 sockets 2 The 4 1 Modular Device has four RJ 45 plugs these plugs mate with th...

Page 13: ...e other end of IC card RS 232 cable to the PC s RS 232 port VFD RS232 PORT 4 If the 4 1 Modular Device includes the i Button MSR and or 40 Key Keypad and you also intend to operate the monitor without...

Page 14: ...of PS2 K B cable directly to the PC s PS2 Keyboard port and disregard the Keyboard Wedge Y Cable VFD RS232 PORT If you wish to connect an external PC standard keyboard set the 40 Key Keypad as SLAVE...

Page 15: ...nscrew the two screws behind the AMON unit 2 Take the base unit out of monitor unit and leave only front panel unit 3 Use four M4 screws to lock and fix the AMON front panel onto any VESA standard mou...

Page 16: ...erface that has been used automatically however only one interface can be accepted and USB interface takes precedence After you have connected all relative cables between the AMON and PC install the t...

Page 17: ...face 1 Connect the RS 232 touch cable s connector to the I O port touch RS 232 connector socket on the back of the unit 2 Connect the other end of the RS 232 touch cable to the RS 232 port of the PC T...

Page 18: ...d PC install the touch driver from the included driver CD The touch function will then be ready for use 3 Connect the RS 232 touch cable s connector to the I O port touch RS 232 connector socket on th...

Page 19: ...ble is correctly connected secured to both the AMON the PC Make sure the RS 232 port of the PC is functioning normally Make sure the touch driver is properly installed 6 4 No function of i button MSR...

Page 20: ...ve ELO Touch Resistive 5 Wires Serial USB FUJI Touch Resistive 7 Wires Serial only Speaker 1 5W 8 X2 R L Power Consumption 36W Max Power Supply Internal Input AC 100 240V 47 63HZ 1A Max Output DC 12V...

Reviews: