background image

SL MCR DW

2

SL MCR DW

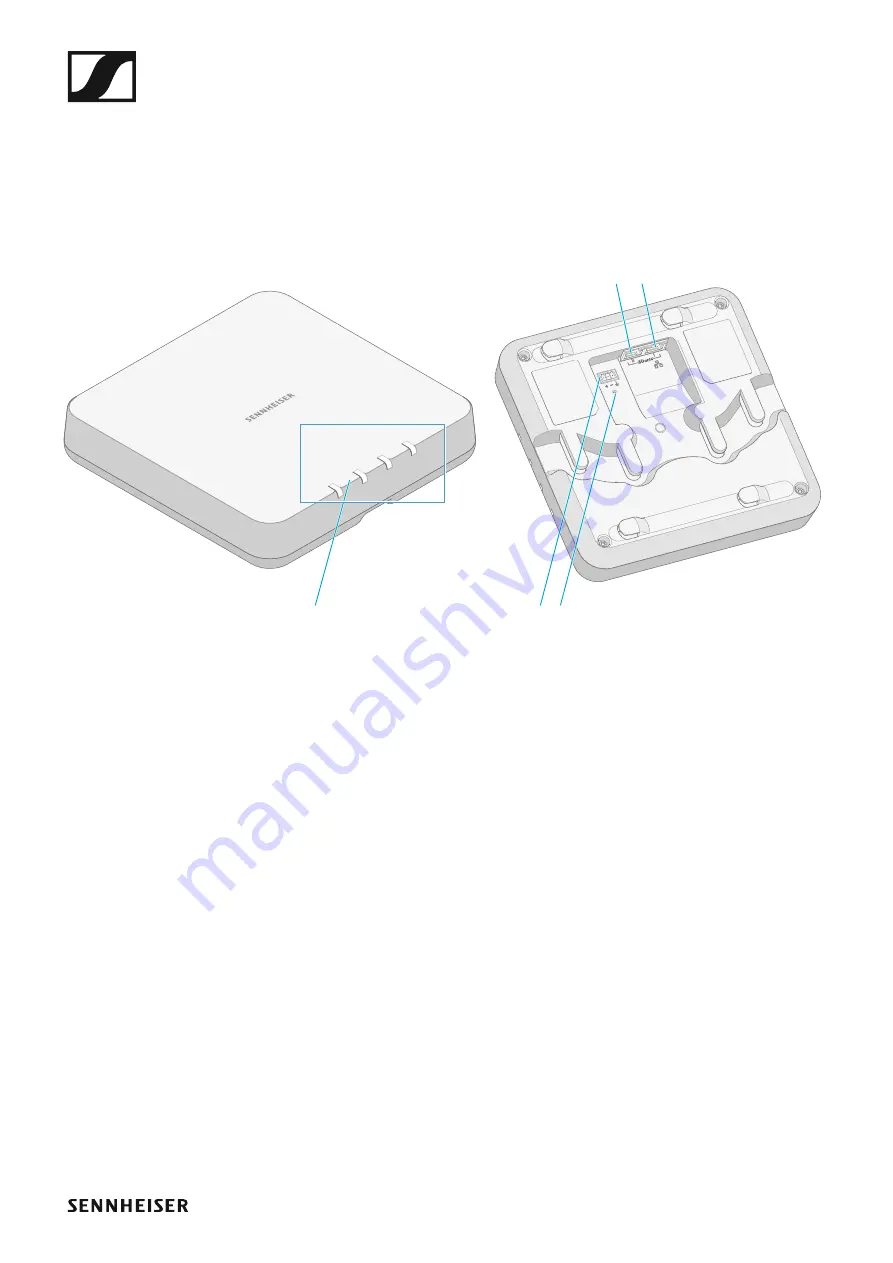
Product overview and operating elements

1

Status LEDs

• See „Meaning of the status LEDs“

2

Analog Out

 3-pin socket

• Analog audio output (see „Connecting the receiver“)

• Suitable for Phoenix Contact MCVW 1.5-3-ST-3.81

3

Reset button

• To restore the factory settings

• Hold  for  5  seconds

4

Dante I

 RJ-45 socket

• Digital audio output (see „Connecting the receiver“)

5

Dante II / PoE / Ctrl

 RJ-45 socket

• Digital audio output (see „Connecting the receiver“)

• PoE supply (Power over Ethernet) (see „Putting the receiver into op-

eration“)

• Configuration via the software or a media control system (see „Con-

trolling and monitoring the receiver via the network“)

Analog Out

PoE

/Ctrl

Rese

t

1

2 3

4

5

Front

Back

Summary of Contents for SL MCR DW

Page 1: ...n To restore the factory settings Hold for 5 seconds 4 Dante I RJ 45 socket Digital audio output see Connecting the receiver 5 Dante II PoE Ctrl RJ 45 socket Digital audio output see Connecting the receiver PoE supply Power over Ethernet see Putting the receiver into op eration Configuration via the software or a media control system see Con trolling and monitoring the receiver via the network Ana...

Page 2: ...tal audio signals are output via the Dante interface with two RJ 45 sockets This interface is also used for control and configuration via the network and for Power over Ethernet supply The following variants are possible PoE network control digital audio PoE network control digital audio digital audio PoE network control digital audio Variant 1 Variant 2 Variant 3 ...

Page 3: ... Control Cock pit software see Controlling and monitoring the receiver via the net work In your network you can either use a switch that provides PoE or a PoE injector Analog Out PoE Ctr l Rese t PoE Analog Out PoE Ctrl Reset PoE Ctrl Control Cockpit clients optional optional Control Cockpit host PC opt client Media control client LAN Application example LAN or WiFi Media control server LAN or WiF...

Page 4: ...gnals The interface supports redundant out put Outputting analog audio signals Use the Analog Out socket to output analog audio signals Analog Out PoE Ctr l Rese t Analog Out PoE Ctrl Reset PoE Ctrl Dante DSP Pri Sec PoE LAN LAN Application example Analog Out Analog Out PoE Ctrl Reset Analog Out Reset suitable for Phoenix Contact MCVW 1 5 3 ST 3 81 ...

Page 5: ...hem identify possible hazards and take appropriate safety measures When mounting the product observe and follow all local national and international regulations and standards The receiver can be mounted in the following ways Mounting the receiver on the wall To mount the receiver on the wall you will need the mounting frame sup plied Screws and anchors for mounting the product to the wall are not ...

Page 6: ...ctly The top marking on the mounting frame must not point downwards Otherwise the receiver may fall out and be damaged Insert the receiver into the mounting frame as shown until you hear it click into place to p c e n te r li n e w a ll m o u n t V E S A 10 0 c e n te r li n e top top center line wall mount VESA 100 center line top top center line wall mount VESA 100 center line top top center lin...

Page 7: ...ors that are appropri ate for the particular characteristics of your ceiling Use the included drilling template to mark the drill holes for ceiling mounting Maintain a minimum distance of 1 5 m from the walls Screw the mounting frame to the ceiling using four suitable screws and anchors ce nt er lin e ce nt er lin e t o p c e n t e r li n e w a ll m o u n t V E S A 1 0 0 c e n t e r li n e 1 5 m 1...

Page 8: ...SL MCR DW 9 Insert the receiver into the mounting frame as shown until you hear it click into place t o p c e n t e r l i n e w a l l m o u n t V E S A 1 0 0 c e n t e r l i n e ...

Page 9: ...s suitable for mounting on a standard microphone stand with 3 8 thread Screw the mounting frame onto the microphone stand as shown Insert the receiver into the mounting frame as shown until you hear it click into place t o p c e n t e r l i n e w a l l m o u n t V E S A 1 0 0 c e n t e r l i n e ...

Page 10: ...ame can be mounted on any VESA 100 mount Screw the mounting frame onto the VESA mount as shown using four suitable screws Insert the receiver into the mounting frame as shown until you hear it click into place top center line wall mount VESA 10 0 center line top center line wall mount VESA 10 0 center line Example of a VESA 100 mount ...

Page 11: ...ate the receiver on the device it self See Controlling and monitoring the receiver via the network Controlling and monitoring the receiver via the net work To configure and use the receiver you need the free Sennheiser Control Cockpit control software You can download it here www sennheiser com control cockpit software To use the Sennheiser Control Cockpit you must complete a one time registration...

Page 12: ...of the entire device and not the individual channels all four LEDs SL MCR 4 DW variant or the first two LEDs SL MCR 2 DW variant will light up or flash All LEDs are green Device is starting approx 20 seconds All LEDs are flashing red Device error Details are shown in the Control Cockpit Channel 4 Channel 3 Channel 2 Channel 1 Variant SL MCR 4 DW 4 channels no function no function Channel 2 Channel...

Page 13: ...n the Control Cockpit Status displays for the individual channels The LEDs for each individual channel display status messages for the cor responding radio connection LED is green A radio link to the transmitter is established LED is flashing red An error has occurred in this channel Details are shown in the Control Cockpit SL MCR 4 DW SL MCR 2 DW SL MCR 4 DW SL MCR 2 DW ...

Page 14: ...LED is yellow The received transmitter has been muted with the MUTE switch LED is flashing yellow A firmware update is in progress on the received transmitter LED is flashing green The Identify function for this channel was initiated in the Control Cock pit ...

Page 15: ...ated using the Sennheiser Control Cockpit software You can find more information about this procedure in the software in struction manual in the Sennheiser Documentation app or in the down load area of the Sennheiser website at www sennheiser com download Sennheiser Control Cockpit instruction manual Download area for the Sennheiser website ...

Reviews: