background image

HD 280 PRO

ASSY 160518 R01, Mar 2018, 4/4

3

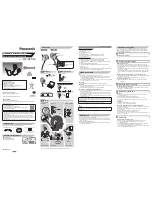
Replacing the earpads

1. Grasp the edge of the earpad [010] and peel it up and away from the cap.
2. Slide the new earpad onto the cap. The edge of the earpad must be tucked completely into the notch.

4

Replacing the headband padding

4.1

Removal

1. Remove the headband padding [010] as shown below.

4.2

Assembly

2. While sitting spread the headband apart thus placing it over your thighs.
3. The headband padding has a zip-lock. Put the new padding [010] around the headband by starting 

to fix it firmly from the centre or the end of the headband position.

4. Ensure that the zip-lock of the headband padding is completely closed as shown above.

010

Summary of Contents for HD 280 PRO

Page 1: ...other than the original parts are used the approval the certification of the device becomes invalid Service and support Special problems may be fixed by our Sennheiser service support center For this please use our Case Management System support sennheiser com Sennheiser ServiceNet users can find additional solutions to any problems via the service support database To apply for ServiceNet access o...

Page 2: ...ide is displayed 010 Acoustic unit Cap 030 Notch Strain relief Lower Screw 18 Ncm 010 Item Designation 010 Padding set for HD 280 PRO 030 Connecting cable See also The spare parts list of this device will be continuously updated in our Sennheiser ServiceNet see page 3 see page 4 see page 4 ...

Page 3: ...verse order Observe the correct cable routing Ensure that the cable will not damaged by the screw dome of the cap Also ensure that the cable s kink protection and the connector PCB are completely even inserted When you put the cap on the acoustic unit a clicking noise is hearable Tighten the lower screw with a torque of 18 Ncm Red Speaker left Copper Speaker left Copper Speaker right Red Speaker r...

Page 4: ... 4 Replacing the headband padding 4 1 Removal 1 Remove the headband padding 010 as shown below 4 2 Assembly 2 While sitting spread the headband apart thus placing it over your thighs 3 The headband padding has a zip lock Put the new padding 010 around the headband by starting to fix it firmly from the centre or the end of the headband position 4 Ensure that the zip lock of the headband padding is ...

Reviews: