background image

Individually adjusting the headset

15 | 

D 10 series

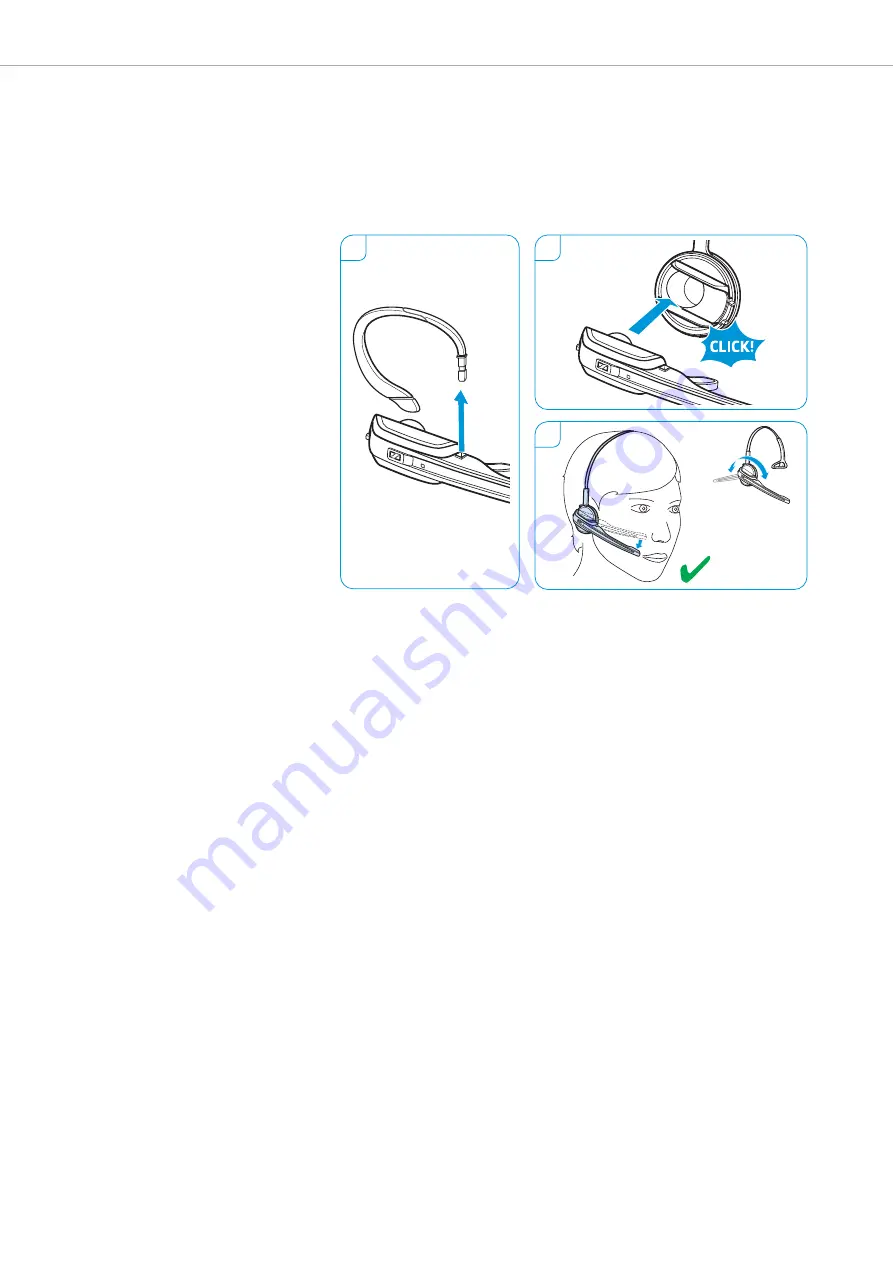
Using the headset with the headband

1

Remove the ear hook by carefully pulling it upwards.

2

Attach the headset to the headset holder of the headband.

3

Rotate the microphone boom and adjust the headset so that the ear
pad rests comfortably on your right or left ear.

1

2

3

Left

Right

Summary of Contents for D 10 BS USB

Page 1: ...D 10 series Wireless DECT headset system Instruction manual ...

Page 2: ... headset with the headband 15 Configuring the headset system 16 Adjusting the headset system using the DIP switches 16 Adjusting the audio signal by means of the dial tone 18 Adjusting the volume of the transmission 19 Adjusting the volume of the ring tone 19 Adjusting the automatic audio transmission Auto Audio 20 Making calls using the headset 21 Adjusting the volume 21 Muting the headset s micr...

Page 3: ...nly use attachments accessories supplied or recommended by Sennheiser 왘 Only clean the product with a soft dry cloth 왘 Unplug the power supply unit from the wall socket to completely disconnect the product from the mains power supply 왘 Do not short circuit the contacts of the product Make sure that no metal objects e g paper clips hair pins earrings come into contact with the interfaces and contac...

Page 4: ...ratures between 10 C 50 F and 40 C 104 F Do not heat above 70 C 158 F e g do not expose to sunlight or throw into a fire Dispose of defective products with built in rechargeable batteries at special collection points or return them to your specialist dealer When not using rechargeable batteries for extended periods of time charge them regularly about every 3 months Only use rechargeable batteries ...

Page 5: ... the product purchased a base station and or a headset with corresponding components Headset with components D 10 BS USB for computer D 10 BS USB ML for computer optimized for Microsoft Lync D 10 BS Phone for fixed line phone A B Safety Guide Quick Guide EU UK US AU D 10 BS USB D 10 BS USB ML D 10 BS Phone Phone USB Safety Guide Quick Guide OR D 10 HS monaural with different wearing styles A B D 1...

Page 6: ...ch row 1 to 6 ABC switch PC socket USB DC IN socket Phone socket Handset socket ACC socket Sticker for DIP switches located underneath the headset holder 쐋 Mic Volume Settings Mode 0 3 6 9 1 A B C 23456 Mic Volume Settings Mode 0 3 6 9 1 A B C 23456 Extra Settings D 10 Phone D H S G M S H S h o rt R a n g e A u to L in k O N N a rr o w b a n d L im it e r F a s t L in k 1 2 3 4 5 6 1 2 3 4 5 6 L o...

Page 7: ...6 9 1 23456 Ring Volume Settings 0 3 6 9 1 23456 Extra Settings D 10 USB R in g to n e R in g to n e OFF 1 2 3 Ringtone S h o rt R a n g e A u to L in k O N N a rr o w b a n d L im it e r 1 2 3 4 5 6 1 2 3 4 5 6 L o n g R a n g e A u to L in k O F F W id e b a n d S ta n d a rd 4 A 9 0 6 7 5 2 3 8 1 1 Headband 2 Headset holder 3 Ear pad 4 Microphone 5 Headset LED 6 Link button 7 Audio button volum...

Page 8: ...n 7 for 5 seconds Switches the headset on off 31 왘 Push the Audio button 8 upwards downwards Adjusts the ring tone volume and the volume of the acoustic signals or the audio volume 21 왘 Press the Audio button 8 Mutes the microphone unmutes the microphone 22 왘 Press and hold the Link button 7 and the Audio button 8 for 5 seconds Changes the direction of the volume up down function of the Audio butt...

Page 9: ...ED white lit Meaning LED segment 1 flashes Rechargeable battery is almost flat LED segments 1 4 are lit Rechargeable battery is charged Headset LED Meaning lights up blue Headset is being charged in the base station flashes blue slowly Active link to the base station flashes red 3 times Rechargeable battery is almost flat is off Standby mode or headset is switched off headset s rechargeable batter...

Page 10: ...nce of 15 cm from the fixed line phone Connecting the base station to the mains power supply 1 Connect the plug of the power supply unit to the DC IN socket marked yellow Connect the power supply unit to a wall socket 2 The Link LED lights up red Disconnecting the base station from the mains power supply 왘 If the product is not used for extended periods of time unplug the power supply unit from th...

Page 11: ...he Handset socket marked gray on the base station 2 Connect the telephone cable to the handset socket on the telephone and to the Phone socket marked green on the base station 3 Use a pointed object e g a ball pen to set the DIP switches 1 and 2 to the position shown Connection possibilities Page Connection to a fixed line phone without headset socket 10 Connection to a fixed line phone with heads...

Page 12: ...handset lifter The Sennheiser HSL 10 mechanical handset lifter is an optional accessory available from your Sennheiser partner The handset lifter allows you to answer calls even when you are away from your desk 왘 Connect the base station to the fixed line phone as described in chapter or 왘 Connect the handset lifter to the ACC socket on the base station 왘 Connect the handset lifter to the fixed li...

Page 13: ...ww sennheiser com cco By way of example of a Siemens and an Alcatel adapter cable the following describes how to connect the base station to an electronic hook switch 1 Connect the base station to the fixed line phone 2 Use a pointed object e g a ball pen to set the DIP switch to the posi tion shown Siemens Agfeo Aastra Auerswald etc Alcatel For an overview of the available connection and adapter ...

Page 14: ...re allows you to add value to your Sennheiser products The Sennheiser Updater for example facilitates easy updating of products with new software For more information visit our website at www sennheiser com cco software Charging the headset before first use Charge the rechargeable battery for at least 20 minutes without interruption before using it for the first time A complete charging process ta...

Page 15: ...adset Using the headset with the ear hook 1 Insert the ear hook into the ear hook slot 2 Pre shape the ear hook by bending it slightly 3 Place the ear hook around your ear 4 Bend the flexible ear hook so that the headset sits comfortably and securely on your ear 1 2 3 4 Left Right ...

Page 16: ...et with the headband 1 Remove the ear hook by carefully pulling it upwards 2 Attach the headset to the headset holder of the headband 3 Rotate the microphone boom and adjust the headset so that the ear pad rests comfortably on your right or left ear 1 2 3 Left Right ...

Page 17: ...peration Lifts hangs up the handset manually or using the handset lifter Sennheiser HSL 10 Electronic hook switch DHSG standard Call control via the headset system For faster link establishment see Fast Link Electronic hook switch MSH standard Call control via the headset system Fast Link for DHSG standard and HSL 10 handset lifter Recommended for frequent callers Shorter battery life Fast link es...

Page 18: ...osition Function Manual link establishment When taking the headset out of the base station you have to manually establish the wireless link between headset and base station Automatic link establishment Auto Link When taking the headset out of the base station a wireless link is automatically established between headset and base station Switch position Function Wideband audio transmission Automatic...

Page 19: ... Put on the headset 2 Press the Link button on the headset The Link LED on the base station lights up blue 3 Lift the handset You hear a dial tone 4 Set the ABC switch to the position A B or C so that you can hear a clear dial tone in the headset Mic Volume Settings Mode 0 3 6 9 1 A B C 23456 1 2 3 4 ...

Page 20: ...imally use the microphone and via your operating system adjust the microphone sensitivity so that the other party can hear you at a comfortable level see the Help function of your operating system Adjusting the volume of the ring tone Adjusting the headset s ring tone volume and the volume of the acoustic signals 왘 Make sure that the headset is in standby mode the Link LED on the base station is o...

Page 21: ... a call or when a connection to Skype or HeadSetup is established the audio transmission stops and you hear for example the ring tone The Auto Audio function is activated by default Deactivating the Auto Audio function 왘 Use a pointed object to press the Set button for approx 5 seconds The Link LED rapidly flashes red several times Activating the Auto Audio function 왘 Use a pointed object to press...

Page 22: ...ar a double beep in the headset Swapping the direction of the volume buttons 왘 On the Audio button check which direction is assigned volume down 왘 Simultaneously press and hold the Link button and the Audio button for 5 seconds The Headset LED alternately flashes blue red 왘 Push the Audio button in the direction volume down until the Headset LED goes off The direction of the volume up down functio...

Page 23: ...ou leave the DECT range In normal office buildings the range between headset and base station is up to 55 m If during a call the audio quality deteriorates or the link breaks down completely you hear a descending sequence of beeps in the headset The Link LED on the base station lights up red 왘 Re enter the DECT range of the base station within 60 seconds You hear a ring tone in the headset 왘 Press...

Page 24: ...o off The headset is in standby mode Managing calls without using a call control functionality Accepting a call You hear the ring tone of the fixed line phone Press the Link button on the headset Lift the handset or press the accept call button on your fixed line phone Making a call Press the Link button on the headset to establish a link between base station and headset Lift the handset and dial ...

Page 25: ...your headset become automatically ready to receive the next call Frequent callers who use an electronic hook switch with DHSG capability are recommended to activate the Fast Link function for faster link establishment see page 15 Switching a call between headset and fixed line phone 왘 Press the Link button on the headset to switch between headset and handset of the fixed line phone during an ongoi...

Page 26: ...p blue and the Headset LED flashes blue slowly OR The link is disconnected The Link LED on the base station and the Headset LED go off The headset is in standby mode Managing calls via the softphone Accepting a call The softphone signals that you are receiving a call You hear a ring tone in the headset Click on Accept call on your softphone Making a call Press the Link button on the headset to est...

Page 27: ... necessary install the software in order to manage calls directly via the headset Accepting a call The softphone signals that you are receiving a call You hear a ring tone in the headset Press the Link button on the headset to accept the call Making a call Start the call using your softphone the audio signal is automatically transmitted to the headset Ending a call Press the Link button If the oth...

Page 28: ...e station The Link LED on the base station is off headset is disconnected or lights up red no headset paired 왘 Place the master headset into the base station The Headset LED alternately flashes blue red until a link to the base station is established The Headset LED flashes blue 3 times 왘 Take the headset out of the base station and press the Link button to connect the headset with the base statio...

Page 29: ...uest headsets to the conference call 왘 Call the other party The Link LED on the base station flashes blue Dropping a GUEST headset from the conference call 왘 Press the Link button on the guest headset The guest headset is dropped from the conference call Ending a conference call 왘 Place the master headset into the magnetic holder of the base station to end the conference call and to drop the guest...

Page 30: ...tation indicates the charge status Shortly before the rechargeable battery is about to run flat only one LED segment lights up weakly The Headset LED flashes red and you hear three beeps You have several minutes of battery reserve When the rechargeable battery is flat the headset switches off LED segment white lit up Required charging time Corresponds to a talk time of Wideband Narrowband approx 1...

Page 31: ...l D 10 series headsets e g for sharing the same base station when working shifts 왘 Refer to the instruction manual of the CH 10 for more information Charging several headsets simultaneously The MCH 7 multi USB power source is an optional accessory available from your Sennheiser partner Together with the CH 10 USB the MCH 7 allows you to charge up to 7 headsets simultaneously 왘 Refer to the instruc...

Page 32: ...t 30 minutes later 2 Press and hold the Link button for 5 seconds to switch off the headset immediately The Headset LED flashes red 3 times the headset is switched off completely The Link LED on the base station lights up red after a short time the Charge status LED on the base station goes off Switching the headset system on and pairing the components 왘 Plug the power supply unit into a wall sock...

Page 33: ...f 1 m from the third party base station 왘 Simultaneously press and hold the headset s Link button and Audio button for 5 seconds The headset switches to a special pairing mode and the Headset LED alternately flashes blue red 왘 Set the third party base station to a special pairing mode see the instruction manual of the third party base station The default code for the headset is 0000 The headset pa...

Page 34: ...and soft cloth to clean the product 왘 Clean the charging contacts of the base station and the charging contacts of the headset from time to time using e g a cotton swab CAUTION Liquids can damage the electronics of the product Liquids entering the housing of the product can short circuit the electronics 왘 Keep all liquids far away from the product 왘 Do not use any solvents or cleansing agents ...

Page 35: ... pads are available from your Sennheiser partner 1 Carefully remove the old ear pad from the ear cup Make sure that the fastening ring of the old ear pad is also removed from the ear cup 2 Pull the collar B of the ear pad over the notch A of the headband 3 Turn the ear pad counter clockwise over the notch until the collar completely surrounds the ear cup 1 3 2 A B ...

Page 36: ...over in the direction of the arrow until you overcome a slight resistance Remove the rechargeable battery and carefully loosen the connector plug of it 3 Insert the connector plug of the new rechargeable battery into the connection socket Observe correct orientation of the connector plug 4 Close the battery compartment CAUTION Damage to the product due to improper handling The cables can be kinked...

Page 37: ...n headset and base station Adjust the radio range 17 Noise interference and connection loss Microphone rubs on the cheek or perhaps the beard Bend the microphone boom so that the microphone is about 0 8 1 2 2 3 cm from the corner of your mouth 14 Too many DECT systems within the radio range Reduce the radio range 17 Set the base station to narrowband transmission 17 Distance between base station a...

Page 38: ...prox 1 hour Range environment dependent free line of sight up to 180 m in office buildings up to 55 m Rechargeable battery built in Lithium Polymer 3 7 V 215 mAh Output power EU AUS 24 dbm 250 mW USA CAN 20 4 dbm 100 mW Speaker type dynamic neodymium magnet Microphone type electret microphone noise canceling Operating temperature range 5 C to 45 C 41 F to 113 F Storage temperature range 20 C to 70...

Page 39: ...1900 MHz 1920 to 1930 MHz SAR value of D 10 HS Ear hook 0 029W kg Headband 0 050 W kg 0 048W kg Europe EMC EN 301489 6 Radio EN 301406 Safety EN 60950 1 SAR EN 50360 ref EN 62209 1 headset Canada IC 2099A D10BSPHONE D 10 BS Phone US D 10 BS USB US D 10 BS USB ML US IC 2099A D10HS D 10 HS USA FCC ID DMOCBDDGG D 10 BS Phone US D 10 BS USB US D 10 BS USB ML US FCC ID DMOCDHDGG D 10 HS ...

Page 40: ... such equipment This will help to protect the environment in which we all live Battery Directive 2013 56 EU The product s built in rechargeable batteries can be recycled In order to protect the environment please dispose of defective products with their rechargeable batteries as special waste or return them to your specialist dealer CE Conformity R TTE Directive 1999 5 EC EMC Directive 2014 30 EU ...

Page 41: ... for devices used by the general public It has been tested for SAR and has complied with Industry Canada SAR limits for devices used by the general public Statement regarding Industry Canada This device complies with RSS 213 Issue 2 of the Industry Canada Rules Operation is subject to the following two conditions 1 This device may not cause harmful interference and 2 this device must accept any in...

Page 42: ...Sennheiser Communications A S Industriparken 27 DK 2750 Ballerup Denmark www sennheiser com Publ 01 15 A02 ...

Reviews: