background image

EN 11

EN

 06/2016

 2016

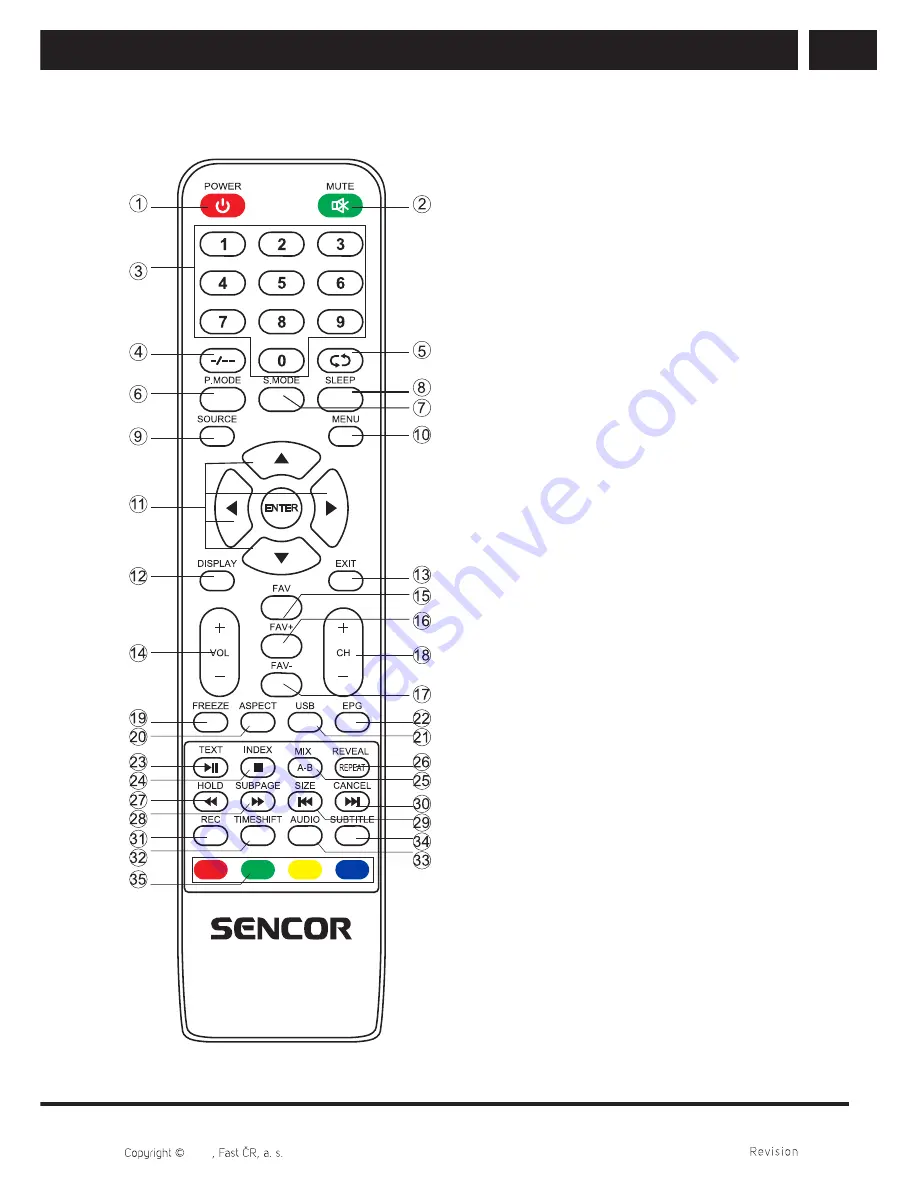
Remote control

4. Remote control

1. POWER 

 button


Turns the television on/from the 
stand-by mode.

2. MUTE 

button


Press to mute the sound. Press is 
again to restore the sound or press 
VOL + button.

3. 

Numerical buttons 0–9


Press 0–9 buttons directly to select 
a TV channel while watching the 
TV. Enter the page number in the 
teletext mode, etc.

4. --/- 

button 


It is used to enter channel numbers 
with various digit counts, e.g. 1 – 11 
– 111.

5.


button


Button to switch the previously 
watched channel.

6. PMODE 

button


Press repeatedly to select a picture 
mode.

7. SMODE 

mode


Press repeatedly to select a sound 
mode.

8. SLEEP 

button


Set the automatic shut off time for 
the television.

9. SOURCE 

button


Press to select the desired input.

10. MENU 

button


It displays TV main menu in TV 
mode.

11. 

////

ENTER buttons


Used to navigate in a menu on 
the screen and to set up the TV 
according to your preferences.

 ENTER 

button


Used to enter/exit the channel list 
menu (DTV/ATV only).

12. DISPLAY 

buttons


Press to show the source and 
information about channels.

Summary of Contents for SLE 55F60TC

Page 1: ...LED Television SLE 55F60TC USER S MANUAL EN ...

Page 2: ......

Page 3: ...ns 2 2 Stand assembly 9 3 Device description 10 3 1 Control panel button function 10 3 2 TV terminal connections 10 4 Remote control 11 5 First time setup 14 5 1 Select Language 14 5 2 Select Country 14 5 3 Surrounding 15 5 4 Auto Tuning 15 6 Menu 17 6 1 Channel menu 17 6 2 Picture menu 21 6 3 Sound menu 24 6 4 Time menu 26 6 5 Lock menu 28 6 6 Hotel mode 31 6 7 Setup menu 32 6 8 Screen menu only ...

Page 4: ... using the appliance Follow the instructions contained in this user s manual Heed all warnings Adhere to all instructions Use only accessories determined by the manufacturer AN OPEN FLAME MUST NOT BE PLACED ON THE APPLIANCE E G A BURNING CANDLE DO NOT PLACE HOT ITEMS OR OBJECTS WITH AN OPEN FLAME E G CANDLES OR NIGHT LAMPS ON OR IN THE VICINITY OF THE APPLIANCE HIGH TEMPERATURES MAY MELT PLASTIC P...

Page 5: ...dripping or running water and objects filled with water must not be placed on it e g vases Protect the appliance against rain spray or contact with any other liquid do not leave or install the appliance outdoors Do not use the appliance outdoors Not adhering to these instructions creates a risk of electrical shock or fire hazard Do not use this appliance near water Treat the glass panel and applianc...

Page 6: ...liance on an unstable cart pedestal stand bracket or table The appliance could fall and cause serious injuries to children or adults or could be seriously damaged or damage other items Only use the appliance with a cart pedestal stand or table designated by the manufacturer or sold with the appliance Any mounting of the appliance should be carried out according to the manufacturer s instructions a...

Page 7: ...ceived the results of an inspection by the employees of the professional service centre Have all repairs carried out by qualified personnel Repairs are necessary if the appliance has been damaged in any way for example if the power cord is damaged liquid was poured on the appliance foreign objects have entered the appliance the appliance has been exposed to rain or moisture if the appliance is not ...

Page 8: ... of batteries may cause the leakage of the electrolyte and corrosion To ensure that the remote control works correctly proceed according to the instructions below Do not insert the batteries in the wrong polarity orientation Do not charge heat open or short circuit the batteries Do not throw batteries into a fire Do not leave discharged batteries in the remote control Do not combine various types o...

Page 9: ...ight emission Similar damage may also occur when watching a DVD or playing games The display of a static image from video games or computers for an extended period of time may cause a partial effect of a persistent image To prevent this effect from occurring lower the brightness and contrast when displaying a static picture Damage to the screen resulting from the above mentioned causes is not cove...

Page 10: ...g hard disk drives HDD Use devices with independent power supplies and power them from their own power supplies The appliance was designed to achieve maximum compatibility with memory devices With respect to the variety of devices on the market it is not possible to guarantee compatibility with every USB device In the event of difficulties try formatting the flash drive directly in the appliance If ...

Page 11: ...ugged from the power outlet Before performing work spread cushioning e g soft blanket over the base area to lay the LED TV on this will prevent it from being damaged Make sure the stand is properly assembled so that the TV would be stable Place the assembled television on a solid and flat base Stand installation instructions BM4 20 4 pcs ...

Page 12: ...URCE source select VOL adjust volume CH channel select 3 2 TV terminal connections 1 VGA connect to the video output jack on your pc 2 PC AUDIO connect to the audio output jack on your PC 3 SCART SCART input 4 RF connect to an antenna or cable TV system 5 HDMI1 connect to the HDMI1 jack of a device with and HDMI output 6 HDMI2 connect to the HDMI2 jack of a device with and HDMI output 7 HDMI3 conn...

Page 13: ... digit counts e g 1 11 111 5 button Button to switch the previously watched channel 6 PMODE button Press repeatedly to select a picture mode 7 SMODE mode Press repeatedly to select a sound mode 8 SLEEP button Set the automatic shut off time for the television 9 SOURCE button Press to select the desired input 10 MENU button It displays TV main menu in TV mode 11 ENTER buttons Used to navigate in a ...

Page 14: ...eletext information fully depends on the operator of the channel button play pause or start a time shift recording 24 INDEX button INDEX button call up a teletext content page button stop recording playback 25 A B MIX button A B button set the A point to B point repeat playback MIX button press to display the picture and the teletext at the same time 26 REPEAT REVEAL button REPEAT button select th...

Page 15: ...mote control is about 5 meters with a deviation of up to 30 from the perpendicular direction to the reception sensor of the remote control on the front side of the device The falling capacity of the batteries gradually reduces the remote control range There must be no solid obstacles in the area between the remote control and the device when the remote control is being used During standard use the...

Page 16: ...ss ENTER button to enter the input source Press EXIT button to quit Connect an RF cable from the Tv s input called RF In and to your TV Aerial socket antenna common antenna cabel 5 1 Select Language Press button to select the language to be used for menus and message 5 2 Select Country Press button to highlight country menu Press button to select the country you want to ...

Page 17: ...gher ballast and consumption Therefore the switch to a Shop surrounding is accompanied by a question of the device where you should confirm your aim For common use it is recommended to set Home surrounding 5 4 Auto Tuning Select among Analogue ATV or digital DVT or leave both sources ATV DTV ATV tuning will start first If you want to skip ATV tuning press MENU button and left arrow button Then DTV t...

Page 18: ...chnical data about channel you wish to tune such as broadcast way frequency audio modes broadcast speed etc A successful finished automatic tuning ends by saving the list of available TV channels and radio stations that you can take in In case of a multiple presence of the same or similar channels e g due to a local variations of the same central channel or distant interference or local net recepti...

Page 19: ...the option that you want to adjust in the CHANNEL menu 2 Press Enter button to adjust 3 After finishing your adjustment Press Enter button to save and return to the previous menu 6 1 1 Auto tuning Press button to select Auto Tuning then press Enter button to enter The system will run the same operation as for the first time setup all previously channels will be deleted ...

Page 20: ... manual tuning Current CH Set the channel number Color System Select the color system available systems AUTO PAL SECAM Sound System Select the sound system Fine Tune Adjust the frequency of the channel finely Search Start searching channel ...

Page 21: ...nter button to enter sub menu The three colored key is the shortcut key for programming the channel First press to highlight the channel you want to select then Press the Red button to delete the program in the list Press the Yellow button to move the channel in favorite list Press the Blue button to skip the selected channel Press FAV button to add or remote the channel to your favorite list Your...

Page 22: ...ital broadcasting Such planned programmed events are saved in the List Press button to select Schedule List then press Enter button to enter sub menu It is available in source Press the YELLOW button to enter the interface below When the time appointment is conflict it will produce a warning message ...

Page 23: ...play the main menu Press button to select PICTURE in the main menu 1 Press button to select the option that you want to adjust in the PICTURE menu 2 Press Enter button to adjust 3 After finishing your adjustment Press Enter button to save and return to the previous menu ...

Page 24: ...ntensity of the picture but the shadow of the picture is invariable Brightness Adjust the optical fiber output of the entire picture it will affect the dark region of the picture Color Adjust the saturation of the color based on your own like Tint Use in compensating color changed with the transmission in the NTSC code Sharpness Adjust the peaking in the detail of the picture Note Items are availab...

Page 25: ...e Reduction then press OK button to enter sub menu Off Select to turn off video noise detection Low Detect and reduce low video noise Middle Detect and reduce moderate video noise High Detect and reduce enhanced video noise Default Set as Default 6 2 4 HDMI mode Select Video e g for a satellite receiver or PC or AUTO for the current connected source into HDMI input This will adapt the picture proc...

Page 26: ...option that you want to adjust in the SOUND menu 2 Press Enter button to adjust 3 After finishing your adjustment Press Enter button to save and return to the previous menu 6 3 1 Sound mode Press button to select Sound Mode then press Enter button to enter sub menu Press button to select You can change the value of Treble and Bass when the sound is in User mode ...

Page 27: ...lect Auto Volume Level then press button to select On or Off 6 3 4 SPDIF Mode Press button to select SPDIF Mode then press button to select Off PCM Auto It is use to perform a digital sound from an external source 6 3 5 AD Switch Press button to select AD Switch then press button to select On or Off Amblyopia function for the blind the tracks will be mixed describe the current screen It need code ...

Page 28: ...ment Press Enter button to save and return to the previous menu 6 4 1 Time zone Press button to select Time Zone then press Enter button to enter sub menu Press button to select time zone Note Correct set time including summer time is important for more functions of a digital broadcasting such as EPG Very accurate time is presented at broadcasting and the device is synchronized upon it It is neces...

Page 29: ...6 4 3 Auto standby Press button to select Auto Standby then press Enter button to enter sub menu Press button to select Tip If the remote control does not make any operation in the hypothesis time it will close down automatically If you do any operation by the remote control it will reset the time Long time is sufficient for the vast majority of applications Off function can be also completely deac...

Page 30: ...ic shut off 6 5 Lock menu Press MENU button to display the main menu Press button to select LOCK in the main menu 1 Press button to select the option that you want to adjust in the LOCK menu 2 Press Enter button to adjust 3 After finishing your adjustment Press Enter button to save and return to the previous menu Default password is 0000 and if forget what you set please call the service center ...

Page 31: ... 5 1 Lock system Press button to select Lock System then press Enter button to make the following 3 options valid 6 5 2 Set password Press button to select Set Password then press Enter button to enter sub menu to set new password ...

Page 32: ...ct Parental Guidance then press Enter button to enter sub menu to select the number of age which is suitable for your children Broadcaster may equip channels by information about the recommended or minimum age for watching If a channel is broadcasted with a hidden index of a minimum age the device will compare it with your set data and it may ask you to enter a password in order you can watch a pr...

Page 33: ... mode in the Lock menu 2 Press Enter button on the remote control to enter the sub menu 3 After finishing your adjustment Press MENU button to save and return back to the previous menu 6 6 Hotel mode Press button to select Hotel Mode then press button to select on or off 6 6 1 Source lock Press button to select Source Lock then press Enter button to enter sub menu to select 6 6 2 Default source Pre...

Page 34: ...u Press MENU button to display the main menu Press button to select SETUP in the main menu 1 Press button to select the option that you want to adjust in the SETUP menu 2 Press Enter button to adjust 3 After finishing your adjustment Press Enter button to save and return to the previous menu 6 7 1 OSD language Select an OSD menu language can be displayed Default English is selected as menu language...

Page 35: ...ton to select Audio Languages then press Enter button to enter sub menu It serves to automatically select a certain language if this is available You can select 2 languages first and second If the desired language is not available the system will select a language of the broadcaster Press button to select the primary secondary of Audio Languages Press button to select the Audio Languages ...

Page 36: ...l broadcasting 6 7 6 PVR File System This option is used to set up recording of the digital broadcasting to your USB flash memory Due to the data size coming from the digital broadcasting the setting is more detailed Press button to select PVR File System then press Enter button to enter sub menu Press button to select Check PVR File System then press Enter button to enter Then it will check the US...

Page 37: ...ct ratio Available options are Auto 4 3 16 9 Zoom1 Zoom2 6 7 8 Blue Screen Press button to select Blue Screen then press Enter button to select On or Off Function will be activated only if no useful picture sound is available 6 7 9 First Time Installation Press button to select First time installation then press Enter button to enter This will delete all previously settings and tunings and you wil...

Page 38: ...e parameters of the device to the highest settings to present the device in a surrounding with extreme lightning accompanying by higher ballast and consumption Therefore the switch to a Shop surrounding is accompanied by a question of the device where you should confirm your aim For common use it is recommended to set Home surrounding 6 7 13 HDMI CEC This function performs the setting of special it...

Page 39: ... in the main menu 1 Press button to select the option that you want to adjust in the SCREEN menu 2 Press Enter button to adjust 3 After finishing your adjustment Press Enter button to save and return to the previous menu 6 8 1 Auto adjust Press Enter button to start adjusting H Offset V Offset Size Phase automatically 6 8 2 H Offset Adjust the horizontal position of the picture Press button to sele...

Page 40: ...nes Press button to select Phase then press Enter button to enter sub menu 6 8 6 Position Reset Press button to select Position Reset then press Enter button to enter Notes 1 Noise Reduction in PICTURE option is invalid 2 AD Switch in SOUND option is invalid 3 TIME menu and description are the same as that for Air mode 4 Block Program and Parental Guidance in LOCK option is invalid 5 Audio Languag...

Page 41: ...will recognise majority of USB devices and it will shortly show the menu for playback If there is no action menu disappears and the previous mode will be on Press button to select Media in the Source menu then press Enter button to enter Press button to select the option you want to adjust in the main Media menu then press Enter button to enter ...

Page 42: ...u then press ENTER button to display picture If you want to watch only this picture press Pause button otherwise a slide show of pictures of the current directory will begin Press down arrow to hide the information bar Press Play Pause again to restore the playing Press Exit button to stop playing you will return to the directory list When highlighting the option you select the file information wil...

Page 43: ...o select drive disk you want to watch then press Enter button to enter Press down arrow to hide the information bar press ENTER to display it again Press Exit button to stop playing you will return to the directory list When highlighting the option you select the file information will appear on the right and picture will be previewed in the center Press button to select return option to the previou...

Page 44: ...y especially its codek Press display button to select menu in the bottom you want to run then press Enter button to operate If a directory contains a movie with external subtitles with the same title as a movie the device will show them SUBTITLE button You can select CharSet in the information bar among the multi nation alphabets When highlighting the option you select the file information will app...

Page 45: ...n the main menu then press Enter button to enter Press Exit button to return to the previous menu and exit menu to quit Press button to select drive disk you want to watch then press Enter button to enter Press button to select return option to back to the previous menu ...

Page 46: ...elf contact your seller Symptoms Possible solutions No power Check that the power cord is connected to the wall power socket Unplug the power cord and plug it again after 60 seconds No picture Check the antenna connection Station may be experiencing problems tune to another station Adjust the contrast and brightness Good picture but no sound Increase volume Is the sound muted Press the MUTE button...

Page 47: ...tive black dots may appear or bright points of light red blue or green may appear constantly on the LED screen This is a structural property of the LED screen and not a malfunction Picture is breaking up Keep the TV away from noisy electrical sources such as cars hair dryers welders and all optional equipment Electrical atmospheric interferences such as local or distant lightning storms may cause ...

Page 48: ...icture is not shown in full screen First check if it is caused by the input signal then try to adjust zoom in function menu Picture defects and the reason Snowy picture Snowy picture is usually due to weak signal Adjust antenna or install and antenna amplifier Double image or ghosts Double image is usually caused by reflections from tall buildings Adjust the direction of the antenna or raise it Radi...

Page 49: ... 1378 x 835 x 171 mm Weight netto with stand 14 25 kg Weight netto w o stand 13 95 Kg Connections RF IN 1x AV in 1x SCART 1x Component YPbPr 1x VGA D Sub 15 pin 1x HDMI 3x SPDIF coaxial 1x USB 1x USB supported formats MKV AVI MP4 WMV MOV XviD MP3 JPEG JPG TXT CI slot yes Other features WXGA resolution 1920 x 1080 Brightness cd m2 250 Aspect ratio 16 9 Dynamic contrast 1 000 000 1 Response time ms ...

Page 50: ...nic Programme Guide EPG Yes Teletext Yes Teletext pages 1000 Comb filter 3D OSD menu Yes Zoom Yes Noise reduction Yes Timer off on sleep Yes Subtitles Yes Audio language Yes Channel list Yes Favourites list Yes Picture freeze Yes Radio Yes Lock No Parent lock Yes Hotel mode Yes Note Technical specifications may change without prior notice Czech is the original version Manufacturer address FAST ČR a ...

Page 51: ...ches cm 140 55 Electric energy consumption when on W 96 Annual electric energy consumption kWh 141 Electric energy consumption in standby mode W 0 5W Screen resolution pixely 1920 x 1080 Electric energy consumption 141 kWh per year based on the power consumption of the television set operating 4 hours a day for 365 days The actual electric energy consumption will depend on how the television is us...

Page 52: ...lp in preventing the potential negative impact on the environment and human health which could be caused as a result of improper liquidation of waste Please ask your local authorities or the nearest waste collection centre for further details The improper disposal of this type of waste may fall subject to national regulations for fines For business entities in the European Union If you wish to disp...

Page 53: ...icate of installation This warranty is void especially if apply as follows Defects which were put on sale Wear out or damage caused by common use The product was damaged by unprofessional or wrong installation used in contrary to the applicable instruction manual used in contrary to legal enactment and common process of use or used for another purpose which has been designed for The product was da...

Page 54: ...Designed in Europe by Sencor Made in China ...

Reviews: