background image

EN 31

EN

Revision 04/2019

Copyright © 2019, Fast ČR, a. s.

Menu

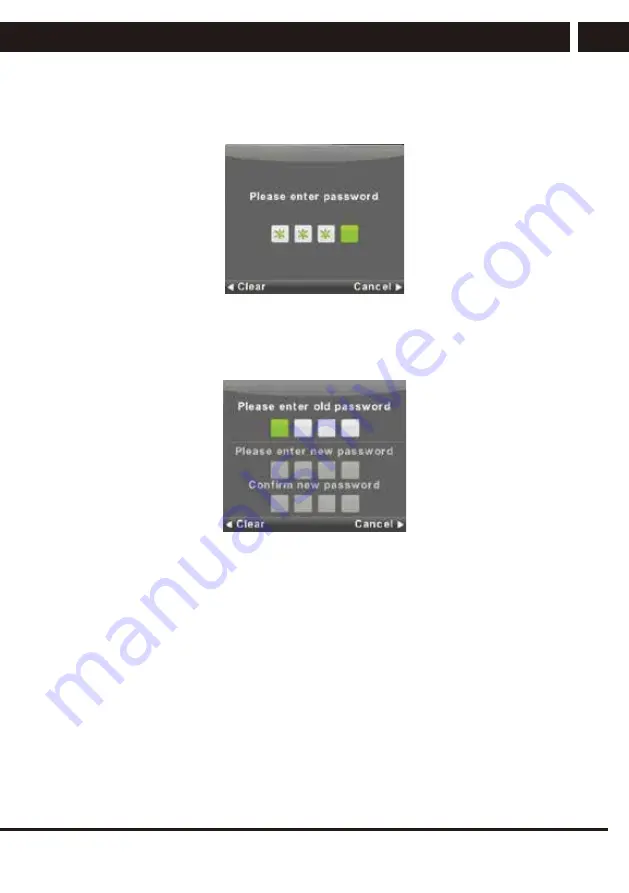
6.6.1. Lock system

Use the buttons 

V

/

v

 to select the item 

Lock System

, press 

OK

 and select one of the 

following three options.

6.6.2. Setting the password

Use the buttons 

V

/

v

 to select the item 

Set Password

 and then press 

OK

 to enter the 

submenu and enter the new password.

Copyright © 2022, Fast CR, a. s. 

Revision 06/2022

Summary of Contents for SLE 3261TCS

Page 1: ...SLE 3261TCS EN User Manual LED TV CZ Uživatelská příručka LED televizor SK Používateľská príručka LED televízor HU Felhasználói kézikönyv LED tévékészülék PL Podręcznik użytkownika Telewizor LED ...

Page 2: ......

Page 3: ... 3 1 Button functions of the control panel 9 3 2 Connecting the TV connectors 10 4 Remote control 11 5 Turn on first time 14 5 1 Language selection 14 5 2 Country selection 14 5 3 Automatic tuning 15 6 Menu 17 6 1 Channel Menu satellite 17 6 2 Channel menu ATV DTV 20 6 3 Picture Menu 23 6 4 Sound menu 26 6 5 Time menu 28 6 6 Lock menu 30 6 7 Hotel mode 33 6 8 Setup menu 34 6 9 ATV Channel menu 39 6...

Page 4: ...OT BE PLACED ON THE DEVICE DO NOT PLACE HOT OBJECTS OR OBJECTS WITH AN OPEN FIRE ON THE DEVICE FOR EXAMPLE CANDLES OR NIGHT LAMPS HIGH TEMPERATURES MAY MELT PLASTIC COMPONENTS AND CAUSE FIRE Use the device in temperate climate The manufacturer and vendor of the device are in not in any way liable for any direct or indirect damages caused by not following the instructions for installation setup ope...

Page 5: ...compressed especially near the plug and point leading from the device or adapter The power plug adapter is used to disconnect the system and must be easy to access Do not use a device with a damaged power cord or plug If the power cord or plug is damaged turn off the device disconnect it from the power supply and contact your authorized repair shop Only a professional can replace a damaged power c...

Page 6: ...y accessories recommended by the manufacturer Do not lean against the device do not lean over or use the device as a step Avoid quick movements Make sure children do not play with the machine Be careful when moving the device when placed on a cart Suddenly stopping using excessive force and uneven surfaces may cause the cart holding the device to tip over Under no circumstances are the manufacture...

Page 7: ... other maintenance work unplug the cord adapter from the socket Clean the device with a dry cloth only Do not use gasoline thinner or other solvents or abrasives scouring pads or sponges with scouring pads to clean the device Note Do not throw the device into your common household waste Respect laws and regulations when disposing of the machine Remote controller and battery Do not expose the remot...

Page 8: ...RNING To prevent risk of fire or electric shock do not expose the device to rain or moisture WARNING The batteries must not be exposed to excessive heat for example sunlight fire etc This symbol indicates the device has double insulation between dangerous voltage from the network and user accessible parts Replace parts with identical spare parts only Do not leave a static image on the LCD panel for ...

Page 9: ...s own power and power them with their own power supply The device was designed with respect to maximum compatibility with memory devices Considering the variety of devices on the market we cannot guarantee compatibility with every USB device available Should you run into any issues try formatting the memory device directly in the device Should problems persist use another memory device Due to wide...

Page 10: ...re attaching removing the stand make sure the TV is turned off and plug is disconnected from the wall oVUMFU Before performing the work put underneath the LED TV set some soft material so that tIF 57 TFU JT TUBCMF Instruction for assembling the stand δ SFVε Copyright 2022 Fast CR a s Revision 06 2022 ...

Page 11: ...OV G you want to use advanced functions you have to use the remote controller Note TIF lHVres are only for orientation Remote Control Sensor Red light indicates the TV is in standby NPEF No light indicates tIF 57 JT PO TV POWER ON OFF INPUT Source seleDU MENU Enters the meOV CH Selects channFM CH Selects channFM VOL Raises vPMVNF VOL Lowers vPMVNF Copyright 2022 Fast CR a s Revision 06 2022 ...

Page 12: ...r satellite 6 HDMI connection of a device with HDMI output 7 USB connection of a USB mash drive for playback of supported multi media content 5 RF IN ANTENNA IN connection to the antenna or to the cable television system The AV output connector of DVD can be connected to AV input via the AV DBCMF Connector for connecting headphones or other sound deWJDFT 7 6 6 6 8 9 3 2 1 4 5 ANT IN DVB S S2 ANT I...

Page 13: ...rical buttons 0 9 Press 0 9 buttons directly to select a TV channel while watching the TV Enter the page number in the teletext mode etc 8 button It is used to enter channel numbers with various digit counts e g 1 11 111 9 RECALL button Button to switch the previously watched channel 10 FAV button Press to enter exit the favourites menu in the TV mode 11 FREEZE button Freeze picture 12 TV RADIO bu...

Page 14: ...shift recording 23 REVEAL m button REVEAL button Press REVEAL button to display hide hidden teletext information depends on the broadcast m button fast rewind 24 SIZE M button SIZE button Press SIZE button to change the size of the screen in MEDIA mode M button fast forward 25 INDEX x button INDEX button call up a teletext content page x button stop recording playback 26 button Skip to previous tr...

Page 15: ... is about 5 meters with a deviation of up to 30 from the perpendicular direction to the reception sensor of the remote control on the front side of the device The falling capacity of the batteries gradually reduces the remote control range There must be no solid obstacles in the area between the remote control and the device when the remote control is being used During standard use the lifetime of...

Page 16: ... to the appropriate input sourDF Press EXIT to exit meOV To watch television connect the antenna cable with functional reception antenna common antenOB DBCMF UP 57 JOQVU markFE BT i3 MOv 5 1 Language selection Using buttons select the language used in menus and nFXT 5 2 Country selection Using buttons select the country meOV Using buttons select the required country Copyright 2022 Fast CR a s Revi...

Page 17: ...TV DTV First will be processed the tuning of the analogue television channels ATV If you want to skip the ATV tuning press the Menu button and the button with left arrow Afterwards the tuning of the digital television channels will be done DTV If you want to skip the DTV tuning press the Menu button and the button with left arrow Copyright 2022 Fast CR a s Revision 06 2022 ...

Page 18: ...e available TV programs and radio stations which you can receive immediately In the case of multiple occurrences of the same or similar programs e g due to local variations of the same central program or a remote reception with interference or local reception clean reception verify which station works best for you or modify the list Automatic satellite tuning is adapted to tune one satellite anten...

Page 19: ... and which you intend to receive If a parameter is wrong or your antenna system will not accept any values Auto or None None it will not be possible to receive the satellite or under the name of a particular satellite will be accepted another satellite When setting a satellite follow the description of the buttons for individual functions on the screen Select a satellite from the list use the Righ...

Page 20: ...east satellite Set the scanning mode to Fast Scan Press OK and wait until the scanning is finished Note on FastScan FastScan finds the appropriate operator channel table and saves it in the device list The list taken by FastScan function the position and the numbers of the individual channels are determined by the broadcast operator and the user can not change them The list is stored in the device r...

Page 21: ...scanned for the network table NIT and then are scanned the transponders found there 2 Channel type select Free FTA for which reception is not necessary any card of conditional access CA and Scrambled sometimes called coded where you need an access card The scrambled channels are displayed in the list by a symbol of a key 3 Service type select DTV and Radio Example of advanced tuning process Skylin...

Page 22: ...HANNEL 2 Press OK and perform the modification 3 When you finish the modification press MENU save the changes and return to the previous menu 6 2 1 Automatic tuning Using the buttons V v select the item Auto Tuning and enter it by pressing OK The same action will happen like in the first tuning all the previously tuned channels will be deleted 6 2 2 Manual ATV tuning Current CH Current channel Setting...

Page 23: ... press OK to enter the submenu Using the buttons b B select the channel and press OK to perform program search 6 2 4 Program edit Using the buttons V v select the item Program Edit and press OK to enter the submenu Use the three color buttons z z z to program a channel First press the buttons V v to mark the channel which you want to select Then Use the red button to remove the program from the li...

Page 24: ...ou can program in the digital broadcast system certain time dependent actions which are called Events These events scheduled by you programmed are saved in the list Using the buttons V v select the item Schedule List and press OK to enter the submenu It is available with some sources Enter the following interface using the yellow button If there is a conflict in the set time a warning appears Note ...

Page 25: ... the item Signal Information Press OK to display detailed information about the signal its strength and quality interference level Available only for the DTV signal For satisfactory reception use only programs channels with the highest values of both variables max is 100 6 3 Picture Menu Press MENU to display the main menu Use the buttons b B to select the item PICTURE in the main menu 1 Using the...

Page 26: ... the button P M Contrast Brightness Color Tint Sharpness Using the buttons V v select the item and then perform the modification using the buttons Contrast The level of intensity of the light places in the picture The dark places remain unchanged Brightness Setting the overall brightness of the picture It will affect the dark places in the picture Colour Setting the color saturation according to yo...

Page 27: ...mal Keeps the white color neutral Warm Emphasizes reddish tint of the white color 6 3 3 Noise reduction Used to filter and suppress noise in an image and improve image quality Using the buttons V v select the item Noise Reduction and them press OK to enter the submenu Off Noise detection in the picture is off Low Detection and reduction of a low picture noise Middle Detection and reduction of a med...

Page 28: ...ess MENU to display the main menu Press b B to select in the main menu the item SOUND 1 Using the buttons V v select the item which you want to set in the menu SOUND 2 Press OK and set 3 After you finish the setting save it by pressing the button MENU and return to the previous menu 6 4 1 Sound mode Use the buttons V v to select the item Sound Mode and press OK to enter the submenu Use the buttons ...

Page 29: ... select the option On or Off 6 4 4 Digital output Use the buttons V v to select the item SPDIF Mode and then use the buttons b B to select the option Off PCM or Auto Designed to process the external digital sound 6 4 5 Switching the sound description Use the buttons V v to select the item AD Switch and then use the buttons b B to select the option On or Off Function for the visually impaired at wh...

Page 30: ...essing the button OK and return to the previous menu 6 5 1 Time zone Use the buttons V v to select the item Time Zone and press OK to enter the submenu Use the buttons V v b B to select the time zone Note Correct time setting incl the switching to summer time is needed for many functions of digital broadcasting e g EPG The accurate time is present in the broadcasting and the device synchronizes wi...

Page 31: ...0 min 6 5 3 Automatic standby mode Use the buttons V v to select the item Auto Standby and press OK to enter the submenu Use the buttons V v to make selection Tip If you do not use the remote control during the set time the TV automatically switches to standby mode If you use the controller the timer resets The length of time suffices for most users You can deactivate the shutoff function entirely ...

Page 32: ...Lock menu Press MENU to display the main menu Use the buttons b B to select in the main menu the item Lock You have to enter a valid password 1 Using the buttons V v select the item which you want to set in the menu LOCK 2 Press b B and enter the setting 3 After you complete the setting save it by pressing MENU and return to the previous menu The default factory password is 0000 and if you forget ...

Page 33: ...buttons V v to select the item Lock System press OK and select one of the following three options 6 6 2 Setting the password Use the buttons V v to select the item Set Password and then press OK to enter the submenu and enter the new password Copyright 2022 Fast CR a s Revision 06 2022 ...

Page 34: ...re you select the age suitable for your children The broadcaster can provide information about a program about a recommended or minimum age for watching it If a program is broadcast with hidden mark of minimum age the device then compares it with what you entered and possibly prompts for a password so that you can watch the program for higher age 6 6 5 Key Lock Use the buttons V v to select the it...

Page 35: ...he previous menu 6 7 Hotel mode Using the buttons V v select the item Hotel Mode and then use the buttons b B to select the option On or Off 6 7 1 Source Lock Use the buttons V v to select the item Source Lock and then press OK to enter the submenu and to select 6 7 2 Default Source Use the buttons V v to select the item Default Source and then press OK to enter the submenu and to select 6 7 3 Def...

Page 36: ...SETUP in the main menu 1 Using the buttons V v select the item which you want to set in the menu SETUP 2 Press b B and enter the setting 3 After you finish the setting save it by pressing the button MENU and return to the previous menu 6 8 1 Menu language on the screen Select the displayed language of the menu on the screen English is the selected default menu language Use the buttons V v b B to se...

Page 37: ...roadcast You can use two languages in order of primary and secondary If there is no language selected by you the language of the broadcaster will be selected Use the buttons b B to select the primary secondary language Use the buttons V v b B to select the audio languages 6 8 4 Subtitle Language Press V v to select the item Subtitle Language and then press OK to enter the submenu Automatically sel...

Page 38: ...is more detailed Use the buttons V v to select the item REC File System and then press OK to enter the submenu Use the buttons V v to select the item Check REC File System and then enter the settings by pressing OK The speed of the USB device will be checked The result determines what best broadcast is your USB device capable of holding When the result is unsatisfactory format the TV which will at...

Page 39: ...oadcast rights only allow watching and not a recording the device will notify you The recording on your storage device is encrypted for protection of copyright against use on another device 6 8 7 Aspect ratio Use the buttons V v to select the item Aspect Ratio and then press OK to enter the submenu Use the buttons V v to select the aspect ratio available options Auto 4 3 16 9 Zoom1 Zoom2 6 8 8 Blu...

Page 40: ... genuine software even with small differences may end up causing irreversible damage to the TV which is not covered by warranty 6 8 12 HDMI CEC The feature performs settings of special items of digital communication between devices at the HDMI interface Follow the instructions in your external HDMI CEC to set the items and verify the correct communication Press V v to select the item HDMI CEC and ...

Page 41: ...anual ATV tuning Using the buttons V v select the item ATV Manual Tuning and press OK to enter the submenu 6 9 3 Manual DTV tuning Using the buttons V v select the item DTV Manual Tuning and press OK to enter the submenu 6 9 4 Programme Edit Use the button V v to select the item Programme Edit and press OK to enter the submenu Notes 1 The menu Sound and its description are the same like in the DTV...

Page 42: ...e item AD switch is not available 3 The menu Lock and its description are the same like in the DTV mode 4 The menu Channel is not available in the AV Component input HDMI modes 5 In the menu Time the items to set time and the time zone selection are not available 6 AV does not support Hearing Impaired items and PVR recording Component input or HDMI do not support teletext language and Hearing Impa...

Page 43: ...he USB devices and shortly offers you to switch to playback When you will not respond the offer disappears and the TV remains in the original mode Use the buttons V v to select the item Media in the menu Source and press Enter to enter the settings Use the buttons b B to select in the main menu the item Media which you want to set and press Enter to enter the settings Copyright 2022 Fast CR a s Re...

Page 44: ...to the directory list When you pause on an image in the directory list after a while the file information appears on the right and a preview of the image is displayed in the middle Basic functions Repeat ALL Use the buttons b B to select the repeat mode press OK and select Repeat None Repeat all Repeat 1 Music Use the buttons b B to select the item Music press OK and select the music background Pla...

Page 45: ... unit which you want to play and press OK to enter the interface You can hide the information bar by using the arrow button down you can renew it by pressing OK End playback by pressing EXIT you will return to the directory When you pause in the directory on a music file after a while the information about the file is displayed on the right and a playback starts Use the buttons b B to select the ite...

Page 46: ...g especially its codec Press Display to select information bar at the bottom which you want to start and press OK to enter it If there is in the movie directory also a file with external subtitles with the same name as the movie the device will play it the button SUBTITLE You can select among national alphabets by pressing CharSet in the information bar When you pause in the directory on a movie fil...

Page 47: ... TEXT and then enter the interface by pressing OK Press Exit to return to the previous menu and to exit menu Use the buttons b B to select the drive unit which you want to browse and press OK to enter the interface Use the buttons b B to select the item to return to the previous menu Copyright 2022 Fast CR a s Revision 06 2022 ...

Page 48: ...s no power Check the attached power cord and the functioning of the electrical outlet Unplug the power cord plug it in after 60 seconds and turn the TV set on again No picture Check the antenna connection There could have been problems at the broadcasting station try another station Adjust contrast and brightness Good picture but no sound Raise volume Check that the sound is not muted Mute functio...

Page 49: ...e of the LED screen and is not a malfunction The picture falls apart Keep the TV set away from interfering sources of electricity such as cars hair dryers welders and any optional equipment The disintegration of image may be caused by atmospheric phenomena such as a local or distant thunderstorm When installing optional equipment leave a space between the optional equipment and the TV set Check th...

Page 50: ... is not displayed on the whole screen First make sure that the problem is not caused by the input signal Then try to adjust the item Zoom in the Functions menu Picture defects and their causes Snowy screen Snowy screen is usually caused by a weak signal Change the antenna setting or install an antenna booster Double images or ghosting Double image is usually caused by reflection from tall buildings...

Page 51: ...kg Net weight without the stand LH CPOOFD UJPO RF IN 2 AV input 1 Component YPbPr 1 HDMI 3 USB 2 maY N Supported USB formats JPEG JPG TXT CI slot Yes OUher func UJPOT WXGA resolution 1366 768 Brightness cd m 180 Aspect ratio 16 9 Response time ms 8 ms Colours Setting the color warmth Cold standard warm Viewing angle H 178 V 178 Video system PAL SECAM MPEG 2 MP ML MPEG 2 1 Audio system BG DK I MPEG...

Page 52: ... Yes Timer OFF ON SLEEP Yes Subtitles Yes Audio language Yes Channel list Yes Favourites list Yes Image freeze Yes Radio Yes Lock Yes Parent lock Yes Hotel mode Yes Note Technical speDJlDations may change without prior notJDF The original version is in CzeDI Manufacturer address F 45 Ă3 B T 6 4BOJUBTV 5 þðĐany Czech Republic Copyright 2022 Fast CR a s Revision 06 2022 ...

Page 53: ...onal 80 0 cm 14 Screen diagonal 32 inches 15 Visible screen area 2 736 7 dm 16 Panel technology used LED LCD 17 Automatic Brightness Control ABC available No 18 Voice recognition sensor available No 19 Room presence sensor available No 20 Image refresh frequency rate default 60 Hz 21 Minimum guaranteed availability of software and firmware updates from the date of end of the placement on the marke...

Page 54: ...human health which could be caused as a result of improper liquidation of wBTUF Please ask your local authorities or the nearest waste collection centre for furtIFS EFUBJMT The improper disposal of this type of waste may fall subject to national regulations foS lnFT For business entities in the European Union If you wish to dispose of an electrical or electronic device request the necessary inform...

Page 55: ...installation This warranty is void especially if apply as follows Defects which were put on sale Wear out or damage caused by common use The product was damaged by unprofessional or wrong installation used in contrary to the applicable instruction manual used in contrary to legal enactment and common process of use or used for another purpose which has been designed for The product was damaged by ...

Page 56: ......

Reviews: