Senco DS212-18V Operating Instructions Manual Download Page 14

Tool Operation 

14

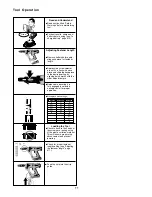
Remove fasteners from the 

tool. (1) Slide bit release 

button to rear. (2) Tilt tool 

forward and pulse trigger.  

Bit will fall out.

(1) Hold tool upright. Insert 

the new bit into the slide 

body. (2) Slide bit release 

button to rear. (3) Pulse tool 

and release button when bit 

drops into place. 

1

1-1/2

1-5/8

1-1/4

1-3/4

2

1

1-1/2

1-5/8

1-1/4

1-3/4

2

1

1-1/2

1-5/8

1-1/4

1-3/4

2

1

1-1/2

1-5/8

1-1/4

1-3/4

2

Changing the nosepiece

Remove battery before 

changing the nosepiece.

Remove retention screw. 

(a coin can be used if a 

screwdriver is not available)

Set the nosepiece on the 

longest setting possible. 

(see adjusting fastener 

length pg. 11)

Depress the screw selector 

pin until it is completely 

depressed. It will be necessary 

to use a screw or thin object to 

depress to this depth

While holding the pin in this 

position, slide the nosepiece 

forward and off of the slide 

body

Install the new nosepiece

Replace the nosepiece 

retention screw ensuring it is 

seated snug against the slide 

body

Adjusting belt hook

l  

Remove the belt hook thumb 

screw until the locking plate 

can be removed

Slide the belt hook out to the 

desired position, replace the 

locking plate, then re-install 

the thumb screw

Moving belt hook to 

alternate side

Remove the thumb screw, 

locking plate, threaded plate 

and belt hook

Insert the threaded plate 

on the opposite side of tool 

and re-install the hook at the 

desired position using locking 

plate and thumb screw

1

1-1/2

1-5/8

1-1/4

1-3/4

2

1

1-1/2

1-5/8

1-1/4

1-3/4

2

Summary of Contents for DS212-18V

Page 1: ...DS212 18V DS215 18V DS312 18V AUTO FEED SCREWDRIVER Operating Instructions...

Page 2: ...nstructions contained in this manual Keep this manual available for use by all people assigned to the use of this tool For personal safety and proper operation of this tool read all of these instructi...

Page 3: ...not operate power tools in explosive atmospheres such as in the presence of flammable liquids gases or dust Power tools create sparks which may ignite the dust or fumes l Keep children and bystanders...

Page 4: ...d safety shoes hard hat or hearing protection used for appropriate conditions will reduce personal injuries l Don t expose power tools to rain or wet conditions Water entering a power tool will increa...

Page 5: ...dust extraction and collection facilities ensure these are connected and properly used Use of dust collec tion can reduce dust related hazards Power Tool Use and Care l Do not force the power tool Use...

Page 6: ...he work to be per formed Use of the power tool for operations different from those intended could result in a hazardous situation English Battery tool use and care l Recharge only with the charger spe...

Page 7: ...ay result in a risk of fire electric shock or injury to persons l To reduce risk of damage to electric plug and cord pull by plug rather than cord when disconnecting charger l Make sure cord is locate...

Page 8: ...your battery should be charged in a location where the temperature is more than 50 F but less than 100 F Do not store outside or in vehicles An extension cord should not be used unless absolutely nec...

Page 9: ...r an engine generator or DC power receptacle Do not allow anything to cover or clog the charger vents Do not recharge non rechargeable batteries This appliance is not intended for use by persons inclu...

Page 10: ...at least 10 minutes and seek medical attention immediately Never attempt to connect two 2 chargers together Consecutive charging may cause overheating If you need to recharge batteries consecutively...

Page 11: ...battery before using see to charge battery page 15 Nosepiece has settings Adjusting Fastener Length Remove battery before adju sting nosepiece for fastener length Read and Understand DS215 18V 1 1 1 1...

Page 12: ...fist screw when depressed against the work surface To remove the strip pull it through from the top of the nosepiece Whenever possible hold the tool at a right angle to the work surface Trigger lock T...

Page 13: ...e depth to ensure appropriate countersink This tool has a depth sensing clutch When the screw is countersunk to the pre set depth it automatically disengages and makes a click or racheting sound This...

Page 14: ...ress the screw selector pin until it is completely depressed It will be necessary to use a screw or thin object to depress to this depth While holding the pin in this position slide the nosepiece forw...

Page 15: ...r of charge time is required to be fully charged A maximum charge time of 1 hour or less is required to recharge a completely discharged battery pack The battery pack will become slightly warm to the...

Page 16: ...rity for information regarding available recycling and or disposal options For more information on battery recycling call 1 800 8BATTERY Battery Disposal Charge the battery pack before it is completel...

Page 17: ...t e n a n c e With battery removed make daily inspection to assure free movement of nosepiece and trigger Do not use tool if nose piece or trigger sticks or binds A c c e s s o r i e s SENCO offers a...

Page 18: ...ding back release button Use only the appropriate Senco bit Bit will not release Not a Senco bit Clutch teeth not aligned Use only the appropriate Senco bit Pulse trigger while holding back release bu...

Page 19: ...e Battery Ampacity RPM Weight Height in Length in Width in Recharge Time Fastener Capacity Torque Delivered Generated Noise Vibration Fastener Length Fastener Range 18V 1500mAh 0 2500rev min 4 26 lbs...

Reviews: