background image

6

Secure DP/HDMI KVM Switch with Dedicated CAC Port  and 4K Ultra-HD Support

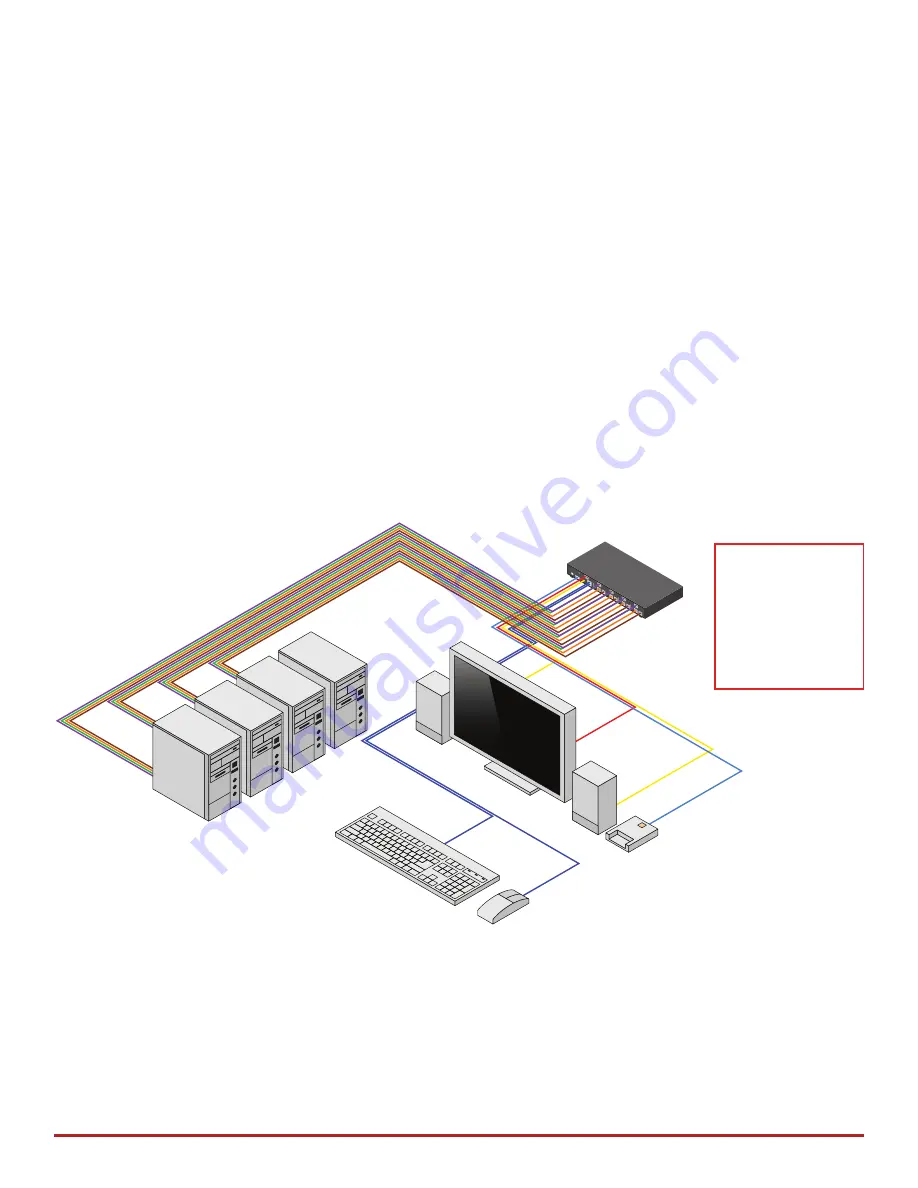
INSTALLATION (Continued)

SINGLE-HEAD UNITS:

1.  Ensure that power is turned off or disconnected from the unit and the computers.

2.  Use a DisplayPort or HDMI cable to connect the DisplayPort or HDMI output port from each 

computer to the corresponding DP/HDMI IN ports of the unit.

3.  Use a USB cable (Type-A to Type-B) to connect a USB port on each computer to the respective 

USB ports of the unit.

4.  Optionally connect a stereo audio cable (3.5mm to 3.5mm) to connect the audio output of the 

computers to the AUDIO IN ports of the unit.

5.  Connect a monitor to the DP/HDMI OUT console port of the unit using a DisplayPort or HDMI 

cable.

6.  Connect a USB keyboard and mouse to the two USB console ports.

7.  Optionally connect stereo speakers to the AUDIO OUT port of the unit.

8.  Optionally connect CAC (COMMON ACCESS CARD, SMART CARD READER) to the CAC port in 

the user console interface.

9.  Finally, power on the KVM by connecting a 12VDC power supply to the power connector, and 

then turn on all the computers.

Note

: The computer connected to port 1 will always be selected by default after power up.

Note

: You can connect up to 2 computers to the 2 port KVM and up to 4 computers to the 4 port KVM.

IMPORTANT WARNINGS - 

For security reasons

:

•  This product does not support wireless devices. Do not attempt to use a wireless keyboard or a 

wireless mouse with this product.

•  This product does not support keyboards with integrated USB hubs or USB ports. Only use 

standard (HID) USB keyboards with this device.

•  This product does not support microphone audio input or line input. Do not connect any 

microphones or headsets with microphones to this device.

•  Connection of authentication devices (CAC) with external power sources is prohibited.

CONSOLE

12VDC2.

0A

AUD

IO

K/M

AUD

IO

AUDIO

AUDIO

AUD

IO

K/M

K/M

K/M

K/M

CA

C

CAC

CAC

CAC

CAC

IN-1

IN-2

IN-3

IN-4

CK4-HP104C

DP/HDM

I IN1

DP/H

DMI

 IN2

DP/HD

MI IN3

DP/H

DM

I IN4

DP/HDM

I OU

T


  DP/HDMI IN


  USB K/M IN


  USB CAC IN


  AUDIO IN


  DP/HDMI OUT


  USB K/M OUT


  USB CAC OUT


  AUDIO OUT

Summary of Contents for CK4-HP102C

Page 1: ...audio and CAC PP 4 0 CK4 HP202C 2 Port DH Secure Pro DP HDMI KVM w audio and CAC PP 4 0 CK4 HP104C 4 Port SH Secure Pro DP HDMI KVM w audio and CAC PP 4 0 CK4 HP204C 4 Port DH Secure Pro DP HDMI KVM w...

Page 2: ...ESS CARD SMART CARD READER__________________ CAC PORT CONFIGURATION______________________________________________________ AUDITING Dumping the Event Log via User Menu Options__________________________...

Page 3: ...Up to 20 ft USB Signal Type USB 1 1 and 1 0 Keyboard and Mouse only USB 2 0 for CAC connection Input Interface CK4 HP102C CK4 HP202C 4 USB Type B CK4 HP104C CK4 HP204C 8 USB Type B Output Interface 2...

Page 4: ...al to provide visual evidence showing if the unit has been opened PROTECTED FIRMWARE The controller of the unit has a special protection feature that prevents reprogramming or reading the firmware HIG...

Page 5: ...ad without internal USB hub or composite device functions unless the connected device has at least one endpoint which is a keyboard or mouse HID class Display Display device e g monitor projector that...

Page 6: ...le interface 9 Finally power on the KVM by connecting a 12VDC power supply to the power connector and then turn on all the computers Note The computer connected to port 1 will always be selected by de...

Page 7: ...HDMI cables The DP HDMI IN ports on one row will be switched to the DP HDMI OUT of the same row 6 Connect a USB keyboard and mouse in the two USB console ports 7 Optionally connect stereo speakers to...

Page 8: ...ltra HD Support INSTALLATION Continued CON SOL E 12VD C2 0 A AUD IO K M AUD IO AUD IO K M K M CAC CAC CAC IN 1 IN 2 C K 4 H P 1 0 2 C DP H DMI OUT DP H DMI IN2 DP H DMI IN1 DP HDMI IN USB K M IN USB C...

Page 9: ...t 10 seconds When the LEDs stop flashing the EDID learn process is done If the KVM has more than one video board such as dual head and quad head models then the unit will continue to learn the EDIDs o...

Page 10: ...annel use the front panel buttons to switch the KVM to the channel whose CAC mode you wish to change Once the channel is selected the button LED for this specific channel should be off CAC port disabl...

Page 11: ...s Enter 4 Enter the default password 12345 and press Enter 5 Request a Log Dump by selecting option 5 in the menu Shown in Figure 12 1 See Administration and Security Management Tool Guidance for deta...

Page 12: ...Display LED User Console Interface CAC LED Front Panel Port Selection LED s Front Panel CAC Selection LED s Front Panel Port and CAC Selection LED s EDID Learn Front Panel LED s All LED s are turned...

Page 13: ...eck if the keyboard is properly connected to the unit Check if the USB cables connecting the unit and the computers are properly connected Try connecting the USB on the computer to a different port Ma...

Page 14: ...ective product to SEKURYX Any replacement product could be new or like new provided that it has functionality at least equal to that of the product being replaced SEKURYX limited warranty is valid in...

Page 15: ...imited to implied warranties of merchantability and fitness for particular purpose SEKURYX will not be liable for errors contained herein or for incidental or consequential damages in connection with...

Reviews: