background image

6

www.seikosmart.com

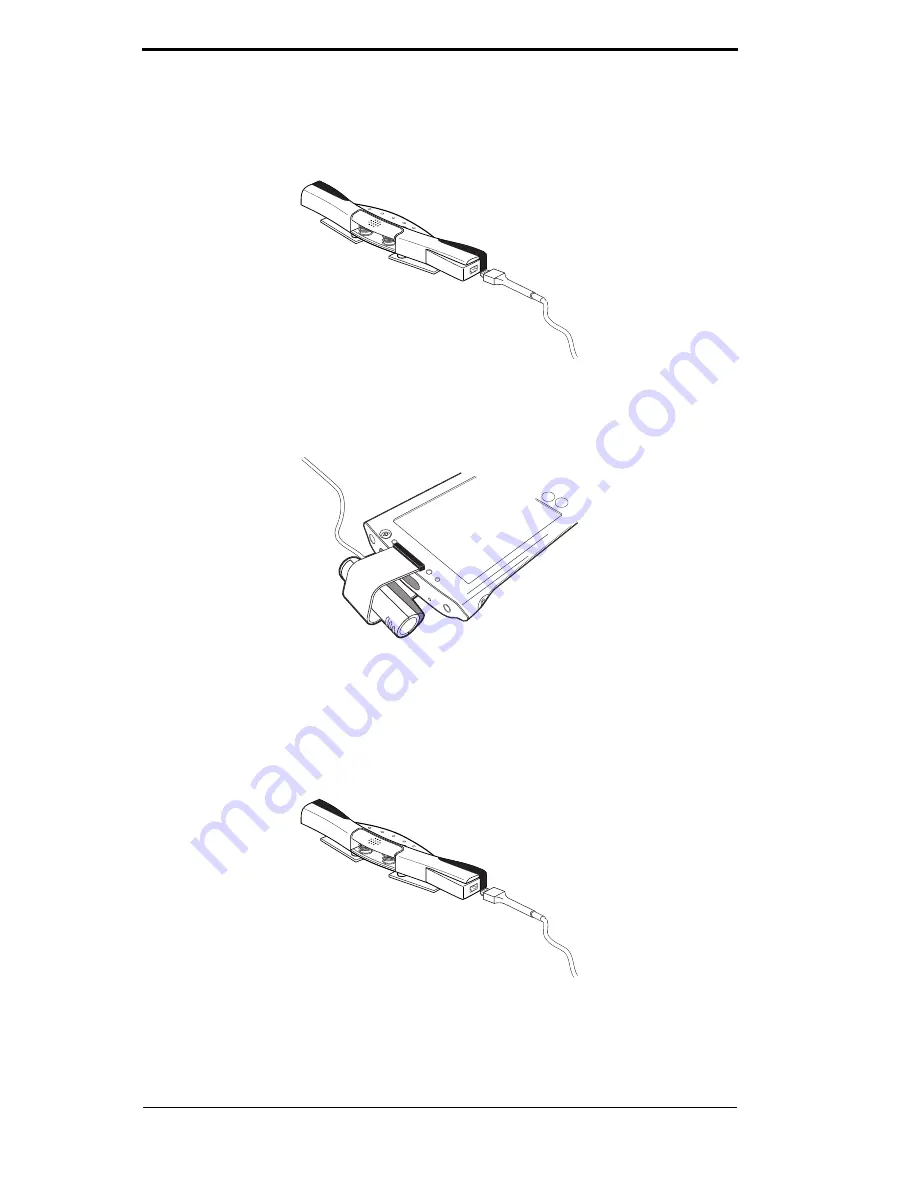
To connect to a handheld:

1.

Connect the cable on the IrDA transceiver to the connector on the left 
end of the data clip.

2.

Place the IrDA transceiver on the edge of your handheld over the IrDA 
port. The positioning is flexible; it doesn’t need to be tight against the 
port. Be sure that the clip is not contacting the screen.

You can also connect the data clip to a desktop or notebook computer using 
the InkLink USB cable or an optional serial cable.

To connect to a desktop or notebook computer:

1.

Connect the small connector on the cable to the connector on the left end 
of the data clip.

2.

Connect the other end of the cable to the appropriate port on the desktop 
or notebook computer.

Summary of Contents for SmartPad LINK-IR-P

Page 1: ...Quick Start Guide Seiko Instruments USA Inc www seikosmart com ...

Page 2: ...ppear in the ActiveSync window In addition it must be configured to synchro nize Files If these conditions are not met refer to the documentation you received with your Pocket PC device to get ActiveSync working To install InkNote Manager 1 Connect your handheld and desktop computer using a cradle cable or infrared connection 2 Insert the software CD ROM in your computer s CD drive The setup progr...

Page 3: ...ber If you are going to use your InkLink with a handheld be sure to check the appropriate box so setup will install the handheld version of InkNote Manager On Windows NT 2000 or XP you must have administrative rights to install the software If you get an error during setup disable your anti virus program and run setup again 2 Install the IrDA Transceiver Battery The InkLink data clip is powered by...

Page 4: ... tip of the pen onto a hard surface until the cartridge won t go in any further Do not attempt to disassemble or unscrew the body of your InkLink pen The pen body is sealed and cannot be opened without damaging the elec tronics 4 Install the InkLink Pen Batteries The InkLink pen is powered by three SR41 batteries To install the InkLink pen batteries 1 Unscrew the battery cap from the top of the pe...

Page 5: ... edge of your pad align the left sides and release it Aligning the data clip with the left edge of the paper makes it easy to put it in the same place every time Note To choose a paper size other than the default letter size see Choosing a Paper Size in the User s Guide To place the data clip on a different edge of the page see Defining a Paper Size in the User s Guide 6 Connect InkLink to a Compu...

Page 6: ...oesn t need to be tight against the port Be sure that the clip is not contacting the screen You can also connect the data clip to a desktop or notebook computer using the InkLink USB cable or an optional serial cable To connect to a desktop or notebook computer 1 Connect the small connector on the cable to the connector on the left end of the data clip 2 Connect the other end of the cable to the a...

Page 7: ... 7 Begin Creating Ink Notes You are ready to create your first ink note Use the InkLink pen end on your InkLink writing pad Use a stylus or the optional stylus pen cap on your handheld Do not use the pen on the handheld screen it might scratch the surface To create an ink note 1 Launch InkNote Manager 2 Write on the InkLink tablet with the InkLink pen An ink note will appear on the screen ...

Page 8: ...Note Manager choose File Help handheld version or Help Help contents desktop version Visit us on the Web at www seikosmart com support Call Seiko support at United Sates 800 757 1011 Canada 800 757 1011 United Kingdom 00 800 727 97870 France 00 800 727 97870 Germany 00 800 727 97870 Central Europe 00 49 4105 1559 136 Brazil 55 11 5041 9515 To purchase supplies Visit us on the Web at www seikosmart...

Reviews: