83
How to reset the built-in IC
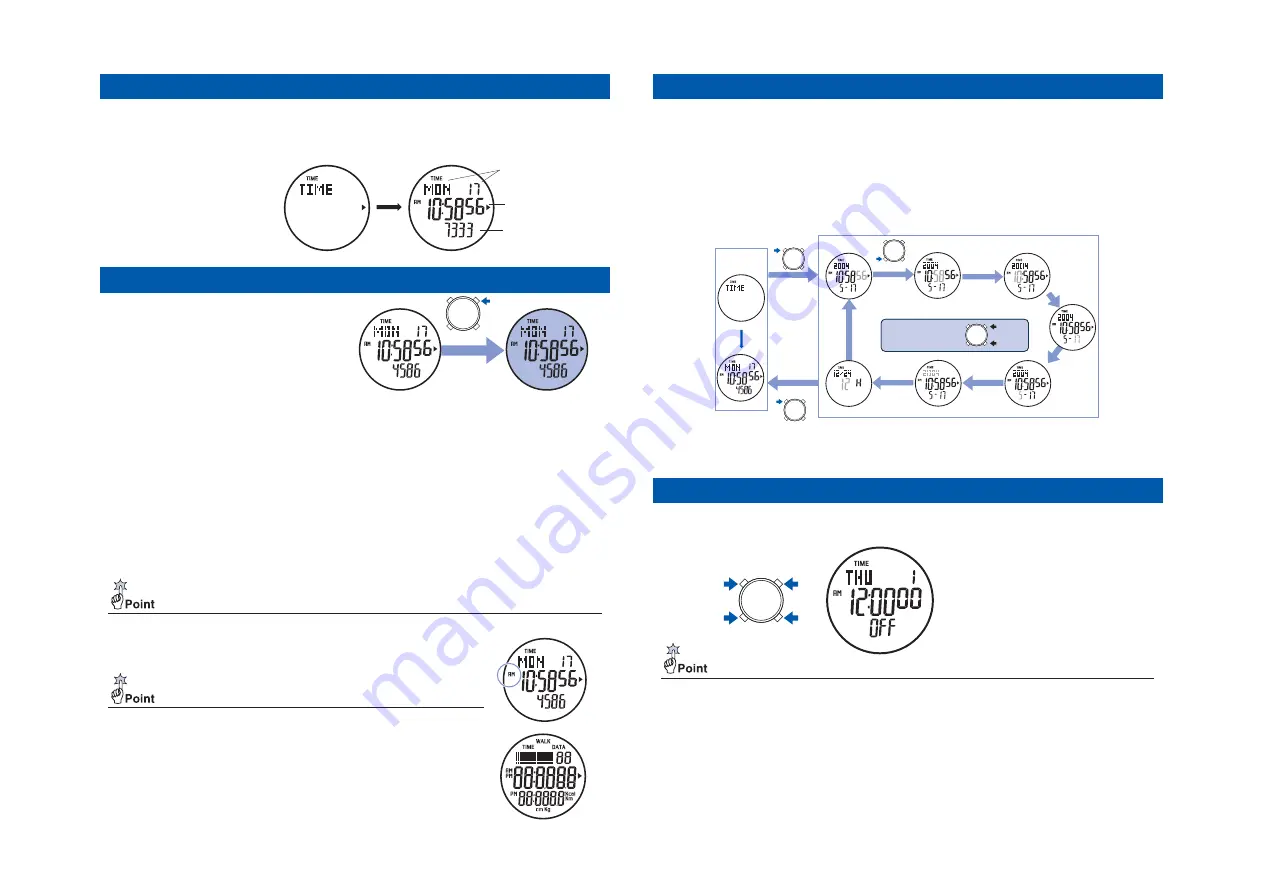
Press and hold all the Buttons A,
B, C and D at the same time
Once the display becomes blank, and when the
Buttons are released, the display returns to
the default setting in the
TIME <current time>
mode
, and immediately starts operating.
When an abnormal display (broken digits, etc.) appears, follow the procedure below. The built-in
IC will be reset and the watch will resume its normal operation.
● After the IC is reset, all the stored data including personal data, date, current time, daily and
weekly walking log are completely erased. And it will be necessary to input the time, date and
personal data once again.
82
To reset the second digits to 00, press either Button C or D. While the second digits count any number
between 00 and 29 the second digits are reset to 00, while the second digits count any number between
30 and 59 one minute is added and the digits return to 00. To set the second digits accurately, a time
signal by a television or by a telephone is convenient.
SECOND SETTING
● Changing the date of the watch may cause discrepancies in the stored daily walking log and weekly walking log.
Press Button C to increase the digits, and press Button D to decrease the digits.
There is no need to set the day of the week, as once the year, month and date are set; the day of the week is automatically set.
MINUTE, HOUR, DATE, MONTH AND YEAR SETTINGS
Press either Button C or D to select either 12H for the 12-hour indication or 24H
for the 24-hour indication.
If you press Button A and D at the same time while adjusting or selecting any item of
the display for any adjustments, all the indicators of the display light. This is not a
malfucntion. In such a case, press any of Button A, B, C or D to return to the
TIME
current time display
.
SELECTION OF 12-/24-HOUR INDICATION
ALL INDICATORS LIGHT
● When the 12-hour indication is selected, the AM indicator for the morning and the
PM indicator for the afternoon will appear at the left side of the display, which is the
default setting. If you select the 24-hour indication, no AM or PM indicator appears
on the display, but 13:00 for PM 1:00 and 14:00 for PM 2:00 etc. will appear.
80
● Built-in illuminating (led) light
Time <current time> mode (watch function) ● How to read the display
Button C
Illuminated for 3 seconds
Press Button A to show the
TIME <current time> mode
.
After approximately 2 seconds,
the current time, date, day of the
week and number of steps (or
calories burned, walking distance)
are all displayed as illustrated
below. For everyday use other
than walking, it is best to set the
watch to the TIME <current
time> mode.
After 2 seconds
Day of the week, date
(Example: Monday,17th)
Current time
(Example: 10:58 56 )
Number of steps
(Example: 7,333 steps)
The watch displays the current time, date, day of the week as well as the number of steps (or
calories burned, walking distance). It also features a full-automatic calendar which requires no
calendar adjustment at month ends including Februaries of leap years.
Each time you press Button C, the built-in illumi-
nating light illuminates the display for approxi-
mately 3 seconds for easy viewing in darkness.
Except when you are adjusting or setting the
watch, you can turn the light on by pressing But-
ton C not only in the
TIME <current time> mode
but also in any other mode.
※ Through the light guide panel, the lightgenerated by the LED
(Light-emitting diode) is evenly projected on the display.
※ When the voltage becomes low as the battery nears its end, the light becomes dim.
81
● How to set the time
Button A
12H-/24H-indication
Button A
Button A
Button A
Button A
Button A
Button B
Press and hold Button B
for 2 seconds or more
After 2 seconds
Button A
TIME
<current time>
mode
Second setting
Minute setting
Year setting
Hour setting
Month setting
Date setting
Button C
Button D
To set each item, you can
increase the digits by pressing
Button C, or decrease the
digits by pressing Button D.
1. Press Button A to show the
TIME <current time> mode
.
2. Press and hold Button B for 2 seconds or more until the year appears atop of the display and the month
and date appear at the bottom of the display. The second digits start fl ashing indicating that the watch
is now in the SETTING mode.
3. Press Button A to select the item to be adjusted, and press Button C (increasing digits) or Button D (de-
creasing digits) to set the time.
4. After all the adjustments are completed, press Button B to return to the
TIME <current time> mode
. If
you press Button B while you are setting the watch, the display returns to the
TIME <current time> mode
. (If
the watch is left untouched while any of the items are fl ashing for adjustment, the display returns to the
TIME <current time> mode
within a few minutes.)
The gray digits in the illustration indicate that they are fl ashing and adjustable.
Summary of Contents for S252
Page 3: ...7 6 5 5 35 4...


