


5
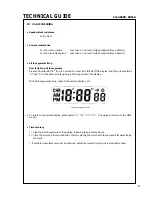
TECHNICAL GUIDE
Cal. A860A, A861A
Speaker lead
terminal
III.
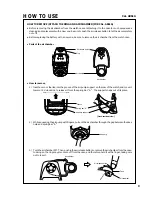
REMARKS ON DISASSEMBLING AND REASSEMBLING
Use the universal movement holder for disassembling and reassembling.
•
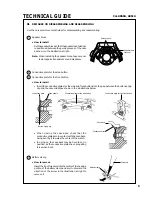
How to install
Set the speaker block so that the speaker lead terminal
is positioned between the guide grooves of the case
as shown in the illustration at right.
Note: When installing the speaker block, take care not
to damage its transparent sound diaphram.
Guide groove
8
Conductive plate for the side button
9
Conductive plate for the front button
7
Speaker block
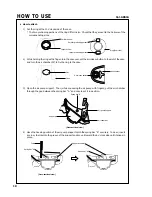
•
How to install
• Insert the conductive plates for the side and front buttons into the gap between the button spring
clip and the case middle as shown in the illustrations below.
Conductive plate
Case middle
Button spring clip
Conductive plate for the side button
Conductive plate for the front button
Case back
Conductive plate
• When closing the case back, check that the
conductive plates are in contact with the case back,
being bent by it towards the center of the watch.
• In doing so, the case back may be hard to set in
position, as the conductive plates have a repelling
force when bent.
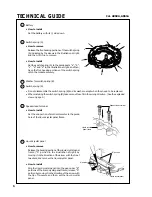
10
Battery clamp
•
How to remove
Insert the tip of tweezers into the center of the hooking
portion of the battery clamp and pry it up toward the
direction of the arrow in the illustration at right to
remove it.
Tweezers
Battery clamp
Summary of Contents for A860A
Page 11: ......
Page 12: ...99 1 Printed in Japan...