


8/10 CHANNEL
MIXING CONSOLE
17
8
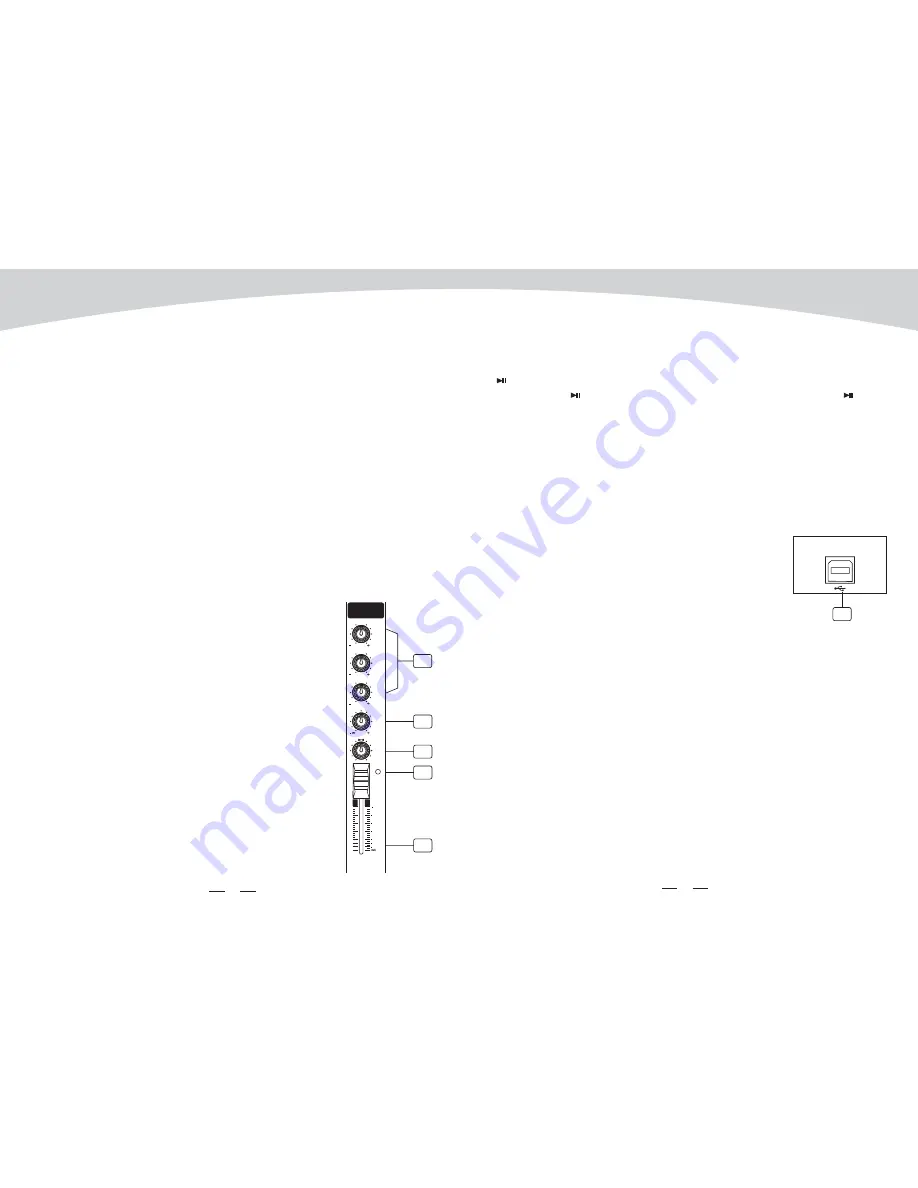
Adjust the amount of compression applied to the channel. Turn the knob to the right to increase
the compression ration and the output gain will automatically adjusted. The result is smoother,
more even dynamics because louder signals are attenuated which the overall level is boosted.
This is the treble control. You can use it to get rid of high frequency noises or to boost the
sound of cymbals or the high harmonics of the human voice. The gain range goes from -15dB
to +15dB with a center frequency of 12kHz.
This is the mid range control. It can affect most fundamental frequencies of all musical
instruments and human voice. An attentive use of this control will give you a very wide
panorama of sound effects. The range goes from -15dB to +15 dB and the center frequency
of 2.5kHz.
This is bass control. it is used to boost male voice, kickdrum or bass guitar. the gain range goes
from -15dB to +15dB with a center frequency of 80Hz.
These controls are used to adjust the level of the POST
FADER signal sent to DFX (AUX) SENDS output, which
can be used for monitor application and effects & sound
processors input.
The PAN control determines the stereo positioning
of the channel signal on the stereo L and R buses.
The BAL control knob sets the balance between left and
right channels. Signal input through the stereo L/R bus.
The peak level of the post-EQ signal is detected, and the
PEAK Indicator lights red when the level reaches 3dB
below clipping. For XLR-equipped stereo input channels,
b o t h t h e p o s t - E Q a n d p o s t - m i c - a m p p e a k l e v e l s a r e
detected, and the indicator lights red if either of these
levels reaches 3 dB below clipping.
8. COMP CONTROL
9. EQUALIZER
Hi
MID
LOW
10. DFX (AUX) / POST
11. PAN / BAL CONTROL.
12. PEAK LED
Press VOL+ key to increase volume during Power on state.
In play state, press
PLAY / PAUSE key to pause the player. In pause state, press
PLAY /
PAUSE key to start playing.
Press this key and hold for 2-3 seconds, the player will change to matching state. In this sate,
the two LEDs alternately flash quickly, and you can u se your mobile phone, tablet or
PC Bluetooth adapter to find devices, BT-2.1. If your device's Bluetooth version lower than
2.0, you should enter the password "0000". If your device's Bluetooth version higher than 2.0,
you do not need to enter a password.
e- VOL+
f-
PLAY/PAUSE
g- PAIR
1
EQ
HI
MID
LOW
PAN
PEAK
1
15
15
0
15
15
0
15
15
0
10
R
L
AUX
POST
15
10
dB
5
0
5
10
20
30
40
60
12KHz
2.5KHz
80Hz
9
10
11
12
13
36. Optional USB interface
USB USE
This section can be selected and installed according to user' s
requirement.
The USB interface provides a digital audio connections to
PC / MAC.
With this interface you can use the unit like soundcard for recording at 16 bit / 44.1 kHz
play back audio file (wave, aiff, mp3 etc.) With Windows and Macintosh computers. Use
computer built in audio recorder or use dedicated Digital Audio Workstation software
to record and play back CD -quality audio within your computer. For connection the unit to
computer. We suggested a standard A MALE / B MALE USB cable , and we wish that you do
not use hubs and other extenders, that often cause glitches and other problems. The USB
port sends the MAIN MIX left and right signals to the computer.
The USB port receives a stereo audio stream from the computer and assigns it to the 2-
INPUT left and right channels of your mixer.
NOTE: If a device is connected to the 2-TRACK INPUT, the signal from this device is
with the signal from the computer.
To ensure that the unit is recognized correctly by your computer, always turn the mixer on a
few seconds before inserting the USB cable into the computer. When powering up both your
computer and the unit, turn on the mixer first and the computer second.
When powering down your computer and the unit, turn off the computer first . Wait to turn
off the mixer until the computer has completed the shut down process.
and
the
(DAW)
TRACK
merged
36


