background image

Needham TV/Media Stand 

Parts List 


Please review all parts and hardware before disposing of any packaging. 
Call Customer Service if missing hardware. Do not return to store/retailer. 
Using hardware that is too long will cause damage.  
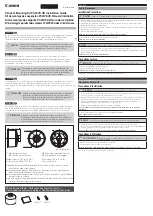
Before beginning assembly, separate each type of hardware. Carefully study the hardware  
diagrams below. You may receive extra hardware with your unit


Assembly Tool Required 

No. 2 Phillips Screwdriver 

(1) 

8mm x 30 mm  
Wood Dowel


Quantity 

of 22 

1/4” x 1”  Bolt 

(2) 

Quantity 

of 20 

3.5mm x 12 mm 
Screw For Back


Assembly Tool Required 

No. 2 Phillips Screwdriver 

(Not Included) 

Care and Cleaning Instructions: 

Before using, wipe with a clean, dry cloth. 
Periodically apply furniture wax to renew 
the finish. Avoid rubbing or scratching the  
surface with rough or abrasive objects. 

For replacement parts or questions, please 
call Customer Service at 1-800-633-5096. 
Do not return product to store. Please call 
manufacturer for assistance, questions or 
parts. 

Quantity 

of 4 

Magnet 

Metal Nut


Metal Pin


(3) 

(5) 

(6) 

(7) 

(9) 

(10) 

Quantity 

of 22 

Quantity 

of 3 

Quantity 

of 12 

Quantity 

of 4 

Quantity 

of 4 

1/4” x 38mm 
Bolt For Drawer


3.5mm x 15 mm 
Screw For Magnet


Metal Knob


(11) 

5/32” x 15mm 
Bolt For Metal Knob


Quantity 

of 4 

Bracket


Plastic Anchor


Quantity 

of 4 

(13) 

(14) 

Quantity 

of 4 

7mm x 38mm 
Screw For Wall


(15) 

Plastic Chain


3.5mm x 15 mm 
Screw For Bracket


Quantity 

of 2 

Quantity 

of 3 

Quantity 

of 4 

Quantity 

of 2 

(4) 

(8) 

(12) 

Summary of Contents for 11740

Page 1: ...For assistance with assembly contact Southern Enterprises Inc Customer Service 1 800 633 5096 service seidal com www seidal com Needham TV Media Stand MS834000TX Espresso Assembly Instructions PO 11740 ...

Page 2: ...tity of 1 Quantity of 1 Drawer Face Panel Drawer Left Side Panel Middle Adjustable Shelf Left Adjustable Shelf Drawer Right Side Panel Right Adjustable Shelf E F G Quantity of 1 Quantity of 1 Quantity of 1 I J K Quantity of 1 Quantity of 1 Quantity of 1 Q R S Quantity of 1 Quantity of 1 Drawer Back Panel Bottom Panel Left Middle Panel Left Door Right Door Top Panel M N O Quantity of 1 Fixed Shelf ...

Page 3: ...Cleaning Instructions Before using wipe with a clean dry cloth Periodically apply furniture wax to renew the finish Avoid rubbing or scratching the surface with rough or abrasive objects For replacement parts or questions please call Customer Service at 1 800 633 5096 Do not return product to store Please call manufacturer for assistance questions or parts Quantity of 4 Magnet Metal Nut Metal Pin ...

Page 4: ...l parts indicated on the front page Step 2 Insert the Wood Dowels 1 into predrilled holes in Left Middle Panel G Step 3 Attach Left Middle Panel G to the Bottom Panel F with Bolt 2 Step 1 Insert the Wood Dowels 1 into predrilled holes in Fixed Shelf I Step 2 Attach Fixed Shelf I to the Left Middle Panel G Figure 2 Figure 1 1 8mm x 30 mm Wood Dowel Quantity of 2 1 8mm x 30 mm Wood Dowel Quantity of...

Page 5: ...Step 2 Attach Side Panels J K to the Bottom Panel F with Bolt 2 then fasten them Step 3 Attach Support Post L to the Bottom Panel F with Bolt 2 then fasten them 5 32 x 15mm Bolt For Metal Knob 7 Quantity of 2 1 2 1 4 x 1 Bolt 8mm x 30 mm Wood Dowel Quantity of 4 Quantity of 2 Step 1 Attach the Left Door M to the Left Side Panel J and Right Door N to the Right Side Panel K Step 2 Attach Handle 6 to...

Page 6: ...m x 12mm Screw For Back Quantity of 20 Figure 7 Step 1 Insert the Wood Dowels 1 into predrilled holes in Side Panels J K and Middle Panels G H Step 2 Attach Top Panel O to the Side Panels J K and Middle Panels G H with Bolt 2 then fasten them 3 Magnet Quantity of 2 Step 1 Attach the Back Panel P with Screw For Back 5 Figure 6 2 1 4 x 1 Bolt Quantity of 8 1 8mm x 30 mm Wood Dowel Quantity of 8 ...

Page 7: ...tal Pins 10 in each section Step 1 Attach the Drawer Side Panels B C to Drawer Face Panel A with Bolt 2 through outer predrilled holes in Drawer Side Panels B C Step 2 Put the Drawer Bottom Panel D into inner grooves of Drawer Side Panels B C and Drawer Face Panel A Step 3 Insert Nut 8 into predrilled holes on Drawer Back Panel E then be attach Drawer Back Panel E to end side of Drawer Side Panels...

Page 8: ...anel J K with Screw For Bracket 12 Step 2 Drill 1 4 pilot holes in near proximity of the Bracket 11 attached to the Side Panel J K and tap the Plastic Anchor 13 into wall Step 3 Fasten Bracket 11 using Screw For Wall 14 into the Plastic Anchor 13 12 11 Quantity of 4 13 Plastic Anchor Quantity of 4 7mm x 38 mm Screw For Wall Bracket 3 5mm x 15 mm Screw For Bracket 14 Quantity of 4 15 Plastic Chain ...

Page 9: ...y assembled We do not recommend modifying product s and we are not responsible for any damages due to product modification s If damages or missing parts are not reported within 90 days of your receipt we are under no obligation to provide parts or replacement merchandise Please contact Southern Enterprises at 800 633 5096 or in Dallas 972 869 0111 9am 4pm Mon Fri Central time if you have product i...

Page 10: ...d with more than 15 lb DO NOT EXCEED RECOMMENDED LOAD Use with products heavier than the maximum sizes and weights indicated may result in instability causing possible injury This unit contains a permanent warning sticker located on under side of top shelf or inside drawer Do not allow children under 16 years to move the cart Model MS834000TX Needham TV Media Stand Southern Enterprises Inc 600 Fre...

Reviews: