background image

LinkStar-H68K-C D F 

Model Routing 

Quick

Start Guide 

Full 
text 

Document version 

20220901 

13 

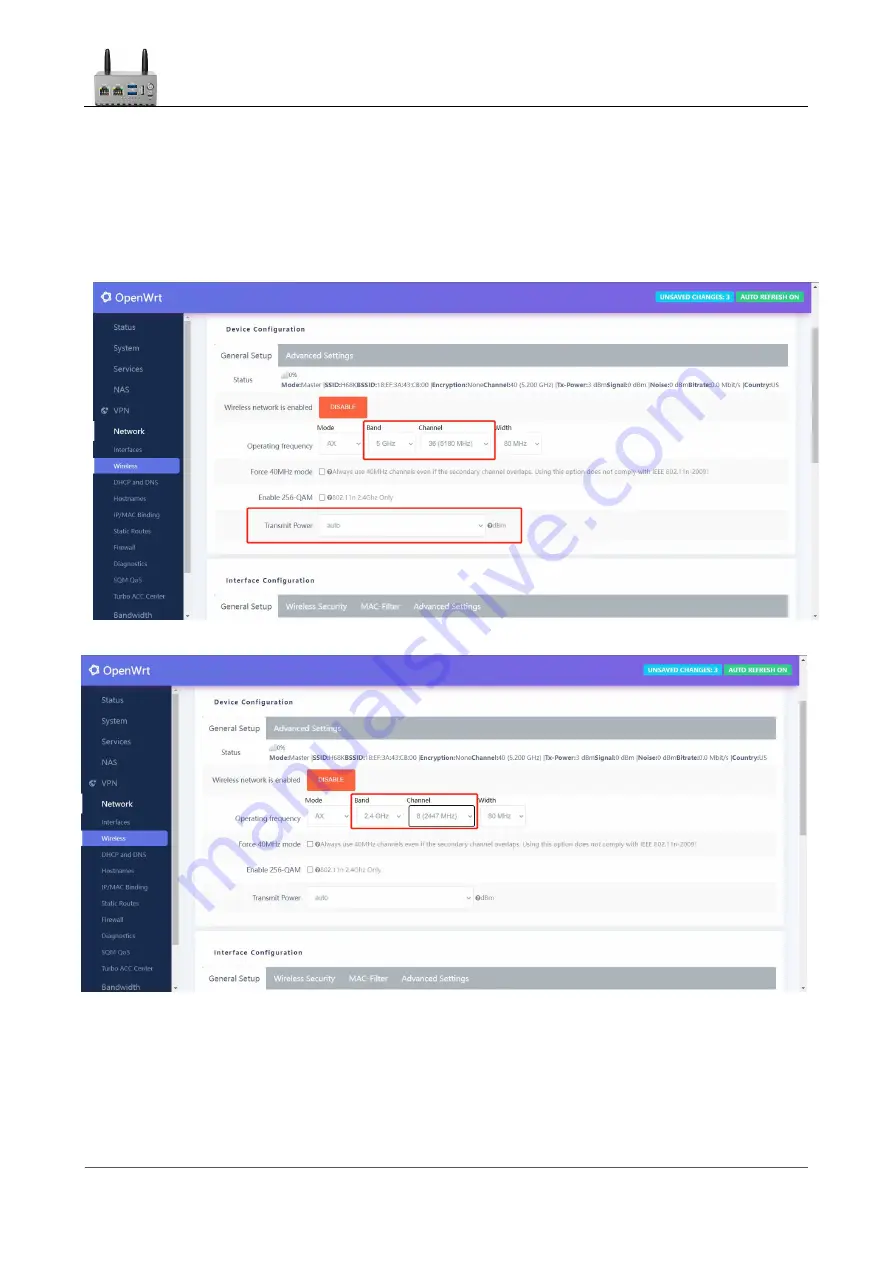
If you need a 

5G WIFI 

hotspot: select 

5GHz for 

[Bandwidth] and a fixed channel for [Channel].

Note: Do not select 

auto 

mode. Other default.

If you need a 

2.4G WIFI 

hotspot: select 

2.4GHz for 

[Bandwidth] and a fixed channel for

[Channel]. Note: Do not select 

auto 

mode. Other default.

Translator: GitHub@IcingTomato

Summary of Contents for C Series

Page 1: ...LinkStar H68K C D F Series Quick Start Guide Document version Release Date 20220901 2022 09 01 Translator GitHub IcingTomato ...

Page 2: ... ÿ ÿ ÿ ÿ ÿ ÿ ÿ ÿ ÿ ÿ ÿ ÿ ÿ ÿ ÿ ÿ ÿ ÿÿ ÿ ÿÿ ÿÿ ÿ ÿÿ ÿ ÿ ÿÿ ÿ ÿ ÿ ÿ ÿ ÿÿ ÿ ÿÿ ÿ ÿ ÿ ÿ ÿ ÿ ÿÿ Model versions From official web material the H68K C D F model routing parameters are as follows Target Audience This document this guide is primarily intended for people who Beginner Intermediate Advanced Players Translator GitHub IcingTomato ...

Page 3: ...t in moderate or minor personal injury Used to communicate equipment or environmental safety warnings which if not avoided could lead to equipment damage data loss reduced equipment performance or other unpredictable results Caution without a safety warning symbol does not cover personal injury Used to highlight important key messages best practices tips etc Instructions is not a safety warning me...

Page 4: ...ribution methods 8 2 5 Secondary routing and distribution methods 10 2 5 1 Device connection topology diagram 10 2 5 2 Distribution methods 10 2 6 Wireless bridges and network distribution methods 14 2 6 1 Device connection topology diagram 14 2 6 2 Distribution methods 14 3 Firmware upgrade 20 3 1 Tool preparation for card brushing 21 3 2 TF card swipe operation procedure 21 3 3 Tool preparation ...

Page 5: ...here the F version has WIFI6 in wireless WIFI AX mode one USB3 0 two USB2 0 ports Storage Supports one way TYPC native SATA Audio and video HDMI 2 0 output 3 5mm four segment headphones with input and output The H68K C D F routing software has been developed by OP open source developers and supports kernel 4 19 and later 5 19 Support wired in and wireless in support wired local area exchange and w...

Page 6: ...text Document version 20220901 3 1 2 Interface description TheH68K F interface has only two more antennas than the C D The following highlights the F model 1 The TYPE C interface is the native SATA hard drive interface in OP mode Translator GitHub IcingTomato ...

Page 7: ...egotiated speed normal gigabit mode ETH0 yellow light flashing ETH1 yellow light flashing Simultaneous flashing of blue light No 3 ETH1 t o ETH2 ETH1 a n d ETH2 interfaces are normal Negotiated speed normal gigabit mode ETH1 Yellow light always on or flashing ETH2 Yellow light always on or flashing ETH1 t o ETH3 ETH1 a n d ETH3 interfaces are normal Negotiation speed normal Gigabit mode ETH1 Yello...

Page 8: ...ower on and the OP will not start up you need to change the card The TF card sent by default is supported Step 5 Press and hold the protruding illuminated power button and after approximately 5S you can observe that the No 1 light goes out and the power button light goes out The hibernation shutdown is complete Translator GitHub IcingTomato ...

Page 9: ...cessfully powered on Step 2 Connect one end of the cable to the H68K ETH1 and the other end to the PC network port H68K ETH0 is the WAN portand ETH1 2 3 i s t h e LAN port The PC PC needs to be set to DHCP mode as shown below Step 3 Type 192 168 100 1 into your computer s browser enter and the login screen will pop up Note that some open source firmware 192 168 100 1 User name root Password passwo...

Page 10: ...LinkStar H68K C D F Model Routing Quick Start Guide Full text Document version 20220901 8 Translator GitHub IcingTomato ...

Page 11: ...istribution methods Step 1 Connect the wire sequence Connect the wire sequence as shown in the topology diagram above Connect the incoming optical cat or incoming network port to ETH0 WAN port Step 2 Back Office Login The H68K waits for a successful power up thePC PC cable is connected to the ETH1 LAN port a n d t h e H68K is wired to access the H68K backend Step 3 Set up PPPOE dialing Click on th...

Page 12: ...the Basic Settings button select PPPOE in the Protocol column and click Switch Protocol to enter the PPPOE settings In the PAP CHAP Username field enter Broadband Account Name and in the PAP CHAP Password field enter Broadband Password Click Hold Apply and you are done Translator GitHub IcingTomato ...

Page 13: ... Step 1 Connect the wire sequence Connect the wire sequence as shown in the topology diagram above Connect the LAN of the dial up optical cat or the main routing network port to ETH0 WAN port Step 2 Back Office Login The H68K waits for a successful power up thePC PC cable is connected to the ETH1 LAN port a n d t h e H68K is wired to access the H68K backend Step 3 Setting up the DHCP protocol Clic...

Page 14: ...n select DHCP Client in the Protocol column and click Hold Apply to complete the wired configuration Step 4 For the F version set the WIFI hotspot Click on the Wireless button to find out that the H68K F will have a WIFI hotspot for the H68K by default Click Modify to enter the configuration Translator GitHub IcingTomato ...

Page 15: ...f you need a 5G WIFI hotspot select 5GHz for Bandwidth and a fixed channel for Channel Note Do not select auto mode Other default If you need a 2 4G WIFI hotspot select 2 4GHz for Bandwidth and a fixed channel for Channel Note Do not select auto mode Other default Translator GitHub IcingTomato ...

Page 16: ...page Select Access Point AP i n Mode of Basic Settings Configure your preferred WIFI hotspot name at ESSID Select lan at Network Finally tap Save Select WPA2 PSK f o r Encryption in Wireless Security Configure your preferred WIFI password at Password Finally tap Save Apply Translator GitHub IcingTomato ...

Page 17: ...le PCs WIFI for applications such as home bedrooms rented rooms in buildings and hotels on business trips the F version is recommended 2 6 1 Device connection topology diagram 2 6 2 Distribution methods Step 1 Plug in the card power on and self start H68K waiting for successful boot PC PC cable connected to ETH1 wired access to H68K backend Step 2 Click the Wireless button to enter the WIFI config...

Page 18: ...one computer or other device We will click Join Network for channel 149 below your device may have a different channel so please select the one you have scanned If WIFI2 4 is required select a channel less than 13 If WIFI5 6 is required select a channel greater than 36 or above At this point note that some electronics that only support WIFI 2 4G mode will not be able to search for t h e H68K SSID ...

Page 19: ...ll text Document version 20220901 17 Click on Channel and select the same as the main WIFI no other or AUTO can be selected click on Radio Power to configure Auto Click on Network and select wwan Click on the Save Apply button Translator GitHub IcingTomato ...

Page 20: ...LinkStar H68K C D F Model Routing Quick Start Guide Full text Document version 20220901 18 Step 5 Add and set up the H68K hotspot Click the Add button Translator GitHub IcingTomato ...

Page 21: ...c Settings configure the following click on Radio Power to configure Auto Click Mode to configure Access Point AP Click ESSID to configure H68K_Test enter the name you like as the name of the WIFI hotspot radiating from theH68K Click Network Configuration to configure lan Click Save Translator GitHub IcingTomato ...

Page 22: ...20901 20 In the following Wireless Security configure as follows click Encryption to configure WPA2 PSK Click on Password to configure Password a password of your choice the phone computer wireless access WIFI need to enter the password click Save Apply Translator GitHub IcingTomato ...

Page 23: ...e Disadvantage The H68K is not compatible with some high speed cards resulting in abnormal boot ups or abnormal functionality due to data loading errors caused by too fast a rate during power up loading Priority different networks can be configured with different TF cards the H68K is a portable route so you can swap different TF cards for business trips and commuting to work Dual system firmware i...

Page 24: ...es not recognize the card you can ask the group for a link to buy it or use the eMMC wire brush method 4 Software tools card writing tool Win32DiskImager Other card writing tools are also available such as balenaEtcher 5 Software material one case firmware package OPxxx img 3 2 TF card swipe operation procedure Step 1 Install the card writing tool P u t theTF card burning tool ImageWriter package ...

Page 25: ...iskImager tool Select the firmware package OPxxx img at the button in the Win32DiskImager tool Click the Write button in the Win32DiskImager tool to download it Wait until Task Progress has completed 100 and the eject has been successful before pulling out the TF card Insert the TF card into the H68K power up and complete the power on the 1 indicator light will flash rapidly to indicate successful...

Page 26: ...le phones used to poke holes 4 Software tool RK chip driver tool DriverAssitant_v5 12 5 Software tool RK firmware burning tool RKDevTool_Release_v2 84 for downloading OP firmware 6 Software material one case firmware package Android xxx img H68K Boot Loader bin OPxxx img 3 4 eMMC wire brush operation procedure Step 1 Install the driver Double click on DriverInstall in the DriverAssitant_v5 12 fold...

Page 27: ...ndroid Firmware 0828 for Erasing Flash img Plug one end of the TYPC C cable into your computer USB Insert the card picker thimble into the H68K spanner hole press the upgrade button inside the spanner hole there is a feeling of the button springing back the other end of the TYPC C data cable into the H68K TYPC C connector to keep the button pressed during the power up process The download tool wil...

Page 28: ...rade the firmware by clicking Download Image Click on the Boot bar the folder will pop up select H68K Boot Loader bin Click on the system bar the folder will pop up select OPxxx img Click on the Execute button The window on the right will show the progress of the download Translator GitHub IcingTomato ...

Page 29: ...me as in the previous section Preparing the eMMC wire brush with tools Step 2 Erase the firmware Double click RKDevTool in the RKDevTool_Release_v2 84 for downloading OP firmware folder Click the Upgrade Firmware button Click on the Firmware button and select H68K Android Firmware 0828 for Erasing Flash img Translator GitHub IcingTomato ...

Page 30: ...YPC C data cable into the H68K TYPC C connector Keep the button pressed during power up The download tool will bring up Found a MASKROM device Click on Erase Flash and wait for it to finish erasing The card picker ejector pin is used with gentle pressure please do not poke the button with a strong miracle Click on the Upgrade button the right window will show the progress of the download wait for ...

Page 31: ...220901 29 4 About power supply and cooling 4 1 DC12V adapter option Power DC connector specification 5 5mm outer diameter 2 1mm inner diameter No external hard drive scenario select 12V 1A adapter With external hard drive scenario select 12V 2A adapter Translator GitHub IcingTomato ...

Page 32: ...e must not exceed 15V H68K Deploy away from heat sources sources of electromagnetic interference and radiation and electromagnetic radiation sensitive equipment You can tell if the 12V is powered by the white light on the power button the light is on for power and the light is not on for no power to the adapter Translator GitHub IcingTomato ...

Page 33: ...on standard adapter may output 9 V The white power light on the H68K will flash and the unit will not power up properly The H68K will be burned out if you disconnect it as soon as possible and use a standard adapter or DC12V 3 H68K Deploy away from heat sources sources of electromagnetic interference and radiation and electromagnetic radiation sensitive equipment 4 The TYPC C wire should be as sho...

Reviews: