Seeed Technology Co., Ltd ReSpeaker Core v2 User Guid
A. Boot from the SD card
Step 1. Click the OneDrive icon above to download our latest image zip files:
respeaker-debian-9-lxqt-
sd-********-4gb.img.xz
or
respeaker-debian-9-iot-sd-********-4gb.img.xz
.
Step 2. Plug the SD card into your PC or MAC with an SD card reader. You need an SD card with a
capacity of more than 4G.
Step 3. Click to download Etcher here, and burn the *.img.xz file directly to your SD card with Etcher. Or
unzip the *.img.xz file to a *.img file, then burn it to SD card with other image writing tools.
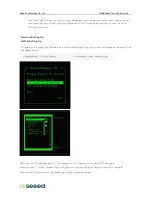
Click the Plus icon to add the image you just download, the software will automatically select the SD
card you plug.Then click Flash! to start burning. It will take about 10 minutes to finish.
Step 4. After writing the image to the SD card, insert the SD card in your ReSpeaker Core v2.0. Power
the board using the PWR_IN micro usb port and DO NOT remove the SD card after powering on.
ReSpeaker Core v2.0 will boot from the SD card, and you can see USER1 and USER2 LEDs light up.
USER1 is typically configured at boot to blink in a heartbeat pattern and USER2 is typically configured at
boot to light during SD card accesses. Now, you should go to the next part: Serial Console.


