Securitytec DVRMP4 User Manual Download Page 9


9

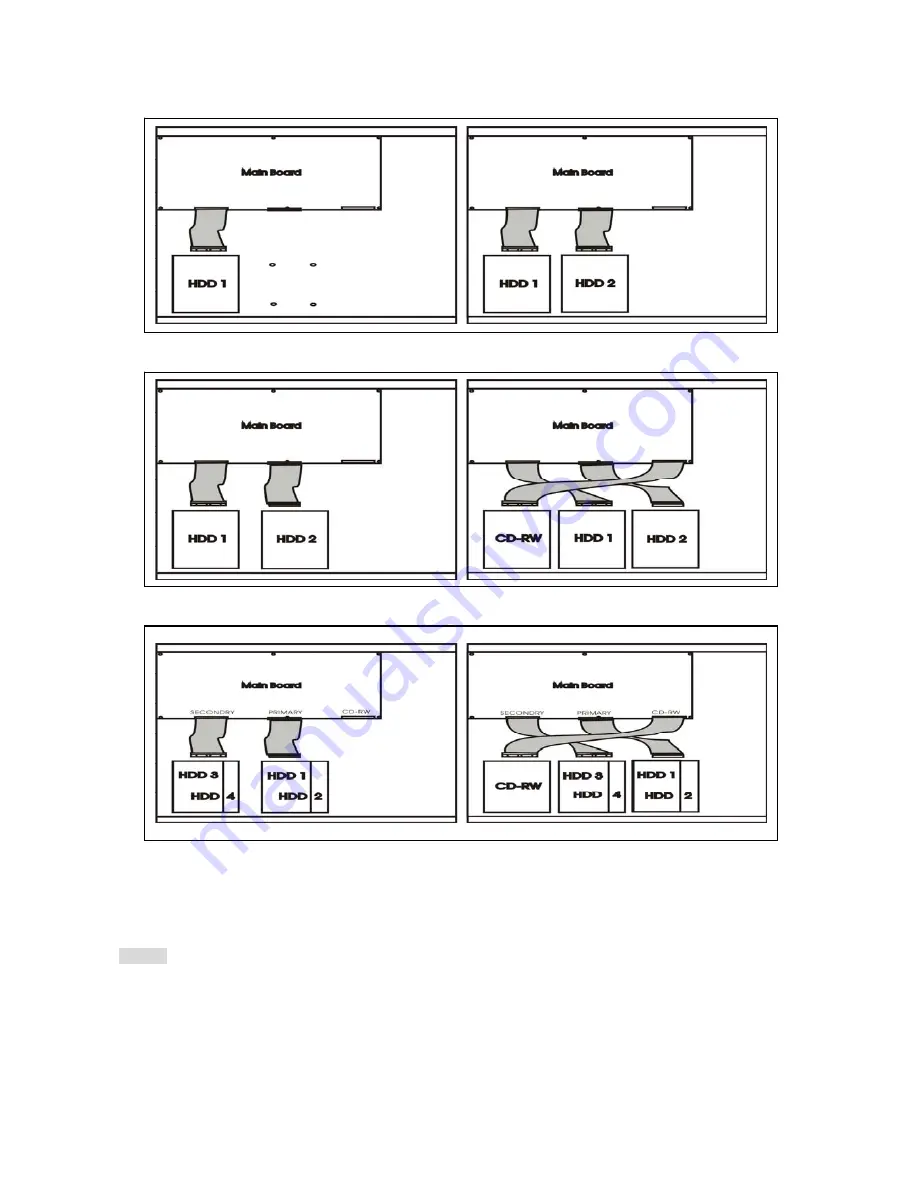
4) HDD internal connection


                Master x 1                                                                    Master x 1 / Slave x 1 


         Master x 1 / Slave x 1                       CD-RW   Master x 1 / Slave x 1 


        Master x 1 / Master x 1                       CD-RW   Master x 1 / Master x 1 

Slave x 1 /    Slave x 1                                                                    Slave x 1 /    Slave x 1 


Notice: 

-Hard Disk Master and Slave jumper pin must be right, otherwise DVR will show fault. 


Summary of Contents for DVRMP4

Page 1: ...1 Thank you for purchasing our product Please read this User s Manual before using the product Change without Notice 4 Channel Digital Video Recorder User s Manual...

Page 2: ...e user to the presence of important operation and maintenance servicing instructions in the literature accompanying the appliance WARNING TO PREVENT FIRE OR SHOCK HAZARD DO NOT EXPOSE UNITS NOT SPECIF...

Page 3: ...s product contact your local dealer Strong recommendation on installation of the DVR unit 1 Check electricity at the place you want to install the DVR unit is stable and meets our electricity requirem...

Page 4: ...led and used in accordance with the instructions may cause harmful interference to radio communications However there is no guarantee that interference will not occur in a particular installation If t...

Page 5: ...allation 7 1 Procedure 7 2 Picture 9 3 Playback 11 5 Function Setup 13 1 Log in 13 2 Basic Operation 14 6 Specifications 36 7 PTZ Control 38 1 X DVR Machine 1 X Power Cord 1 X IDE cable 1 X Adaptor 12...

Page 6: ...tton Time search button Key lock button Function exit button Value change button Direction button Up and Down Record or playback stop playback pause or step button Direction button left and right Fast...

Page 7: ...l dealer for optional purchase Unit Description of Rear Panel Power cord in DC 12V power switcher Camera 1 4 input and looping output Audio channel input x 4 and output x 2 75 ohm high and low dips sw...

Page 8: ...nel of the DVR Relay output COM NC COM NO Alarm input Short circuit between Alarm1 Alarm2 Alarm3 or Alarm4 and GND is recognized as alarm Alarm 1 4 Camera1 4 NOTICE Sensor input is recognized as LOW w...

Page 9: ...er x 1 Slave x 1 Master x 1 Slave x 1 CD RW Master x 1 Slave x 1 Master x 1 Master x 1 CD RW Master x 1 Master x 1 Slave x 1 Slave x 1 Slave x 1 Slave x 1 Notice Hard Disk Master and Slave jumper pin...

Page 10: ...lay quad screen Press numeric 1 2 3 4 buttons to display the desired camera image in full screen 1 FREEZE Mode 1 In live and the quad mode press FREEZE button to freeze image Press again to cancel fre...

Page 11: ...button to display pictures on screen 7 Alarm Sensor Recording See the alarm recording setup page 24 8 Scheduled Recording See the scheduled recording setup page 27 9 Motion detection Recording See the...

Page 12: ...oth going recommend using CD R disk to backup data Multi used CD disk is not recommend BACKUP SETUP PAGE 1 BACKUP DEVICE USB FROMAT 2 BACKUP FORMAT 3 BACKUP CHANNEL 1 2 3 4 START xxxx xx xx xx xx xx E...

Page 13: ...t Event source Video loss Alarm trigger Motion Pwreset DVR reboot Key lock Key unlock Net login Net logout Notice Each page contains 12 events recorded the DVR stores total 1024 events and then rewrit...

Page 14: ...splay GOTO xxxx xx xx xx xx xx year month day Hour Minute Second Press values change button to change date and time values PLAY GOTO TIME After date and time input direction move to PLAY GOTO TIME pre...

Page 15: ...panel function buttons Notice 1 ADMIN level can setup all DVR menu functions 2 USER level cannot setup ADVANCED page of DVR main menu function 3 GUEST level cannot setup DVR menu LOGIN 1 Default passw...

Page 16: ...tup 3 Press sub menu item with direction button up down or left right button And change the value with values change button or turn inner shuttle 4 Press ESC to go back to main sub menu or exit menu O...

Page 17: ...d full is 99 Brand DVR system auto detect hard disk brand after power on Status USE IDLE START xxxx Y xx M xx D xx xx xx H M S The first recording date and time display END xxxx Y xx M xx D xx xx xx H...

Page 18: ...down choose position values change button to change date and time values Notice Please stop REC function first if you want to change the time 5 Date and Time position setup Notice User can see the dat...

Page 19: ...off setup ON OFF DVR STATUS DVR system record playback audio caption display mode on or off setup ON OFF VLOSS DISPLAY Video loss display ON OFF Press direction button UP DOWN to choose the desired i...

Page 20: ...We recommend you to adjust each element of COLOR SETUP for cameras and monitor to be connected to the DVR unit Press direction button UP DOWN to choose items Press values change button to change value...

Page 21: ...apital letter A B C D E F G H I J K L M N O P Q R S T U V W X Y Z SPACE Press direction button UP DOWN LEFT RIGHT to choose items and position Press values change button to change values CAMERA SETUP...

Page 22: ...ON 2 CH 2 OFF ON 3 CH 3 OFF ON 4 CH 4 OFF ON CAMERA SETUP 1 COLOR SETUP 2 TITLE SETUP 3 MARK MIRROR SETUP MASK MIRROR SETUP PAGE MASK FUNCTION OFF 1 CH 1 OFF 2 CH 2 OFF 3 CH 3 OFF 4 CH 4 OFF MIRROR F...

Page 23: ...rection buttons UP DOWN to BUZZER SETUP items Press values change button to change values BUZZER RELAY SETUP PAGE BUTTON TONE ON SYSTEM BUZZER OFF 1 ALARM BUZZER ON 2 MOTION BUZZER ON 3 VLOSS BUZZER O...

Page 24: ...On quad or full screen user needs to select channel live output 2 But on playback mode this function is no used Users need to choose channel output That means just press channel button to playback aud...

Page 25: ...1 P2 preset point Present 2 is the preset point for alarm event after duration time the camera lens return to P1 preset point For detail setting please refer to the DVR PTZ control description MAIN SE...

Page 26: ...POPUP ON OFF ALARM POLARITY SETUP ALARM01 NO NC OFF ALARM02 NO NC OFF ALARM03 NO NC OFF ALARM04 NO NC OFF MENU ESC EXIT MODIFY ALARM POLARITY SETUP PAGE ALARM01 NO NC OFF ALARM02 NO NC OFF ALARM03 NO...

Page 27: ...ion Sensitivity 1 15 3 MOTION ACTIVE For each channel ON OFF 4 MOTION AREA SETUP MOTION SETUP PAGE MOTION FUNCTION ON CHANNEL NUMBER CH01 1 FRAME NUMBER 03 2 SENSITIVITY 010 3 MOTION ACTIVE ON 4 MOTIO...

Page 28: ...lect all area mode OFF CLEAR CH01 AREA MASK WALK ON MODE 1 2 3 4 SELECT CHANNEL MOVE CURSOR ENTER KEY MASK OFF ESC KEY QUIT Press 1 2 3 4 numeric to select channel Press value change button to change...

Page 29: ...d effect records to hard disk ON OFF 7 SCHEDULE SETUP 8 RECORD SPEED SETUP Notice Normal record is Independent It will not in conflict with event record RECORD SETUP PAGE 1 RECORD TYPE FIELD 2 HDD FUL...

Page 30: ...ss values change button to increase or reduce Press direction buttons UP DOWN LEFT RIGHT to see date and time difference Press values change LEFT RIGHT button to change 30MIN or 5 MIN RECORD SETUP 1 R...

Page 31: ...00 00 01 00 02 00 03 00 04 00 05 00 06 00 07 00 08 00 09 00 10 00 11 00 12 00 13 00 14 00 15 00 16 00 17 00 18 00 19 00 20 00 21 00 22 00 23 00 00 30 01 30 02 30 03 30 04 30 05 30 06 30 07 30 08 30 0...

Page 32: ...F CH 04 ON OFF Notice Normal recording is independent It will not in conflict with event record RECORD SPEED SETUP PAGE TOTAL SPEED FULL HALF 20 fps 10 fps 4 fps CH 01 ON CH 02 ON CH 03 ON CH 04 ON RE...

Page 33: ...t in conflict with normal record EVENT RECORD SETUP PAGE 1 EVENT MOTION OFF 2 EVENT ALARM OFF 3 EVENT DURATION 0 10 SEC 4 RECORD SPEED FULL 5 RECORD RESOULTION NORMAL 6 PRIORITY RECORD OFF 7 PRE ALARM...

Page 34: ...ment has authority to control DVR OFF Network management and user have no authority to control DVR PS DVR management authorization is higher than network management PASSWORD SETUP PAGE 1 PASSWORD AUTH...

Page 35: ...ormation base on LAN or WAN Notice After IP information input go back to 4 TYPE STATIC IP CON Choose CON And then press ENTER to load If correct Network connecting shows under screen PPPOE USER NAME P...

Page 36: ...SS ESC TO CANCEL Press direction buttons UP DOWN to HDD FORMAT items position Press ENTER to format all HDD Caution User can format HDD only when all HDD stop record or playback Press ENTER button to...

Page 37: ...NFIG PRESS TSH TO RESTORE FROM FILE PRESS ESC TO CANCEL Press ENTER button to restore Press ESC button to cancel ADVANCED SETUP PAGE 1 ALARM SETUP 2 MOTION SETUP 3 RECORD SETUP 4 EVENT RECORD 5 EVENT...

Page 38: ...120 frames Recording Play Function Recording Max Field FULL HALF 20 fps 10 fps 4 fps CIF FULL HALF 40 fps 20 fps 8 fps Record Quality Super High Fine Normal Low Compressed Picture MPEG4 Picture Record...

Page 39: ...JOG Shuttle X 1 Power Supply DC 12V 5 A if hard disk x 2 installed DC 12V 8 33 A if hard disk x 3 or x 4 installed Weight N W 7 3 kg Dimension 430 W x 360 D x 72 6 H mm Operating Temperature 41 F 104...

Page 40: ...e PTZ dome to any position wants Key QUAD to finished P1 2 Set preset 3 key 8 P3 shows on right up screen Then move PTZ dome to any position wants Key QUAD to finished P3 KEY ZOOM 2 functions 1 ZOOM I...

Page 41: ...0 10 4 Hours 113 194 hr 253 hr 357 hr 506 hr Record Quality Fine FPS Full Half 20 10 4 Hours 62 hr 114 hr 158 hr 260 hr 423 hr Record Quality High FPS Full Half 20 10 4 Hours 51 hr 96 hr 132 hr 225 hr...

Page 42: ...tart client viewer 4 Make sure the VGA card driver is originally from VGA manufacturer 5 Make sure Microsoft DirectX 9 0b is installed 6 Make sure IE all ActiveX item are all on Input user s name pass...

Page 43: ...Live Live mode status 2 File File mode status 3 Event Event mode status 4 D L Play back mode status 5 Net Network connecting status FUNCTION BUTTON C REC live record button Setting record path setup b...

Page 44: ...ayback mode DVR REC Start DVR record start time DVR REC End DVR record end time Start choose playback start time End choose playback end time Last one minute display CH 1 CH 4 choose camera Press Coun...

Page 45: ...45 After data count press OK to start playback Playback data auto save to REC path...

Page 46: ...46 Record path setup ps file saved REC press REC button to record live image...

Page 47: ...47 Capture Capture image file to bmp saved Only live and file play acceptable Press Setting to DVR function setup 1 SYSTEM 2 REC 3 ALARM MOTION 1 System...

Page 48: ...48 2 REC 3 ALARM MOTION...

Page 49: ...49 Event Event list playback Only alarm and motion playback Choose event time click OK to start playback...

Page 50: ...50 Press File Play to data backup play mode Click Open to choose file Choose path and file name and then ready to play mode...

Page 51: ...25 40 of the P T Z dome mode Click PTZ button to control mode and then select channel 1 channel 4 which is corresponding to PTZ dome PTZ Control function Click the left button of mouse on direction a...

Page 52: ...52 Memo...

Reviews: