background image

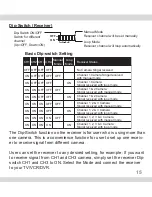
Dip-Switch (Receiver)

The Dip-Switch function on the receiver is for user who is using more than
one camera. This is a convenience function for user to set up one receiv-
er to receive signal from different camera. 

User can set the receiver to any desired setting, for example: If you want
to receive signal from CH1 and CH3 camera, simply set the receiver Dip-
switch CH1 and CH3 to ON. Select the Mode and connect the receiver
to your TV/VCR/DVR.

Basic Dip-switch Setting

CH1 CH2 CH3 CH4

Receiver Status

Manual

Mode

Loop

Mode

OFF OFF OFF OFF

No Camera Singal received

Channel 1 Camera Singal received 
with manual mode

ON

OFF

OFF OFF OFF

Channel 1 Camera 
Singal received with loop mode

ON

ON

OFF OFF OFF

Channel 1 & 2 Camera 
Singal received with manual mode

ON

OFF

ON OFF OFF

Channel 1 & 2 Camera 
Singal received with loop mode

ON

ON

ON OFF OFF

Channel 1, 2 & 3 Camera 
Singal received with manual mode

ON

OFF

ON ON OFF

Channel 1, 2 & 3 Camera 
Singal received with loop mode

ON

ON

ON ON OFF

Channel 1, 2, 3 & 4 Camera 
Singal received with manual mode

ON

OFF

ON ON

ON

Channel 1, 2, 3 & 4 Camera 
Singal received with loop mode

ON

ON

ON ON

ON

M

3 4

L

O N

O F F

2

1

Manual Mode
Receiver channel will be set manually

Loop Mode
Receiver channel will loop automatically

Dip-Switch ON/OFF
Switch for different
channel 
(Up=OFF, Down=ON)

15

Summary of Contents for OutdoorWatch

Page 1: ...SecurityMan OutdoorWatch Series 2 4GHz Wireless Outdoor Indoor Color Camera Kit with Night Vision Audio User Guide...

Page 2: ......

Page 3: ...ests with the following two conditions 1 The equipment should not cause any harmful interference 2 The equipment must receive and process any interference including any possible interference caused by...

Page 4: ...ar or any condition other than what can be considered normal use Limitation of Liability The liability of SecurityMan arising from this warranty and sale shall be limited to a refund of the purchase p...

Page 5: ...ent the cogitative research of the scientific workers who continu ously explore and annotate the involved fields So we believe that our prod ucts are safe for customers Operating Restrictions DO NOT u...

Page 6: ...t directly in sunlight Keep product away from heat sources such as electric heater Do not use the camera near aggressive chemicals Do not place product near any magnetic objects Maintenance It might i...

Page 7: ...er supply in thunder and lightning or when not in use for long periods of time Do not attempt to service the product yourself as opening or removing cov ers may expose you to dangerous voltage or othe...

Page 8: ...and severe physical hurt DO NOT cover the AC adapter when it is connected to power socket place the adapter near heaters and put it on the floor that is equipped with a heater The above mentioned ope...

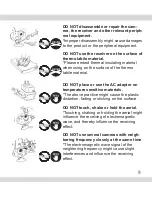
Page 9: ...and thereby influence the receiving effect DO NOT place or use the AC adapter on temperature sensitive materials The above practice might cause the plastic distortion fading or sticking on the surface...

Page 10: ...mbling block will affect the electromagnetic wave and influence the receiving range Wall tree and other stumbling block might absorb reflect the electromagnetic wave and influence the receiving range...

Page 11: ...hnical Support 12 Product Basics 13 Installation Diagram 17 Installation 17 A Setting up the Anntannas 17 B Setting up the Camera 18 C Setting up the Receiver 18 D Setting up the Receiver with TV Moni...

Page 12: ...roduct Package contents OutdoorWatch 1 x Wireless outdoor indoor color camera SM 823T 1 x 4 CH 2 4GHz wireless receiver SM 734 and antenna 1 x 12V power AC adapter for camera 1 x 8V power AC adapter f...

Page 13: ...tch Audio Video Output Manual Auto Channel Dip Switch Antenna CH1 CH4 Dip Switch Power Jack DC 8V OFF 2 1 Antenna Power Jack Microphone Built in not weatherproof for indoor use only Bracket with 2 adj...

Page 14: ...e the front portion of the camera Use a pointed object to set the dip switch to desired channel ON GDH02 1 2 OG 1 2 Channel ON ON 1 ON GDH02 1 2 OG OFF ON 2 ON GDH02 1 2 OG ON OFF 3 ON GDH02 1 2 OG OF...

Page 15: ...l received Channel 1 Camera Singal received with manual mode ON OFF OFF OFF OFF Channel 1 Camera Singal received with loop mode ON ON OFF OFF OFF Channel 1 2 Camera Singal received with manual mode ON...

Page 16: ...essing the Channel Switch The LED channel indicator light will be on when the desired channel is selected Sunshade For outdoor use you should attach the sunshade to reduce sun reflec tion A For indoor...

Page 17: ...ica tions on the adapters are compatible to the devices to avoid potential damages for incorrect usage of power Installation A Setting up the Anntannas Connect the antenna to the receiver and camera C...

Page 18: ...ple Channel 1 on the TV Monitor will display the image from Camera 1 only Note The OutdoorWatch4 cameras Dip Switch settings has been pre set to 4 different channels Ch1 to Ch4 Each camera is desig na...

Page 19: ...onitor A V jacks 2 Plug the Receiver s Power Supply 8V DC Adapter into any wall out let and plug its jack into the Receiver 3 Position the Receiver in a convenient location AUDIO VIDEO AUDIO VIDEO VCR...

Page 20: ...20 Specification...

Page 21: ...21...

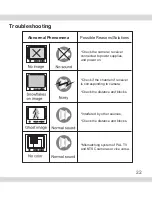
Page 22: ...the camera receiver connected to power supplies and power on Check if the channel of receiver is corresponding to camera Check the distance and blocks Interfered by other sources Check the distance a...

Page 23: ......

Page 24: ...www securitymaninc com...

Reviews: