background image

3

Important 

z


You 

may

 connect the HDD 

SATA and

 power cable 

prior to installing the HDD within the

    case.

z


When removing the DVR cover, gently tip up from the rear of the unit and lift upwards to

avoid damaging the front panel clip.

4. Front Panel

The front panel is shown as in Figure 1.

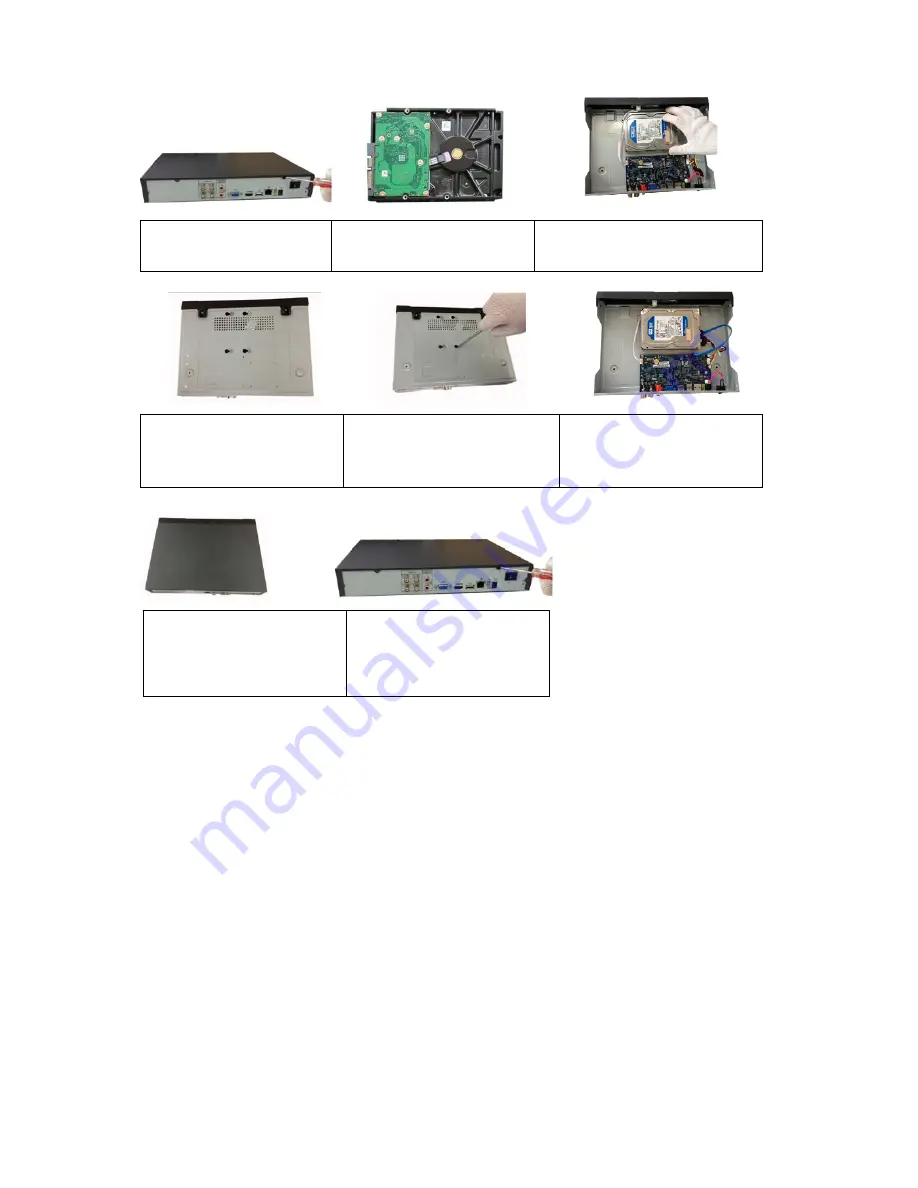
1.

Remove the top cover

from the DVR

.    

2.

Loosely  attach 

four screws

to the HDD

.

3

.

Align

 the HDD 

with the mounting

holes in the bottom

 tray

.

4.

Flip the case over and

tighten the HDD mounting 
screws

5. Ensure that the HDD is

6. Connect the 

SATA

 and

 power

cable

s to the HDD and system 

board

.    

7.

Replace

 the cover 

while

aligning 

the 

front panel 

clip 

and 

lowering the

 back

 side

.       

8. Secure the screws in the

rear side panel

s

firmly attached to the case.

Summary of Contents for DVR-CVI4120M

Page 1: ...HD CVI Mini Series Quick Start Guide DVR CVI4120M DVR CVI8240M 720P Resolution 1yr Warranty Motion Activated Recording PTZ Control ...

Page 2: ...al electric safety rules 1 Check Unpacked DVR Upon receiving your new HDCVI DVR please check to ensure there is no visible damage The shipping materials used in the packaging of the DVR can protect against most accidental damage during transportation and should be retained for any future shipping needs You should also check the items included with your DVR to ensure complete packaging 2 About Fron...

Page 3: ... is shown as in Figure 1 1 Remove the top cover from the DVR 2 Loosely attach four screws to the HDD 3 Align the HDD with the mounting holes in the bottom tray 4 Flip the case over and tighten the HDD mounting screws 5 Ensure that the HDD is 6 Connect the SATA and power cables to the HDD and system board 7 Replace the cover while aligning the front panel clip and lowering the back side 8 Secure th...

Page 4: ...ontrol and image color Backspace function when entering text Press for 1 5seconds to delete the previous character before the cursor In motion detect setup use the Fn and direction keys to configure In text mode click to switch between alphabetic numeric special characters and upper or lower case 7 FN Assist Other miscellaneous special functions Confirm current operation Go to default button 8 Ent...

Page 5: ...audio output device such as powered PC speakers 3 AUDIO IN Audio input port Connect to audio input device such as powered microphone 4 VGA VGA video output port Connect to computer monitor or other VGA device to view main DVR display 5 HDMI High Definition Multimedia Interface video output port Connect to computer monitor television or other HDMI device to view main DVR display 6 USB2 0 port Conne...

Page 6: ... within 30 minutes will trigger a system alarm and five incorrect login attempts within 30 minutes will result in the account being locked Figure 4 7 Web Service Internet Explorer Open Internet Explorer and enter the DVR IP address in the address bar The default IP address for your HDCVI DVR is 192 168 1 108 you may access it by entering http 192 168 1 108 in the address bar Your system may presen...

Page 7: ...7 Figure 5 For more detailed instructions on the operation of your HDCVI DVR please refer to the User s Manual included on the resources CD ...

Page 8: ...od the toxic or hazardous substance or elements contained in products will not leak or mutate so that the use of these substances or elements will not result in any severe environmental pollution any bodily injury or damage to any assets The consumer is not authorized to process such kind of substances or elements please return to the corresponding local authorities to process according to your lo...

Reviews: