


12
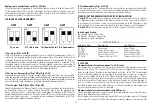
1) Step-by-step (Dip 1 and 2 OFF)
The following type of operation may be obtained using the BeFree xx radio control: the
Up key controls the upward movement until the end of the set motor time (2 minutes), the
Stop key makes the shutter stop and the Down key controls the downward movement. If a
stop command is sent during the upward or downward movement, the control unit causes
the shutter to stop. If a command that is in the opposite direction to the current movement
is sent during the upward or downward movement, the control unit causes the shutter to
change direction. The electronic control unit will control the upward movement of the sun
shade every time the wind exceeds the selected threshold.
2) Step-by-step + Aut. downward movement (Dip 1 ON and Dip 2 OFF)
The device operates as described previously (step-by-step) with the difference that, when
the wind speed exceeds the set value, the control unit will cause the shade to move
upwards; once the disturbance is over, the control unit will cause the shade to move
downwards after 5 minutes in which the wind speed is less than the set value.
3) Sun Sensor Test (Dip 1 OFF and Dip 2 ON)
The operation of the Sun Sensor and the correct rotation direction can be checked at
the time of installation in the following way: turn the VR1 trimmer as far as possible in
a clockwise direction (in the + position); at the same time, the control unit will cause the
SUN LED to light up and there will be an downward movement lasting 5 seconds. Turn
the VR1 trimmer in an anticlockwise direction (in the – position); at the same time, the
control unit will cause the SUN LED to switch off and there will be a upward movement
lasting 5 seconds.
4) Anemometer Test (Dip 1 and 2 ON)
The operation of the Anemometer and the correct rotation direction can be checked at the
time of installation in the following way: manually turn the anemometer blades; at the
same time, the control unit will cause an upward movement lasting 5 seconds.
PROGRAMMING KEYS AND INDICATOR LEDS
SEL key:
selects the type of function to store; selection is indicated by the LED flashing.
The desired function can be selected by pressing the key repeatedly. The selected func-
tion remains active for 15 seconds (flashing LED) following which the control unit returns
to its original status.
SET key:
programmes the function that has been selected using the SEL. Key.
Indicator LED:
Led on: option stored.
Led off: option not stored.
Flashing LED: option selected.
————————————— MAIN MENU ————— ————————
Reference Led
LED Off
LED On
1) CODE
No code
TX Pgm code
2) T. MOT.
Motor time 2 minutes
Pgm motor time
3) WIND
Wind safety 25 km/h
Pgm. Wind safety
4) MAN/AUT
Sun sensor = OFF
Sun sensor = ON
5) SUN
Sun shining = OFF
Sun shining = ON
1) CODE LED
Programming using a 1- or 2-button radio control:
To programme the transmission codes in the radio control, proceed as follows: press
the SEL key; the CODE LED begins to flash. Send the first preselected code using the
relevant radio control at the same time; when the CODE LED begins to flash rapidly send
the second code to be stored. The CODE LED will remain lit and the programming will
be complete. If the second code is not sent within 10 seconds the control unit exits the
programming stage, selecting the function using a single button on the radio control. If
you have stored 4 codes and you repeat the programming operation, all the indicator
LEDs will start flashing extremely rapidly to indicate that no more codes can be stored.
Programming BeFree xx series radio controls.
The control unit allows you to store the whole “BeFree xx” radio control by programming
only the UP key.
To programme the “BeFree xx” radio-control codes, proceed as follows: press the SEL key;
the CODE LED begins to flash. Press the UP key of the desired radio control at the same time;
at that moment, the CODE LED will remain lit and programming will be complete. If all of the
possible 4 radio control codes have been stored and you repeat the programming operation,
all indicator LEDs will start flashing very rapidly to indicate that no new codes can be stored.
Deleting the codes
To delete all transmission codes stored in the memory, proceed as follows: press the SEL
key; the CODE LED starts flashing. Then press the SET key; the CODE LED switches off
and the procedure is complete
.
2) LED T. MOT.
Programming the motor operating time
The control unit comes with a motor power supply time of two minutes (LED T.MOT. OFF).
The motor time must be programmed when the shutter is down and in the following way:
Press the SEL key until the T.MOT LED key flashes, then hold down the SET key; the shutter will
begin to move upwards. Once the desired position has been reached, release the SET key – at
this very moment, the motor time will be stored and the T.MOT LED will remain lit.
If you are using an automation with a stop limit, we recommend that you set a time that
exceeds the stop limit of the shutter by a few seconds.
If you want unlimited motor time, perform the same programming procedure, holding down
Summary of Contents for 96010000
Page 1: ...BeSUN Electronic Control Unit ...
Page 2: ...Product installation ...
Page 55: ......
Page 56: ......


