background image

PREPARATION

INSTALLATION (Continued)

BASIC TOOLS AND MATERIALS NEEDED

Pipe Wrenches

Screwdriver

Hacksaw

Check Valve

Adjustable Wrench

Teflon Tape

Knife

NOTICE:

Depth to water must not be more than 20’.

1. Long runs and many fittings increase friction and reduce

flow. Locate pump as close to water source as possible:
use as few elbows and fittings as possible.

2. Be sure water is clear of sand. Sand will plug the pump

and void the warranty.

3. Protect pump and all piping from freezing. Freezing will

split pipe, damage pump and void the warranty. Check lo-
cally for frost protection requirements (usually pipe must
be 12” below frost line and pump must be insulated).

4. Be sure all pipes and foot valve are clean and in good

shape.

5. No air pockets in suction pipe.
6. No leaks in suction pipe. Use Teflon tape or Plasto-Joint

Stik

1

to seal pipe joints.

7. Unions installed near pump and water source will aid in

servicing. Leave room to use wrenches.

8.

Pump body may explode if used as a

booster pump. DO NOT use in a booster application.

1

Lake Chemical Co., Chicago, Illinois.

INSTALLATION

NOTICE:

Use the installation method below which matches

your well type.

CASED WELL INSTALLATION

1. Inspect foot valve to be sure it works freely. Inspect

strainer to be sure it is clean.

2. Connect foot valve and strainer to the first length of suc-

tion pipe and lower pipe into well. Add sections of pipe
as needed, using Teflon tape on male threads. Be sure that
all suction pipe is leakproof or pump will lose prime and
fail to pump. Install foot valve 10 to 20 feet below the low-
est level to which water will drop while pump is operat-
ing (pumping water level). Your well driller can furnish
this information.

3. To prevent sand and sediment from entering the pump-

ing system, the foot valve/strainer should be at least 5 feet
above the bottom of the well.

4. When the proper depth is reached, install a sanitary well

seal over the pipe and in the well casing. Tighten the bolts
to seal the casing.

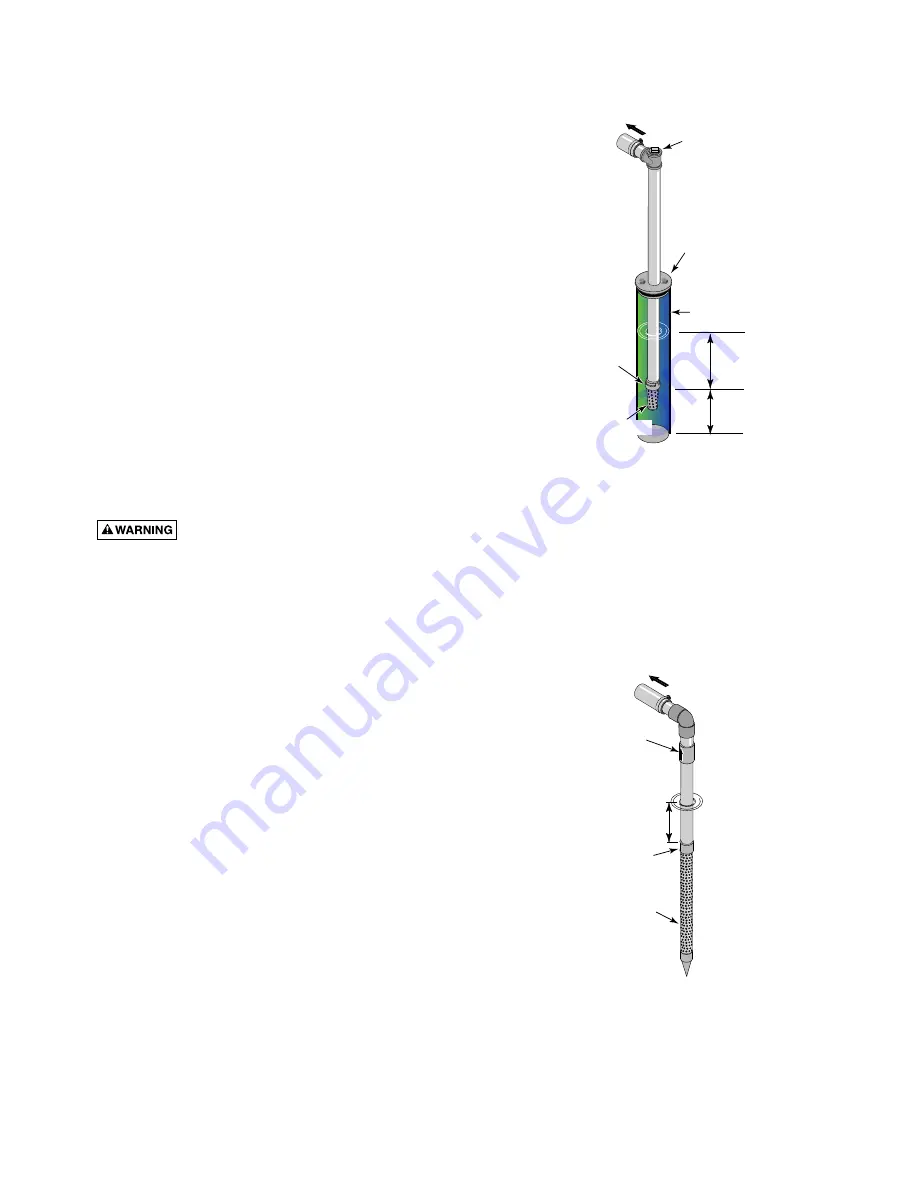
5. When using a foot valve, a priming tee and plug as shown

in Figure 1 are recommended.

DUG WELL OR OPEN WATER
INSTALLATION

1. Follow cased well installation, steps 1, 2, 3 and 5.

DRIVEN POINT INSTALLATION

1. Connect the suction pipe to the drive point as illustrated in

Figure 2. Keep horizontal pipe run as short as possible. Use
Teflon tape on male pipe threads. Multiple well points may
be necessary to provide sufficient water to pump.

2. Install a check valve in piping as shown in Figure 2. Flow

arrow on check valve must point toward pump.

HORIZONTAL PIPING FROM WELL TO
PUMP

1. Never install a suction pipe that is smaller than the suc-

tion tapping of the pump.

3

Well
Casing

Foot
Valve

Sanitary
Well Seal

Suction Pipe

10'

Min.

5–10'

Strainer

2590 0996

Priming Tee
and Plug

Figure 1 – Cased/Dug Well Installation

Drive
Coupling

Drive
Point

Check
Valve

Drive point
below water
level

Suction Pipe
to Pump

2589 0996

Figure 2 – Driven Point Installation

Summary of Contents for CRAFTSMAN HYDROGLASS 390.2622

Page 1: ...Before First Use of This Product Save This Manual For Future Reference Sears Roebuck and Co Hoffman Estates IL 60179 U S A Safety Instructions Installation Electrical Maintenance Repair Parts PRINTED IN U S A HYDROGLASS HIGH PRESSURE SPRINKLER PUMP Form No F642 04710 8 6 04 MODEL NOS 390 2622 390 262553 MODEL NO 390 2623 ...

Page 2: ...t electrical power source before installing or working on pump 6 Ground pump with a ground wire run from grounding lug on motor to a grounded lead in the service panel 7 Line voltage and frequency of electrical power supply must agree with motor nameplate 8 Use of fuses or wire smaller than size recommended in owner s manual can cause overheating possible fires and will void warranty 9 Pump water ...

Page 3: ...l Add sections of pipe as needed using Teflon tape on male threads Be sure that all suction pipe is leakproof or pump will lose prime and fail to pump Install foot valve 10 to 20 feet below the low est level to which water will drop while pump is operat ing pumping water level Your well driller can furnish this information 3 To prevent sand and sediment from entering the pump ing system the foot v...

Page 4: ...joint compounds on the pump they can react with the plastic in the pump components 1 Bolt pump to solid level foundation 2 Support all piping connected to the pump 3 Wrap 1 1 2 to two layers of Teflon tape clockwise as you face end of pipe on all male threads being attached to pump 4 Tighten joints hand tight plus 1 1 2 turns Do not over tighten NOTICE Install pump as close to water source as poss...

Page 5: ...ide a correctly fused disconnect switch for protec tion while working on motor Consult local or national electrical codes for switch requirements A L1 230 Volts 115 Volts 230 Volt to 115 Volt Conversion Plug in Type Pull plug straight out from terminal board 1 1 2 2 Plug in again with arrow on plug pointing to 115 Volts Ground Screw A L1 230 Volts 115 Volts Clamp the power cable to prevent strain ...

Page 6: ...he diagram on the motor IMPORTANT 115 230 Volt single phase models are shipped from factory with motor wired for 230 volts If power supply is 115 volts remove motor canopy and re connect motor as shown in Figure 6 Do not try to run motor as received on 115 volt current 8 Motor has automatic internal thermal overload protec tion If motor has stopped for unknown reasons thermal overload may restart ...

Page 7: ...ontal run 10 of horizontal suction pipe 1 of vertical lift due to friction losses in the pipe If no water is produced within 10 minutes stop pump release all pressure remove priming plug refill and try again Hazardous pressure and risk of explo sion and scalding If pump is run continuously at no flow that is with discharge shut off or without prim ing water may boil in pump and piping system Under...

Page 8: ...r terminals together see Figure 14 Do not touch metal screwdriver blade or capacitor terminals If in doubt consult a quali fied electrician 4 Unscrew capacitor clamp and remove capacitor Do not disconnect capacitor wires to motor 5 Slide 7 16 open end wrench in behind spring loaded switch on motor end of shaft hold motor shaft with wrench on shaft flats and unscrew impeller by turning counterclock...

Page 9: ...op is sufficient to in side diameter of rotating seal member 8 Slide rotating seal member carbon face first onto shaft until rubber drive ring hits shaft shoulder NOTICE Be sure not to nick or scratch carbon face of seal when passing it over threaded shaft end or shaft shoulder The carbon surface must remain clean or short seal life will result 9 Hold motor shaft with 7 16 open end wrench on shaft...

Page 10: ...Pump has lost prime through 2 In installation already in use a Air leaks a Check all connections on suction line and shaft seal b Water level below suction b Lower suction line into water and re prime If receding water level of pump in well exceeds suction lift a deep well pump is needed 3 Impeller is plugged 3 Clean impeller see Maintenance 4 Check valve or foot valve is stuck 4 Replace check val...

Page 11: ...92PBBB C105 214PFA Impeller Screw C30 51SS 8 Diffuser C1 258PCA C1 258PCA 8A Diffuser C1 274P 9 Screw 8 32 RH U30 869SS U30 869SS U30 542SS 1 and 1 1 2 HP 4 Req d 2 HP 2 Req d Lockwasher U43 21SS 10 V Clamp C19 54SS C19 54SS C19 37A 11 Tank Body Front Half Incl No 12 C176 53PA C176 53PA 11A Tank Body Front Half Complete Incl Nos 3 and 12 C176 62PA 12 Draincock 1 4 NPT U212 68T U212 68T U212 68T 13...

Page 12: ... Agreement call 9 am 5 pm Monday Saturday 1 800 827 6655 M A I N T E N A N C E A G R E E M E N T America s Repair Specialists REPAIRSERVICES America s Repair Specialists REPAIRSERVICES America s Repair Specialists REPAIRSERVICES OWNER S MANUAL Model No 390 2622 390 262553 390 2623 The model number of your Sprinkler Pump will be found on a plate attached to the side of the pump body When requesting...

Reviews: