background image

MAINTENANCE

9

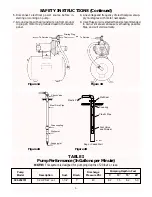
3. Remove pump back half from motor by unscrew-

ing four (4) nuts. Pry back half off motor by insert-
ing two (2) screwdrivers between the back pump
half and the motor flange. This will force rotating
portion of seal off shaft. See Figure 5, Page 8.

4. Place back half of pump on flat surface and tap out

ceramic seat. See Figure 6.

5. Clean seal cavity.
6. Install new seal.

A. Clean polished surface of ceramic seat with clean

cloth.

B. Wet outer edge of “O” Ring with detergent solu-

tion.

C. With finger pressure press seat firmly and

squarely into cavity. See Figure 7A. Polished face
of seat faces inside of pump. If seat will not lo-
cate properly, place cardboard washer over pol-
ished face and use piece of 3/4” standard pipe for
pressing purposes. See Figure 7B.

D. Dispose of cardboard washer and clean surface

of seat.

E. Clean motor shaft.
F. Reassemble back half of pump to motor.
G. Apply detergent solution to inside diameter of ro-

tating seal member.

H. Slide rotating member on shaft until rubber drive

ring hits shaft shoulder. NOTICE: BE SURE you
do not chip or scratch seal face on shaft shoulder
or seal will leak!

I. Screw impeller on shaft (clockwise) while hold-

ing shaft with 7/16” open end wrench on shaft
flats. This will automatically locate seal in place.
See Figure 8.

J. Remount diffuser on seal plate.

Cleaning Impeller

1. Follow steps 1A through 1E under “Disassembly

and Assembly of Pump” on Page 8.

2. Remove diffuser and impeller from pump per in-

structions under “Removing Motor for Service and
Replacing Shaft Seal” on Page 8.

3. Clean impeller and reassemble impeller and diffuser

per instructions under “Removing Motor for
Service and Replacing Shaft Seal” on pages 8 and 9.

Cleaning Shallow Well Jet

To remove debris from venturi or nozzle, proceed as
follows:

1. Disassemble pump per instructions on Page 8.
2. Turn venturi counterclockwise and remove it. The

nozzle is now exposed. Remove it using a 5/8” hex
socket wrench with extension. Turn counterclock-
wise. If socket wrench is not available, insert an ice
pick or similar pointed tool carefully into the noz-
zle. This will dislodge debris.

479 0194

477 0194

478 0194

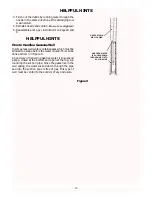
Figure 6

Figure 7A

Figure 7B

Figure 8

483 0194

Summary of Contents for Craftsman 390.252151

Page 1: ...s Before First Use of This Product Save This Manual For Future Reference Sears Roebuck and Co Hoffman Estates IL 60179 U S A Safety Instructions Installation Electrical Maintenance Repair Parts PRINTE...

Page 2: ...or national plumbing and electri cal codes when installing pump 3 Keep well covered while installing pump to prevent leaves and other debris from falling into well con taminating well and possibly da...

Page 3: ...ased Well 611 1293 To Service To Service Priming Plug Tee Figure 1A Figure 1B Figure 2A Figure 2B Check Valve Steel Drive Pipe Drive coupling Driven point 6 Disconnect electrical power source before i...

Page 4: ...t should be in stalled five to ten feet below the lowest level to which the water will drop while the pump is operating pumping water level To keep sediment from clog ging the strainer be sure it is f...

Page 5: ...8 PSI It is necessary to flush all air out of the piping system and water reservoir portion of the pre charged tank This is required on new installations pumps requiring repriming and pumps that have...

Page 6: ...on power to pump ELECTRICAL OPERATION Priming the Pump NOTICE To properly prime the pump install a pipe tee in the discharge piping see Figure 1A Page 3 To prevent damage to internal parts do not star...

Page 7: ...from tank and pump To avoid serious or fatal injury be sure all air pressure has been released from tank before proceeding to step 5 5 Pop flange cover off and remove nuts from tank cover plate Key N...

Page 8: ...be needed the pump and piping do not need to be dis connected or disturbed 1 Disassemble pump as follows A Disconnect power B Drain pump by opening drain cock Remove pressure switch tubing from fittin...

Page 9: ...ntil rubber drive ring hits shaft shoulder NOTICE BE SURE you do not chip or scratch seal face on shaft shoulder or seal will leak I Screw impeller on shaft clockwise while hold ing shaft with 7 16 op...

Page 10: ...gases which must be allowed to escape before the water is used This can be done as shown in Figure 9 A good way of delivering gas free water is to suspend a pipe closed at the bottom and open at the t...

Page 11: ...using excess friction new steel pipe above 3 Offset piping is too small in size 3 Use larger offset piping Pump pumps water 1 Pressure switch is out of adjustment 1 Adjust or replace pressure switch b...

Page 12: ...27 28 29 30 587 1193 24 SEARS 1 2 HP SHALLOW WELL WATER SYSTEM Pump Only Model 390 252151 To Order Parts in the U S A Call Sears Product Service 1 800 366 7278 To Order Parts outside the U S A Call Yo...

Page 13: ...zzle 14 N76 29P Insert 15 J20 18 Gasket 16 N176 28PB Tank Body Assembly Front Half Includes Key No s 11 12 13 14 15 16 19 20 21 23 and 24 16 N76 28P Tank Body Only Front Half 17 U37 673P Switch Tube 1...

Page 14: ...e Model 390 252151 Key 1 2 HP Qty No Part Number Used Description 1 U231 289 S 1 Tank Assembly Includes Diaphragm Valve Nuts Inlet Flange U20 13 1 Bag Vinyl U212 160 1 Air Valve w Cap 2 U131 167 1 Inl...

Page 15: ...about an existing Agreement call 9 am 5 pm Monday Saturday 1 800 827 6655 M A I N T E N A N C E A G R E E M E N T America s Repair Specialists REPAIRSERVICES America s Repair Specialists REPAIRSERVICE...

Reviews: