Sears Craftsman 390.252151 Owner'S Manual Download Page 8

MAINTENANCE

NOTICE:

Do not overtighten; you may twist studs

off of tank. If you have a torque wrench, tighten to
85 inch-pounds torque.

18. Stand tank on feet and reconnect piping.
19. Recharge tank to proper air pressure (see Page 5).
20. Reconnect hoses and pressure switch tube; prime

pump (see Page 6).

Air Valve Replacement

1. Follow steps 1 through 5 under “Vinyl Bag

Removal”, Page 7.

2. Cut valve off as close to tank as possible. Push re-

maining portion back into tank.

3. Tip tank on end and BE SURE all water is drained

from bag.

4. Carefully remove bag ring from lip on tank opening

and push bag ring back into tank; reach in around
it and remove cut off portion of valve from tank.

5. Wipe a thin film of soapy solution on replacement

valve and from inside tank insert in hole in top of
tank.

6. Pull valve through hole with pliers or a valve tool

(available at your local filling station or Automotive
Center).

7. Follow steps 14 through 20 under “Vinyl Bag Re-

moval”, Page 7, to reinstall bag in tank.

Testing for Bag Leakage

1. Follow steps 1 through 4 under “Vinyl Bag

Removal”, Page 7.

2. Tip tank on end, valve down. Be careful not to

break valve!

3. If bag leaks, water will run out of valve. If so, re-

place bag as instructed above.
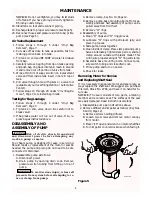
DISASSEMBLY AND
ASSEMBLY OF PUMP

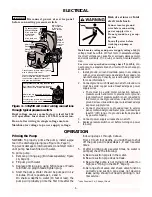
Risk of electric shock. Ground unit

and disconnect power before attempting any
work on pump or motor.

Your Sears pump is designed for ease in servicing.
Should repair or replacement of the motor or seal be
needed, the pump and piping do not need to be dis-
connected or disturbed.

1. Disassemble pump as follows:

A. Disconnect power.
B. Drain pump by opening drain cock. Remove

pressure switch tubing from fitting on top of
pump.

To avoid serious injury, release all

pressure from system before attempting to re-
move clamp from pump.

C. Remove clamp, Key No. 10, Page 12.
D. Remove pump base mounting bolts. Motor as-

sembly and back half assembly of pump can be
pulled away from front half.

E. Remove “O” rings.

2. Reassembly of pump.

A. Clean “O” rings and “O” ring grooves.
B. Lubricate “O” rings with petroleum jelly, and

place in grooves.

C. Slide pump halves together.
D. Clean inside of clamp. Place clamp around pump

halves. Alternately tighten clamp screw and tap
clamp around outside with plastic mallet. This
will insure proper seating of “O” ring and clamp.

E. Assemble base mounting bolts. Connect pres-

sure switch tubing and close drain cock.

F. Prime pump and turn on power.
G. Check for leaks.

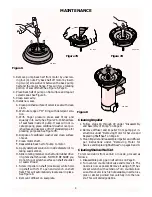
Removing Motor for Service 
and Replacing Shaft Seal

If it is necessary to separate motor and seal plate, al-
ways replace the shaft seal. We suggest you purchase
this item, Stock No. 2784, and have it on hand for fu-
ture use.

NOTICE:

The seal consists of two parts, a rotating

member and a ceramic seat. The surfaces of the seal
are easily damaged. Read instructions carefully.

1. Disassemble pump per instructions above.
2. Remove diffuser and impeller as follows (Key Nos.

8 and 9, Page 12).
A. Remove screws holding diffuser.
B. Loosen two screws and remove motor canopy

from motor.

C. Place 7/16” open end wrench on motor shaft flat.
D. Turn impeller counterclockwise when facing it.

8

475 0194

Figure 5

Summary of Contents for Craftsman 390.252151

Page 1: ...s Before First Use of This Product Save This Manual For Future Reference Sears Roebuck and Co Hoffman Estates IL 60179 U S A Safety Instructions Installation Electrical Maintenance Repair Parts PRINTE...

Page 2: ...or national plumbing and electri cal codes when installing pump 3 Keep well covered while installing pump to prevent leaves and other debris from falling into well con taminating well and possibly da...

Page 3: ...ased Well 611 1293 To Service To Service Priming Plug Tee Figure 1A Figure 1B Figure 2A Figure 2B Check Valve Steel Drive Pipe Drive coupling Driven point 6 Disconnect electrical power source before i...

Page 4: ...t should be in stalled five to ten feet below the lowest level to which the water will drop while the pump is operating pumping water level To keep sediment from clog ging the strainer be sure it is f...

Page 5: ...8 PSI It is necessary to flush all air out of the piping system and water reservoir portion of the pre charged tank This is required on new installations pumps requiring repriming and pumps that have...

Page 6: ...on power to pump ELECTRICAL OPERATION Priming the Pump NOTICE To properly prime the pump install a pipe tee in the discharge piping see Figure 1A Page 3 To prevent damage to internal parts do not star...

Page 7: ...from tank and pump To avoid serious or fatal injury be sure all air pressure has been released from tank before proceeding to step 5 5 Pop flange cover off and remove nuts from tank cover plate Key N...

Page 8: ...be needed the pump and piping do not need to be dis connected or disturbed 1 Disassemble pump as follows A Disconnect power B Drain pump by opening drain cock Remove pressure switch tubing from fittin...

Page 9: ...ntil rubber drive ring hits shaft shoulder NOTICE BE SURE you do not chip or scratch seal face on shaft shoulder or seal will leak I Screw impeller on shaft clockwise while hold ing shaft with 7 16 op...

Page 10: ...gases which must be allowed to escape before the water is used This can be done as shown in Figure 9 A good way of delivering gas free water is to suspend a pipe closed at the bottom and open at the t...

Page 11: ...using excess friction new steel pipe above 3 Offset piping is too small in size 3 Use larger offset piping Pump pumps water 1 Pressure switch is out of adjustment 1 Adjust or replace pressure switch b...

Page 12: ...27 28 29 30 587 1193 24 SEARS 1 2 HP SHALLOW WELL WATER SYSTEM Pump Only Model 390 252151 To Order Parts in the U S A Call Sears Product Service 1 800 366 7278 To Order Parts outside the U S A Call Yo...

Page 13: ...zzle 14 N76 29P Insert 15 J20 18 Gasket 16 N176 28PB Tank Body Assembly Front Half Includes Key No s 11 12 13 14 15 16 19 20 21 23 and 24 16 N76 28P Tank Body Only Front Half 17 U37 673P Switch Tube 1...

Page 14: ...e Model 390 252151 Key 1 2 HP Qty No Part Number Used Description 1 U231 289 S 1 Tank Assembly Includes Diaphragm Valve Nuts Inlet Flange U20 13 1 Bag Vinyl U212 160 1 Air Valve w Cap 2 U131 167 1 Inl...

Page 15: ...about an existing Agreement call 9 am 5 pm Monday Saturday 1 800 827 6655 M A I N T E N A N C E A G R E E M E N T America s Repair Specialists REPAIRSERVICES America s Repair Specialists REPAIRSERVICE...

Reviews: