background image

31

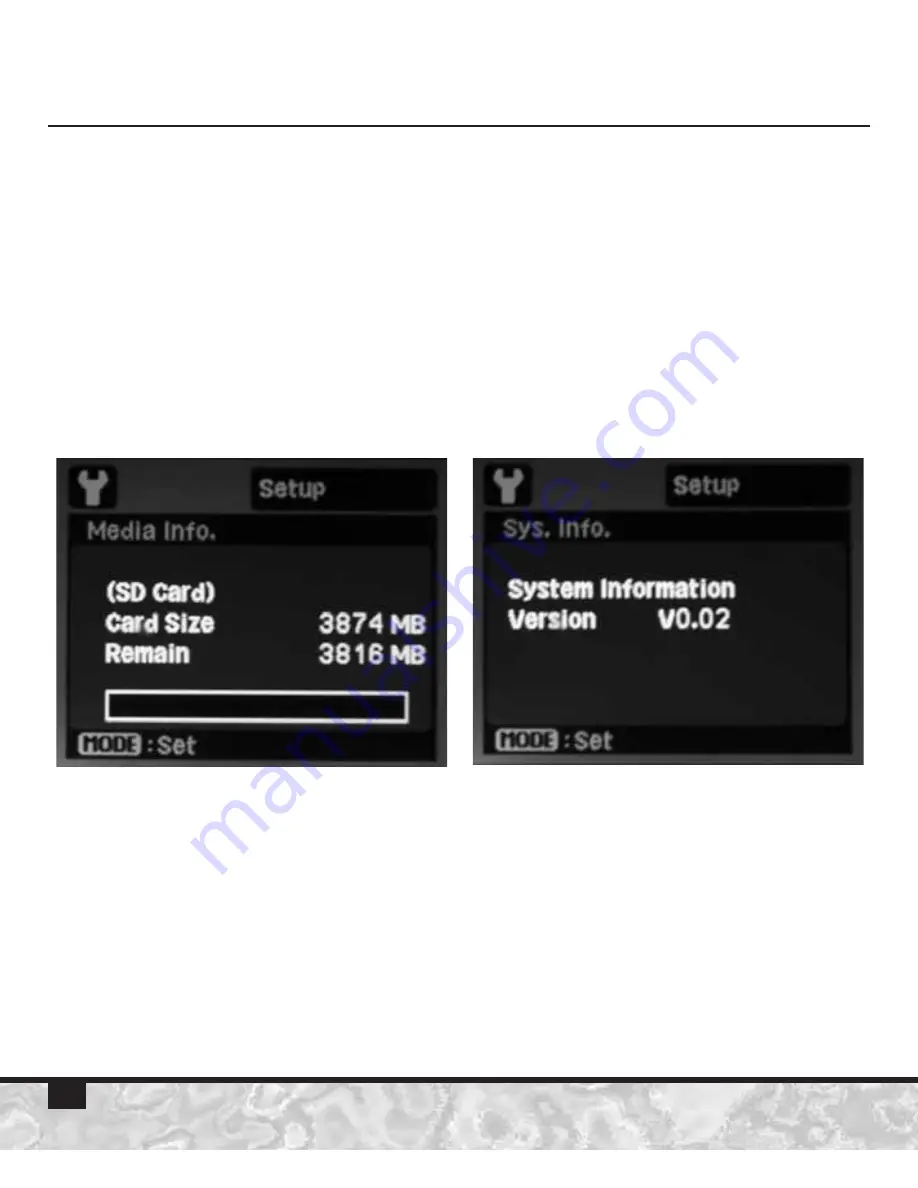
Media and System Information

Media Information (Media Info.) will display the memory card size
and amount of memory storage remaining in megabytes (MB).

System Information (Sys. Info.) will display the firmware version
installed on the camera.  New firmware may be released to repair
bugs in the operating system or improve the camera
performance.  Any new firmware versions would be posted on
the www.sealife-cameras.com and available for free download.

1) Select “Media Info” or “Sys. Info.” using the right or left Directional buttons

and push the Mode button to enter the information screen.

2) Push the Mode button to exit the information screens.

Summary of Contents for Reefmaster SL330

Page 1: ......

Page 2: ...anced Setup Menu 24 Changing the Language 24 Changing the Date Time 25 Using the Spy Mode 25 26 Changing the Auto Off setting 27 Changing the Beep setting 27 Changing the Display setting 28 Changing the Frame Number Reset setting 28 Changing the Light Frequency setting 29 Changing the LCD Monitor Brightness setting 29 30 Formatting the Memory Card or Internal Memory 30 Media and System Information...

Page 3: ...ir the camera Doing so may result in electric shock fire and will void the warranty Use new or freshly charged AAA sized batteries Recommend using NiMH rechargeable or Energizer Lithium Remove batteries from camera before transporting traveling or long periods of storage Avoid exposing camera to high temperatures or direct sunlight for prolonged periods of time Safety first Observe all applicable ...

Page 4: ... w SL32070 strap Two AAA Batteries SD SDHC Card Reader SL33010 SeaLife Mini II Wide Angle Lens SL974 Only included w ReefMaster Mini SL332 Flash Link Adapter SL33052 Spare O ring SL33008 Cleaning Brush Tool SL256 Soft Camera Case SL33090 ...

Page 5: ...m SeaLife Digital Pro Flash SL961 For brighter more colorful underwater pictures SeaLife Mini II Wide Angle Lens SL974 For wide angle close up pictures from 1ft to infinity Float Strap SL920 SeaLife Photo Video Light SL980 For brighter more colorful underwater pictures and videos Moisture Muncher SL911 Insert two capsules inside battery compartment during storage to remove moist air trapped inside...

Page 6: ... button Shoot picture Start Stop Video Delete in Playback 2 Power button Power camera ON and OFF 3 Flash window 4 Lens 9 megapixel F3 0 Multi coated Anti Reflective glass optics 5 Latch For opening waterproof door 6 Latch lock Prevents accidental opening of latch ...

Page 7: ... left up 3 Flash Directional button Adjust flash setting or scroll right down 4 Strap connection 5 Mode button Push to cycle through Camera Video Playback and Easy Setup modes Push and hold for 3 seconds to access setup menu 6 Waterproof Door Serial located inside door 7 Tripod mount Standard 1 4 20 thread 8 Focus Lever Macro close up or Landscape 9 LCD monitor ...

Page 8: ...8 Product view BOTTOM Waterproof Door Bottom Waterproof Door Parts 1 Battery door 2 x AAA Batteries 2 O ring 3 SD SDHC memory card slot 4 Waterproof Door Serial located inside door ...

Page 9: ...9 Opening Waterproof Door 1 Push and hold red latch lock tab away from latch 2 Lift latch Do not force beyond stopping point 3 Push end of latch away from door to release door 4 Open waterproof door ...

Page 10: ...d as shown in the illustration 3 Close latch Latch lock will engage automatically Important Before closing waterproof door make sure O ring and opposing contact surfaces are perfectly clean Refer to How to Maintain a Waterproof Seal on Page 37 Make sure nothing is trapped under the door to prevent it from closing and sealing properly ...

Page 11: ...lide battery door cover to unlock position 2 Spring loaded door will open 3 Insert 2 new or freshly charged AAA batteries according to the polarity markings on the camera 4 Push down battery door and slide to locking position ...

Page 12: ...ure camera power is turned off Push lightly on the edge of the card and it will eject Use end of Cleaning Brush Tool provided for easier removal of card Notes You should format the memory card when it s first installed or when the card is used in another camera Refer to page 30 for instructions on formatting the memory card Each 1GB of memory card storage size is equal to about 900 pictures or 30 ...

Page 13: ...l automatically go into power save mode when no buttons are pushed for a period of one minute The LCD will turn off but the Status LED light remains on Push any button to wake up the camera The power is turned OFF automatically when the camera has not been operated for a fixed period of time Turn the power ON again to resume operation Refer to Setting Auto Off on page 27 The LCD monitor will displ...

Page 14: ...ed on the bottom of the LCD monitor indicating the camera is now recording video 6 Hold camera steady and pan slowly when recording video 7 Push the Shutter button again to stop recording video Notes There must be sufficient lighting for good quality video Use the SeaLife Photo Video Light SL980 Optional accessory for recording video in low light conditions Changing the Focus and Zoom setting is d...

Page 15: ...layed on the upper left corner of the LCD monitor and the last recorded picture or video clip will be displayed on the LCD monitor 4 Push the left or right Directional button to scroll through the pictures and video clips stored in memory Note Video clips will start playing automatically Push and hold the left Directional button to reverse the video clip ...

Page 16: ... The LCD monitor will display DeleteThis Image Yes or No a Push the left or right Directional button to select Yes and push the Shutter button to delete the picture or video b Push the left or right Directional button to select No and push the Shutter button to exit Picture will NOT be deleted Note You can also delete all images and videos stored in memory by formatting the memory card Refer to pa...

Page 17: ... camera to Easy Set up mode 3 Easy Set up is displayed on the upper left corner of the LCD monitor 4 Follow the on screen guide using the left or right Directional button to make your selections 5 Push the Shutter button to confirm selection 6 Once you have completed the Easy Set up the camera will automatically exit the Easy Set up mode and return to the Camera mode ...

Page 18: ... for taking underwater pictures or videos when using the optional external flash and or photo video light accessory Underwater Camera Only Snorkeling Ideal for taking underwater pictures or videos without external flash or light accessory at depths less than 20ft 6m Underwater Camera Only Diving Ideal for taking underwater pictures or videos without external flash or light accessory at depths grea...

Page 19: ...ce when using 3X zoom to avoid blurry pictures 1 To activate the zoom push and release the Zoom button 2 Each push and release will increase the zoom by one step up to 3X The magnification is displayed on the LCD monitor 3 Compose your scene and push the shutter button to take a picture or start recording video Note The Zoom cannot be adjusted during video recording ...

Page 20: ...r videos at close up or far away subjects 1 Turn Focus Lever to Landscape for shooting distances of 4ft to infinity 1 3m to infinity 2 Turn Focus Lever to Macro for close up shooting distances between 2ft to 4ft 0 65m to 1 3m Notes The Focus setting will be displayed on the LCD monitor ...

Page 21: ...e flash fires automatically according to the lighting conditions Flash ON The flash will always fire regardless of the lighting conditions This option is useful when the subject is set against a bright background or to reduce dark shadows Flash OFF The flash is turned off and will not fire regardless of the lighting conditions Turn the flash off when taking pictures at shooting distances beyond th...

Page 22: ...shooting distance inside of 3 ft 1m or using the optional external flash accessory Keeping the flash turned OFF or using the optional flash accessory reduces backscatter figure 1 Backscatter refers to the small dots that appear in underwater pictures which occurs because the tiny particles suspended on the water are illuminated by the camera s flash Keeping the flash ON increases backscatter figur...

Page 23: ...nformation When using the optional SL961 external flash or SL980 photo video light accessories follow the Easy Setup mode to set the camera to UNDERWATER CAMERA FLASH This optimizes the camera s exposure program to compensate for the more powerful light emitted from the external flash or light The camera s flash is locked to FLASH ON Pushing the Flash button will adjust the exposure setting of the...

Page 24: ...ional buttons to scroll up and down the setup menu 4 Use the Mode button to confirm the desired setting 5 To exit the menu push and hold the Menu button for 3 seconds or select Exit from the menu and push the Mode button Changing the Language 1 Select Language from the setup menu using the right or left Directional buttons and push the Mode button to enter the Language setting screen 2 Select the ...

Page 25: ...e left or right to increase or decrease the value and push the Mode button to confirm each setting Note The Date Time setting will not be saved if the battery is removed for more than 3 minutes Using the Spy Mode In Spy Mode the camera will automatically capture continuous pictures of a scene at specified time intervals The Spy mode is useful for taking multiple pictures of hard to photograph wild...

Page 26: ...ttons to select the desired time interval 5 sec 10 sec 30 sec 1 min 5 min or 30 min 7 Push the Mode button to confirm the time interval 8 The advanced setup menu will automatically close and you will see the spy mode icon displayed on the LCD monitor 9 Aim the camera at the desired scene A compact tripod is helpful to keep the camera aimed at the subject 10 Push the shutter button The camera will ...

Page 27: ...ttons and push the Mode button to enter the Auto Off setting screen 2 Select the desired time period using the right or left Directional buttons and push the Mode button to confirm Changing the Beep setting The camera will make a beeping sound when a button is pushed buttons You can set the Beep to On or Off 1 Select Beep using the right or left Directional buttons and push the Mode button to ente...

Page 28: ... do not display icons using the right or left Directional buttons and push the Mode button to confirm Changing the Frame Number Reset setting This feature will create a new folder on the memory card The captured pictures and video clips are saved in the new folder starting at frame number 0001 1 Select Fr No Reset using the right or left Directional buttons and push the Mode button to enter the Fr...

Page 29: ...rld 1 Select Light Freq using the right or left Directional buttons and push the Mode button to enter the Light Freq setting screen 2 Select 60Hz or 50Hz using the right or left Directional buttons and push the Mode button to confirm Changing the LCD Monitor Brightness setting Use this setting to increase the brightness of the LCD monitor You can select between Standard default or Bright The Brigh...

Page 30: ...ictures and video clips after being saved on your computer 1 Select Format using the right or left Directional buttons and push the Mode button to enter the Format setting screen 2 Select Yes format or No exit using the right or left Directional buttons and push the Mode button to confirm Changing the LCD Monitor Brightness setting Continued 2 Select LCD Bright using the right or left Directional ...

Page 31: ...stalled on the camera New firmware may be released to repair bugs in the operating system or improve the camera performance Any new firmware versions would be posted on the www sealife cameras com and available for free download 1 Select Media Info or Sys Info using the right or left Directional buttons and push the Mode button to enter the information screen 2 Push the Mode button to exit the inf...

Page 32: ...ode button to confirm Using the Copy to Card Function Use this function to copy the pictures and video clips saved in the camera s internal memory to the SD SDHC memory card You can only use this when the memory card is installed and you have pictures or video clips saved in the camera s internal memory 1 Select Copy to Card using the right or left Directional buttons and push the Mode button to e...

Page 33: ...ng For improved accuracy of the battery power indicator select the battery type to match the AAA batteries being used For longer battery life we recommend using Energizer Lithium or NiMH rechargeable batteries not alkaline batteries ...

Page 34: ...s from the memory card to your computer Remove the memory card from the camera Refer to page 12 for information on how to install remove the memory card Insert the Memory Card into Card Reader and Card reader into the computer USB port as illustrated Your PC or MAC computer will automatically detect the card reader ...

Page 35: ... you will see the DCIM folder which contains the pictures and video clips saved on the inserted memory card Copy or Cut the pictures and video clips contained in the folder and Paste to the desired folder location on your computer Notes For Mac double click the Untitled or Volume 1 folder that appears on your desktop iPhoto should launch automatically ...

Page 36: ...ware allows you to open view organize and make edits adjustments to your pictures and video clips If your computer does not include editing software you may want to purchase one Here are some links to popular photo editing software Google Picasa www picasa google com Adobe Photoshop Elements www adobe com Arcsoft Photo Studio www arcsoft com Ulead PaintShop www ulead com ...

Page 37: ... the O ring contact surfaces become damaged Clean O ring and O ring contact surfaces removing all sand hair and other debris before every use Use the cleaning brush provided or wipe the O ring and O ring contact surfaces with clean moistened cloth Make sure O ring is completely seated into O ring groove before sealing the waterproof door Make sure there are no obstructions preventing the waterproo...

Page 38: ...r other damages before each use Replace O ring if damaged or have camera serviced if the O ring contact surfaces become damaged 3 Use a damp lint free cloth to clean O ring and O ring contact surfaces removing all sand hair and other debris 4 Use the cleaning brush provided to remove any sand or debris from the O ring groove waterproof door and sealing area 5 Install O ring see next page ...

Page 39: ...oor Refer to page 9 for instructions on opening and closing the waterproof door 2 Use the end of the Cleaning Brush Tool or the side of a credit card to lift the O ring out of its groove To Install O ring 1 Make sure O ring O ring groove and O ring contact surfaces are perfectly clean and undamaged for installing the O ring 2 Lay O ring flat along the O ring groove Be careful not to roll or twist ...

Page 40: ...ning the waterproof door or changing the batteries or the memory card Avoid opening waterproof door in wet sandy or humid environments It is recommended to load batteries and prepare the camera in dry cool air such as inside an air conditioned room This will prevent water or humidity from being trapped inside the camera which may cause fogging to occur Avoid exposing camera to direct sunlight or e...

Page 41: ...water is essential for good underwater pictures Low visibility caused by fine particles suspended in the water will diminish the picture and video quality Limit your shooting distance to 1 10 of the water visibility For example if the visibility is 30ft 10m limit your shooting distance to 3ft 1M Closer shooting distances result in better pictures Consider buying the Mini II Wide Angle Lens SL974 w...

Page 42: ...cy is very important for your diving safety so don t start shooting until your buoyancy is under control Compose a good picture Avoid shooting down on the subject from above Shooting down usually results in a poor contrast because the subject blends into the background Try and shoot upwards from below the subject so you get a blue water background and better contrast Get the entire subject into yo...

Page 43: ...ovie Maker Practice makes perfect There is no better way to learn than from your mistakes Become familiar with your camera controls so you can make quick adjustments depending on the conditions Take the time to practice and experiment with different settings Review your pictures and learn from your mistakes Always observe dive safety rules and Never Touch Marine Life Do not let photography distrac...

Page 44: ...sing the SeaLife Digital Pro Flash SL961 for brighter more colorful pictures Pictures or Video clips are not sharp The focus switch is not set correctly Refer to page 20 for more information on setting the focus and correct shooting distances Light conditions are too dark resulting in grainy pictures or motion blur Hold camera steady or use optional external flash or light accessory The lens is di...

Page 45: ...ernal SD and SDHC card Recommend 4GB or 8GB SDHC card EXIF Format EXIF 2 2 Operating Environment PC Windows XP Vista 7 or MAC OS 9 0 and up On Screen language English German French Spanish Italian Russian Dutch Turkish Portuguese Brazil Chinese T C and S C Instruction manual English printed German French Spanish Italian Dutch Power AAA Battery x 2 Battery life 100 pictures w Alkaline 500 pics w En...

Page 46: ...tailed warranty information please refer to the warranty statement included with the product In the event the original purchaser believes there is a defect in a product it is recommended that the purchaser first visit www sealife cameras com for product updates and technical advice The SeaLife website also includes detailed information on how to get repair service Pioneer Research www sealife came...

Page 47: ...47 ...

Page 48: ...June 2012 Item SL33025 ...

Reviews: