


6.4.
rePlacing tHe saw blade
6.4.1.
We recommend you keep a small supply of commonly used saw blades to hand. Change saw blades frequently for best results. Ensure
you choose a blade with a pitch suitable for workpiece to be cut (see cutting chart, section 4).
warning! taKe care wHen Handling saw blades, blade teetH are verY sHarP.
6.4.2.
Loosen the blade tension, move both front guide bearings away from blade (see para. 6.2.) and remove blade cover.
6.4.3.
carefully remove old blade and install new one ensuring that tooth direction is consistent with the blade travelling left-to-right in the cutting
area.
6.4.4.
Reset blade tension (see para. 6.1.), check tracking (see para. 6.5.), replace blade cover and adjust guide bearings (see para. 6.2.).
6.5.
blade tracKing
6.5.1.
Adjustment of the blade tracking is necessary to prevent the blade from twisting or coming off the blade wheels. this adjustment
should be made whenever a new blade is fitted (see para. 6.4.).
6.5.2.
Run saw for a short time and then switch off.
6.5.3.
raise saw arm, remove blade cover and check blade-to-wheel relationship (tracking). rear edge of blade should be very close to, but
not hard against, the wheel flanges.
6.5.4.
If inspection indicates that adjustment is required reduce blade tension (see para. 6.1.) and loosen the screw (65) in driven wheel (67).
6.5.5.
move drive wheel in or out on shaft as required to improve tracking and tighten set screw.
6.5.6.
Having made a small adjustment, tension blade, replace the blade cover, lower the arm and run the saw for a short time.
6.5.7.
Switch saw off, remove blade cover and check tracking. Repeat adjustment procedure if necessary.
7. maintenance
7.1.
clean saw after each operation and smear unpainted surfaces with oil to prevent rusting.
7.2.
Annually replace gearbox oil (SAE 90) as follows:
7.2.1.
With blade arm horizontal remove gearbox cover screws (16), cover (78) and gasket (77).
7.2.2.
Place oil container under right hand lower corner of gearbox and then carefully raise saw arm fully to drain oil.
7.2.3.
lower saw arm, remove any remaining oil from gearbox with clean cloths and then refill with fresh oil. replace cover and gasket.
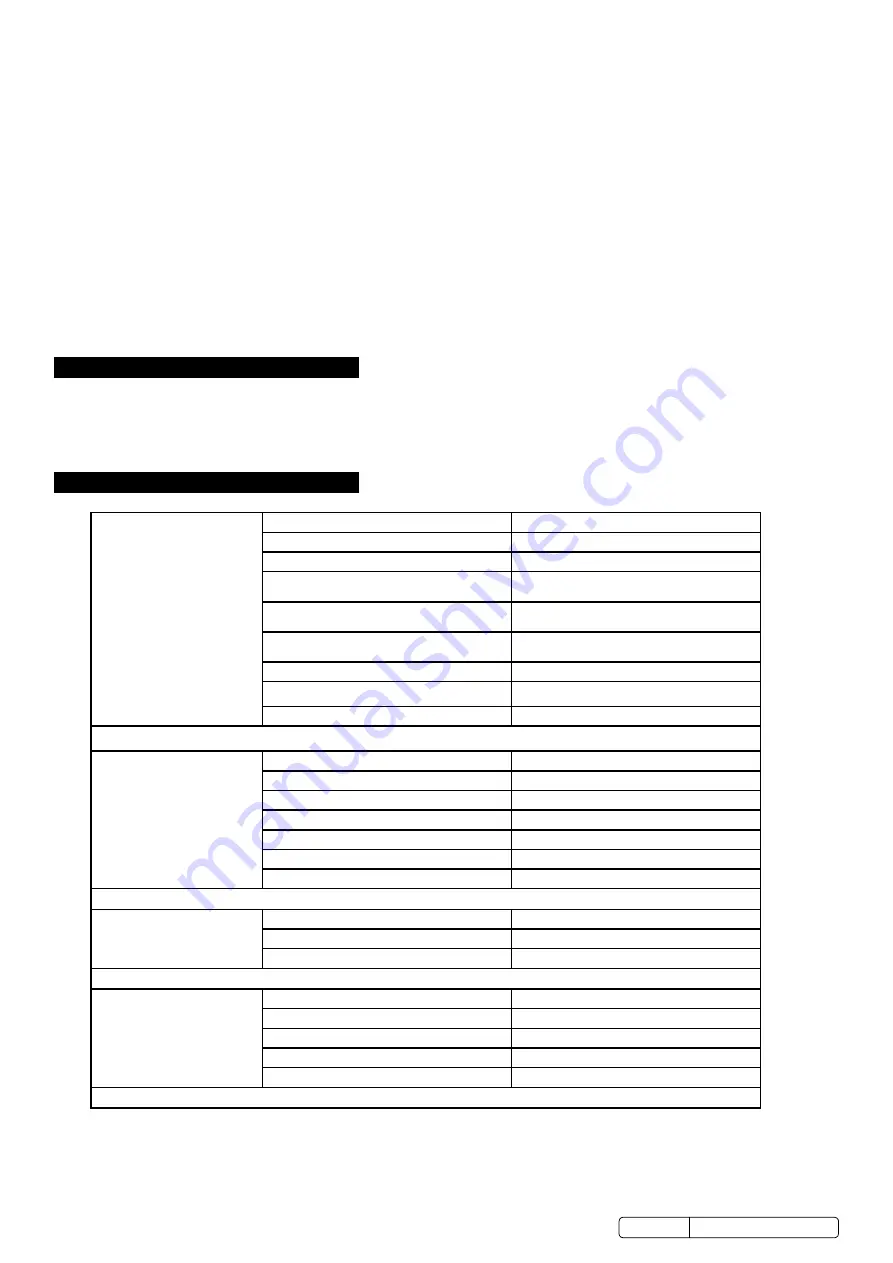
8. trOublesHOOting
Excessive blade breakage and/or
teeth ripping from the blade.
1. Workpiece is loose in the vice.
1. clamp the workpiece securely.
2. incorrect speed or feed.
2. Adjust the speed or feed to suit the workpiece.
3. Blade is too fine.
3. replace with a coarser blade.
4. Workpiece is too course.
4. use the saw at slower speed and use a smaller
tpi blade.
5. incorrect blade tension.
5. Adjust blade tension so that it does not slip on
the wheel.
6. Blade is in contact with workpiece before saw
is started.
6. Place blade in contact with the workpiece
only after the saw has started.
7. Blade is rubbing on the wheel flange.
7. Adjust blade wheel alignment.
8. Blade guides are misaligned.
8. Adjust blade guide alignment.
9. Blade is too thick.
9. use correct thickness blade.
Premature blade dulling.
1. Blade tpi is too high.
1. replace with a smaller tpi blade.
2. incorrect speed - too fast.
2. reduce speed.
3. inadequate feed pressure.
3. increase feed pressure.
4. Hard spots or scale on the workpiece.
4. reduce speed, increase feed pressure.
5. Blade is twisting.
5. replace blade and adjust to the correct tension.
6. Insufficient blade tension.
6. Increase blade tension.
7. Blade is slipping.
7. increase blade tension and reduce speed.
unusual wear on side or back of
blade.
1. Blade guides are worn.
1. replace blade guides.
2. Blade guides are misaligned.
2. Adjust guide pivots.
3. Blade guide brackets are loose.
3. tighten blade guide brackets.
motor overheating.
1. Blade tension too high.
1. reduce blade tension.
2. drive belt tension too high.
2. reduce drive belt tension.
3. Blade too coarse or too fine.
3. use a blade more suitable for the workpiece.
4. Gears need lubrication.
4. lubricate the gears.
5. Blade is binding in the cut.
5. decrease feed and speed.
Original Language Version
© Jack sealey limited
s
M65.V2 Issue 4 (H, F) 06/02/18


