7.5.
INsPeCtING, rePLaCING or CLeaNING the sParK PLuG
Note:
The spark plug should be checked after every 100 hours of operation or every six
months.
7.5.1.
To replace or clean the spark plug:
1. disconnect the spark plug wire by pulling it off the spark plug.
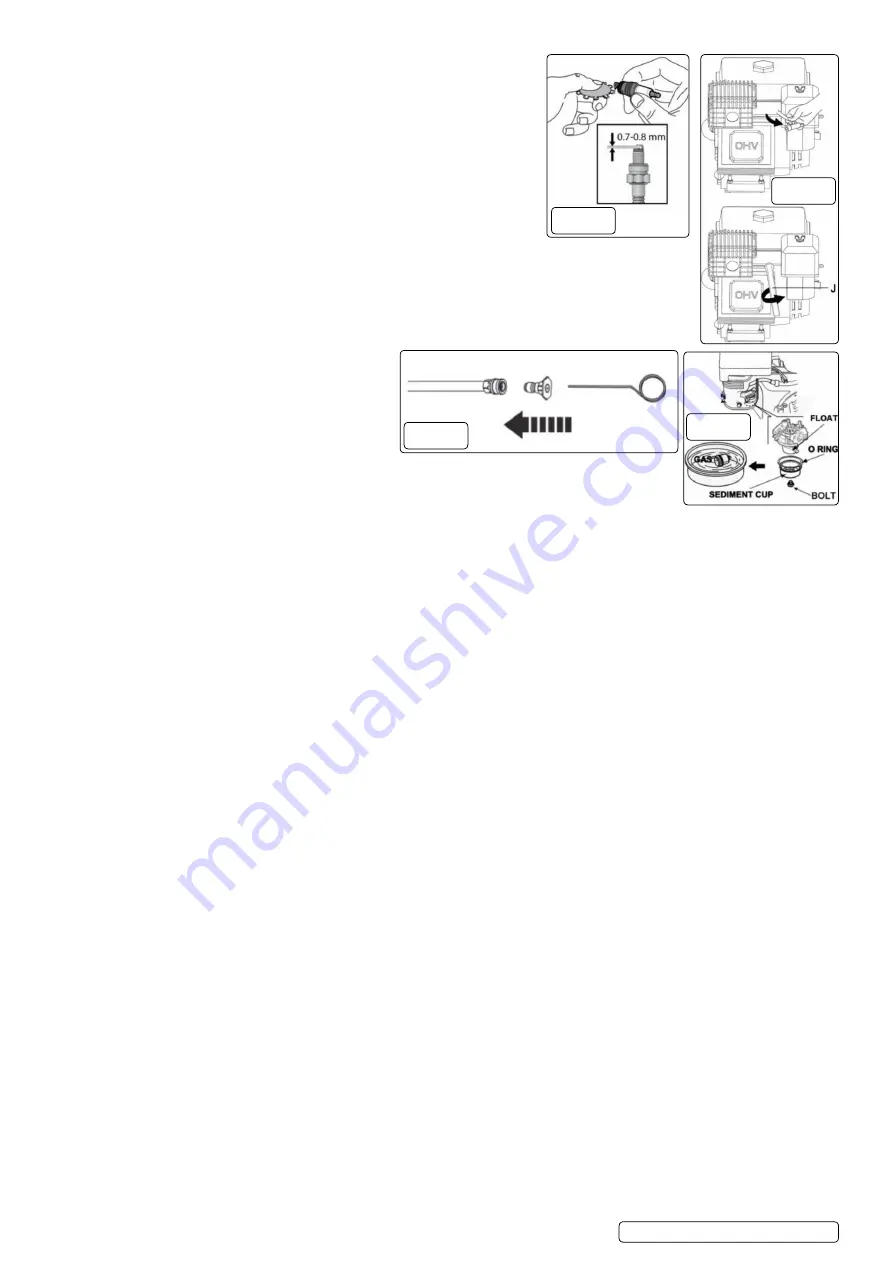
2. Using provided spark plug wrench (fig.15.J), remove the spark plug by
turning it counter-clockwise. If there is a carbon sediment build-up, remove it.
If there is too much carbon sediment, replace the spark plug.
3. Check the gap with a wire gauge. If necessary, reset the gap to 0.7-0.8 mm (fig.14).
Install and tighten the spark plug to the recommended torque – 180 lb.·in (20 Nm).
4. Reinstall the spark plug wire and protection cage in reverse order.
Note:
In some areas, local law requires using a resistor spark plug to suppress ignition
signals. If this engine was originally equipped with a resistor spark plug,
use the same type for replacement.
7.6.
CLeaNING the Carburettor fIG.16
7.6.1.
To clean the carburettor:
1. Screw down the bolt on the bottom of carburettor with wrench.
2. Push the float up four to five times, then clean sediment cup with fuel.
Note:
Put the sediment cup back. Be careful not to miss the o ring.
7.7.
CLeaNING the sPray tIPs fIG. 17
WarNING!
Clogging of the spray tip increases the
water pressure and might damage the pump unit .
7.7.1.
Clean the spray tip by carefully inserting the provided
spray tip cleaner, or a thin, sharp object (e.g.,
paper clip) into the tip to remove deposits
(fig.17)
.
7.8.
PuMP WINterIzatIoN aND LoNG terM
storaGe
7.8.1.
steP 1: eNGINe storaGe.
If the unit is not to be used for more than one month the following
procedure should be followed.
1. Top-up engine oil to maximum.
2.
Drain petrol from the fuel tank, fuel line, fuel tap and carburettor.
3. Pour one teaspoon of engine oil through the spark plug hole, pull the recoil starter several times and replace the spark plug. Then pull
the starter slowly until an increase in pressure is felt indicating that the piston has commenced its compression stroke and leave it in this
position. This closes both the intake and exhaust valves and prevents the inside of the cylinder from rusting.
7.8.2.
steP 2: ProteCt fueL systeM
fueL aDDItIVe:
Fuel can become stale when stored for over 30 days. Stale fuel causes acid and gum deposits to form in the fuel system or on essential
carburettor parts. Please use fuel stabilizer to keep fuel fresh. Run the engine for 2 minutes to circulate the stabilizer throughout the fuel
system before storage.
DraIN fueL fIG 6:
If fuel in the engine has not been treated with a fuel stabilizer, it must be drained into an approved container. Run the engine until it
stops from lack of fuel. Remove the hex screw from the carburettor then drain the fuel from the tank, carburettor, and tube. Screw the
carburettor drain hex screw back once the fuel has been completely drained.
7.8.3.
steP 3: ChaNGe oIL
WarNING!
Petrol is extremely flammable and potentially explosive.
Do Not
perform maintenance on petrol associated components
where there is any source of ignition present such as cigarettes, sparks, naked flame or hot surfaces.
7.8.4.
While engine is still warm, drain oil from crankcase. Remove the hex screw from the crankcase (fig.6). Drain the oil to a container. Refill
with recommended grade oil (SAe 10W-30).
IMPortaNt:
• If the pressure washer is to be stored with fuel in the fuel tank and carburettor, it is important to reduce the hazard of fuel vapour ignition.
• Select a well-ventilated storage area away from any appliance that operates with a flame, such as a furnace, water heater, or clothes
dryer. Also avoid any area with a spark-producing electric motor, or where power tools are operated.
• If possible, avoid storage areas with high humidity, this will promote rust and corrosion.
• Place the pressure washer on a level surface. Tilting can cause fuel or oil leakage.
7.9.
MaINteNaNCe sCheDuLe.
7.9.1.
Before each use;
Check engine oil level.
Inspect the unit for evidence of oil and fuel leaks.
7.9.2.
After the first 8 hours or 20 hours only;
Change the engine oil.
Check pump oil
every 50 hours.
Change the engine oil.
7.9.3.
every 6 months or 100 hours;
Change the engine oil.
Check pump oil
Inspect and clean air filter.
Clean the deposit cup.
Clean spark plug and check gap.
7.9.4.
every 300 hours;
Replace air cleaner element.
Check valve clearances.
Check idling speed.
Clean spark plug and check gap.
Clean fuel tank fuel filter.
fig.14
fig.15
fig.17
fig.16
Original Language Version
© Jack Sealey limited
PWM2500.V2 Issue 1 29/11/19


