


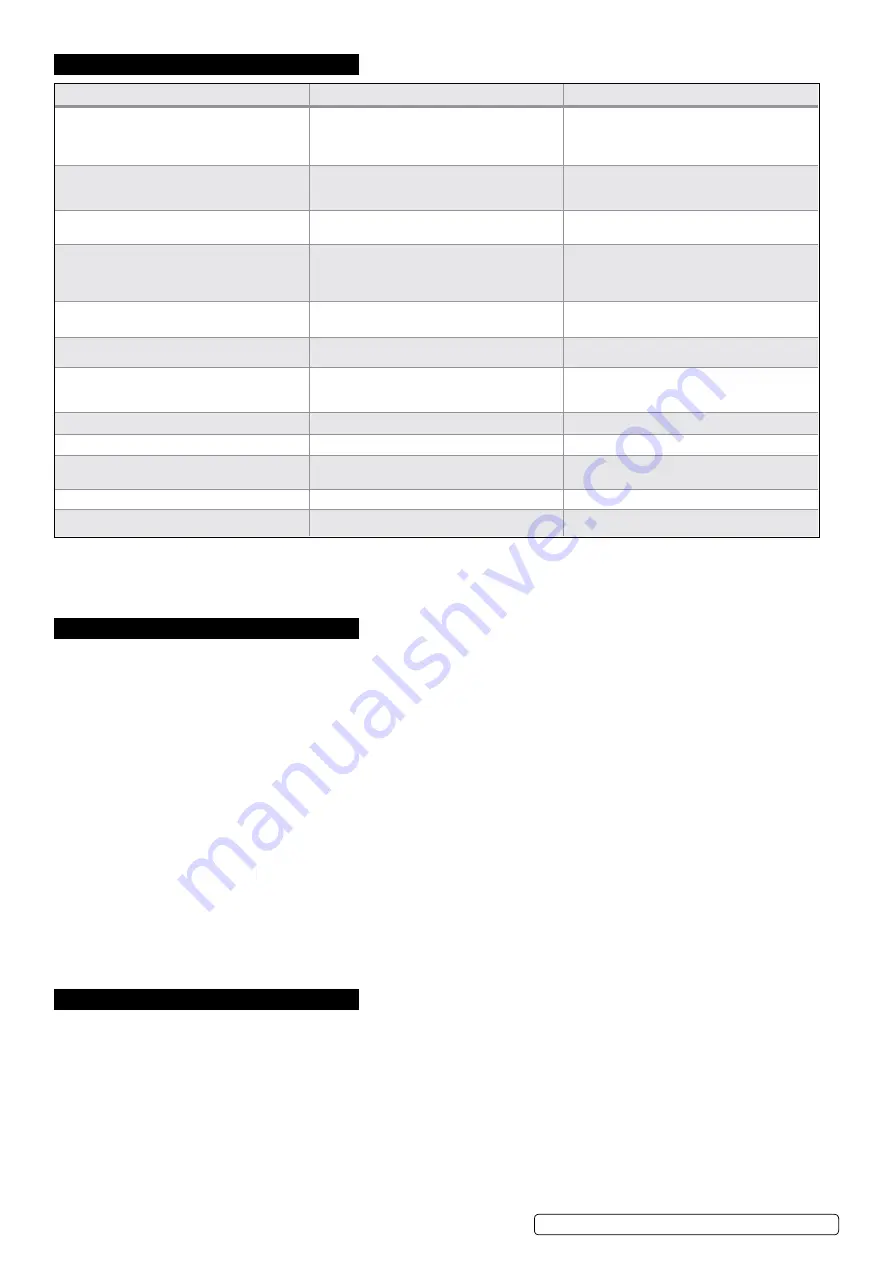
8. troUBleshootiNG
4 pc Air AccessorY Kit
SUPPLIED WITH MODEL NO:
sAc5020epK.v2
9. sprAY GUN sAFetY
WArNiNG!
disconnect the spray gun from the air supply before changing accessories, servicing or performing any maintenance.
9
Familiarise yourself with this products application and limitations, as well as the specific potential hazards peculiar to the spray gun.
Paint cup remains pressurised after gun is disconnected from air line.
8
do Not
pull the trigger, but release the pressure by gently opening cup.
9
maintain the spray gun in good condition (use an authorised service agent).
9
Replace or repair damaged parts. Use recommended parts only. Non authorised parts may be dangerous and will invalidate the
warranty.
9
locate the spray gun in an adequate working area for its function, keep area clean and tidy and free from unrelated materials, and
ensure there is adequate ventilation and lighting.
9
Keep the spray gun clean for best and safest performance.
9
Wear approved respiratory protection and safety eye goggles.
9
Remove ill fitting clothing. Remove ties, watches, rings, and other loose jewellery, and tie back long hair.
9
Keep children and unauthorised persons away from the working area.
9
Avoid unintentional operation.
8
do Not
point spray gun at yourself, at other persons or animals.
8
do Not
carry the by the air hose, or pull the hose from the air supply.
8
do Not
use the spray gun for any purpose other than for which it is designed.
8
do Not
allow untrained persons to operate the spray gun.
8
do Not
get the spray gun wet or use in damp or wet locations or areas where there is condensation.
8
do Not
operate gun if any parts are missing or damaged as this may cause failure or personal injury.
8
do Not
direct air from the air hose at yourself or others.
9
When not in use switch the spray gun off, and disconnect from the air supply.
10. tYre iNFlAtor sAFetY
9
disconnect the gauge from the air supply before changing accessories, servicing or performing any maintenance.
9
maintain the
gauge in good condition (use an authorised service agent), and keep the gauge clean for best and safest performance.
9
Replace or repair damaged parts.
Use recommended parts only. Unauthorised parts may be dangerous and will invalidate
the warranty.
9
locate gauge in a suitable work area, keep area clean and tidy and free from unrelated materials and ensure there is adequate lighting.
9
Keep children and unauthorised persons away from the work area.
8
do Not
direct gauge outlet at yourself or at other persons or animals.
8
do Not
carry by the hose, or yank the hose from the air supply.
8
do Not
use the gauge for a task which it is not designed to perform.
8
do Not
operate the gauge when you are tired or under the influence of alcohol, drugs or intoxicating medication.
8
do Not
operate gauge if parts are missing or the gauge is damaged, as this may cause failure and/or personal injury.
FAUlt
cAUse
remedY
1A) Pressure drop in the tank
Air leaks at connections
Run compressor to max. pressure, switch off
Brush soap solution over connections and look for
bubbles. Tighten connections showing leaks
If problem persists contact Authorised Service Agent
1B) Pressure drop in the tank
Air leaks from safety valve
operate the safety valve manually by pulling on the
ring. If valve continues to leak when in the closed
position it should be replaced
1C) Pressure drop in the tank
Air leaks from cylinder head gasket
Check tightness of head bolts. If leak continues
contact Authorised Service Agent
2) Pressure switch valve leaks when
compressor is idle
non-return valve seal defective
Empty the air tank. Referring to fig.6, remove the
non-return valve cap (3), spring (2) and seal (1)
Clean the seal and its seat, or if necessary replace
the seal
3) Air leaks from tank body or tank welds
Internal corrosion caused by infrequent tank
draining or non permitted modifications to tank
Tank could rupture or explode. Cannot be repaired
discoNtiNUe Use immediAtelY
4A) motor stops and will not restart
Thermal cut out has operated
Allow unit to cool for 30 minutes, then press reset
see fig.7.
4B) Motor stops and will not restart
Supply fuse has tripped
Reset fuse and restart unit. If repeated tripping
occurs replace the check valve or contact
authorised service agent
5) Compressor stops and does not restart
motor failure
Contact Authorised Service Agent
6A) Compressor does not stop at max. pressure
Pressure switch fault
Contact Authorised Service Agent
6B) Compressor does not stop at max. pressure
Filter clogged
Head gasket or valve fault
Replace filter element.
Contact Authorised Service Agent
7) Compressor noisy with metallic knock
Bearing or piston damage
Contact Authorised Service Agent
8) Excessive moisture in discharged air
High humidity environment
drain tank after each use
Original Language Version
© Jack Sealey limited
S
AC5020E.V3, SAC5020EPK.V2 Issue 1 13/06/19