Inlet Line
Outlet Line
Figure
6
Figure
7
Cartridge Replacement Instructions
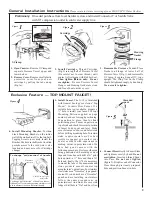
7. Mount Faucet.
Slide open side of Faucet
Mounting Nut onto reduced diameter,
un-threaded section of Faucet Stem now
beneath the sink, and slide the Nut
upwards to contact the threads. Then
carefully engage the threads, being
careful to not cross thread. Hand tighten
as necessary to hold the Faucet in place,
but do not use tools and do not
overtighten.
Check alignment and
position of Faucet, and adjust as
necessary.
(We suggest you practice
threading the Nut to the Stem above the
sink, prior to the actual installation, to
become familiar with the method before
installing Faucet to sink.)
8. Connect Inlet and Outlet lines.
Connect
free end of Thermoplastic Connection
Hose from Faucet Stem to Outlet (center)
Port on the Pressure Vessel. Tighten
securely.
Do not overtighten.
Connect
remaining Hose from fitting on cold
water supply line to Inlet (outside) Port
on top of Pressure Vessel.
Do not
overtighten.
All Seagull
®
IV X-1 units employ a RS-1SG Cartridge. The rated average capacity for the RS-1SG
Cartridge is 1,000 gallons. Actual capacity will vary depending on operating conditions and the quality
of the water source. Cartridges should be replaced when the flow rate decreases or when foul tastes or
odors become apparent (evidence of extra heavy loading of sulfur, tannin, iron or contamination), or
annually otherwise. Installing a Cartridge is easily accomplished as follows:
A. Close cold water supply valve.
B. Open X-1F Faucet,
and keep it open
until new Cartridge is installed and
operating.
C. Remove unit from Mounting Bracket,
place over a large sauce pan or other
container, remove V-Clamp and drain
loose water from Pressure Vessel. (If
Pressure Vessel halves remain attached
due to “set,” pull apart manually or
momentarily allow a small amount of
water to flow into the unit with the X-
1F faucet closed to separate the halves.
If X-1F faucet is closed, be sure and
reopen before continuing with next
step).
D. Remove expended Cartridge
by
placing plastic bag over it and turning
counter clockwise. Close bag and
discard. Rinse inside of Pressure Vessel
9. Mount unit on Bracket
by placing the
V-Clamp over the raised section on top
of the Bracket. Open the X-1F Faucet to
allow air to exhaust slowly. Open Valve
on cold water service line. Check for
leaks. Allow water to run for several
minutes to clear line and system of air
and any loose materials. Please note that
for the first few days you may see
entrapped air bubbles within the water.
This is perfectly normal and will cease
after the unit has processed several
gallons of water. Also, some black
“fines” from inside of cartridge may flow
with the first few gallons of water. These
are harmless, if consumed, or may be
discarded.
Figure
8
3
Inlet Line
connects
to Cold Water
Supply.
Outlet Line
connects to
Pure Water
Faucet.
QUESTIONS?
Call 1-800-441-8166
for Customer service
with water and wipe clean with paper
towel Be sure thick White Rubber
Cartridge Seal is bonded in place inside
the top of the unit.
E. Align carefully,
and being careful not
to cross thread, thread new Cartridge
into place
UNTIL CONTACT IS
FIRST MADE WITH SEAL, THEN
TIGHTEN ONE QUARTER TURN
ONLY. DO NOT OVERTIGHTEN.
Please refer to
Step 2 and Figure 2.
Reassemble the two stainless steel
halves together, making sure the
rubber Housing Gasket is in
place between the two halves.
IMPORTANT:
Make sure Gasket is
not cut or nicked, and be sure
housing has not been dropped or dented
on either of the two mating halves.
F.
Refer to Step 9 to place unit back in
service.
H
ELPFUL
H
INTS
If you have difficulty separating the upper and
lower halves of the pressure vessel, water
pressure can help. Turn off cold water supply;
remove the V-clamp and close the pure water
faucet. With a pan ready to catch water from
the unit, slowly turn on the water supply. Once
the unit begins to separate, turn off the water
supply and proceed according to your
Installation and Operations instructions.
You may apply a light coating of petroleum
jelly to the housing gasket to assure ease of
opening and closing of the system.
When a new cartridge is put into service, you
may see air bubbles and black particles in the
water until the system has stabilized. These are
harmless and will be purged from the system
within the first few liters or quarts of water.


