5
Hinge
Epoxy
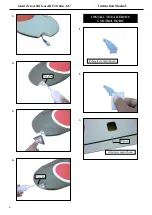
Turn the wing panel over and delect the
aileron in the opposite direction from the
opposite side. Apply thin C/A glue to each
hinge, making sure that the C/A penetrates
into both the aileron and wing panel.
Using C/A remover/debonder and a paper
towel, remove any excess C/A glue that may
have accumulated on the wing or in the
aileron hinge area.
Repeat this process with the other wing
panel, securely hinging the aileron in
place
.
Ater both ailerons are securely hinged,
irmly grasp the wing panel and aileron to
make sure the hinges are securely glued
and cannot be pulled out. Do this by
carefully applying medium pressure, try-
ing to separate the aileron from the wing
panel. Use caution not to crush the wing
structure.
Work the aileron up and down sev-
eral times to “work in” the hinges
and check for proper movement.
Note :
WING TIP BULBS
Please see below pictures.
2
.
1
.
5
.
3
.
4
.
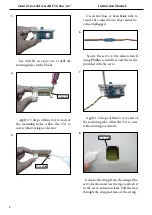
hey are designed to operate on volt-
ages 12 volts.
Summary of Contents for SEA 334
Page 11: ...11 5 6 7 8 2 3 4 Epoxy 9 ...
Page 14: ...Giant Zero A6M Gas ARF 50 60cc 86 Instruction Manual 14 28 25 29 26 30 27 31 3x10mm ...
Page 15: ...15 1 1 2 3 4 2 WING ASSEMBLY ASEMBLE BOMB INTO THE WING 3 3x15mm ...
Page 21: ...21 22 19 23 21 25 20 24 Ignition Modude Pen 26 ...
Page 23: ...23 COWLING Please see below pictures 1 4 5 6 7 2 3 3mm Epoxy ...
Page 30: ...Giant Zero A6M Gas ARF 50 60cc 86 Instruction Manual 30 2 6 3 7 4 8 5 9 Epoxy ...
Page 31: ...31 10 11 1 INSTALL RUDDER CONTROL HORN Epoxy 2 3 6 4 5 Epoxy Epoxy ...
Page 33: ...33 8 10 9 11 Epoxy 2 1 12 3 INSTALL ELEVATOR CONTROL HORN Epoxy ...
Page 35: ...35 4 1 2 ELEVATOR PUSHROD HORN INSTALLATION 3 1 2 3 INSTALL ELEVATOR CONTROL HORN ...
Page 41: ...41 3 4 5 6 Wing bolt 7 8 9 10 hen install wing guns on the wings ...


