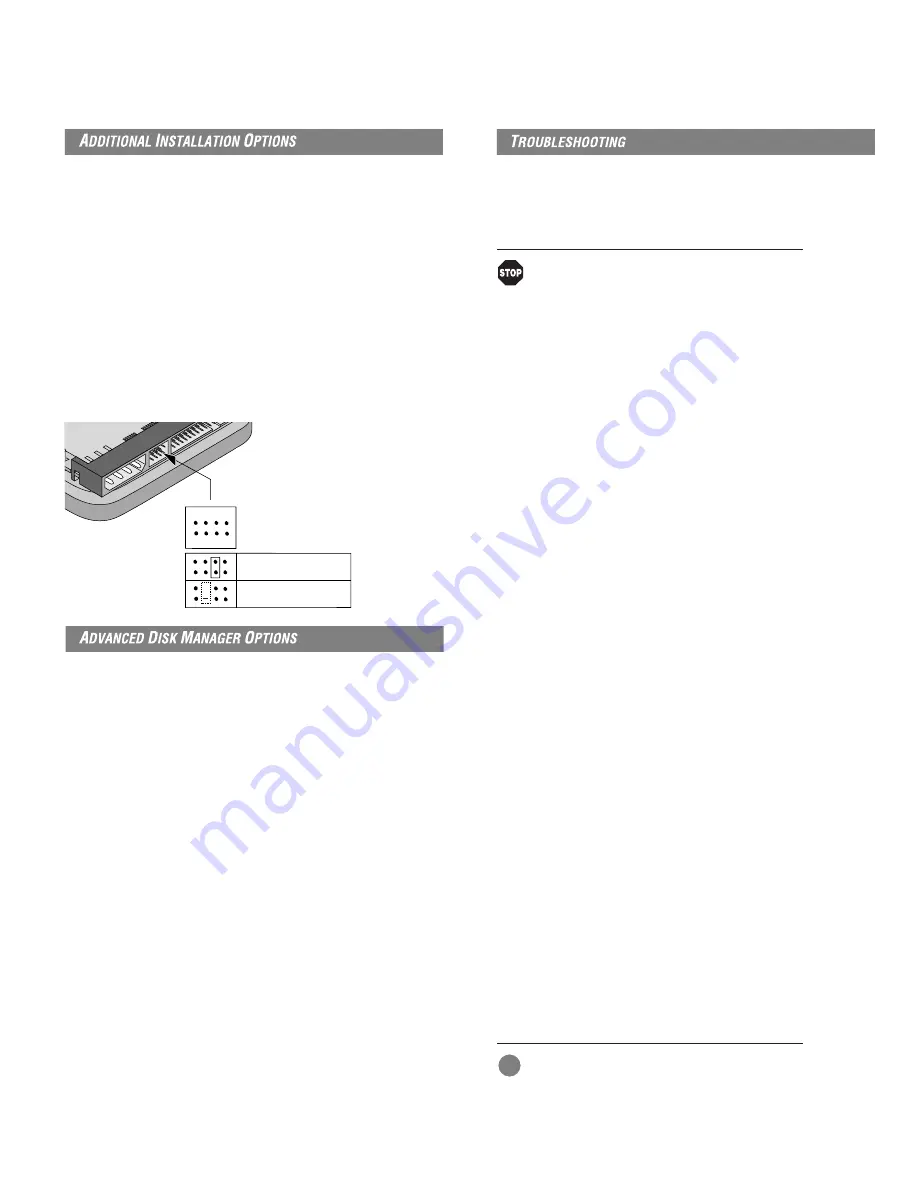
Cable Select Jumper
Some computers differentiate between master and slave drives using
specially designed interface cables that have the line to pin 28 (the Cable
Select pin) removed or cut at one connector. The connector that has pin
28 disabled is used for the slave drive. See your computer manual to
determine whether your computer supports this feature. To configure
your Seagate drive for cable select, place a jumper on pins E and F as
shown below.
Remote LED Connection
You can connect a remote LED to pins C (–) and D (+) as shown in the
figure below. Do not install a jumper on these pins. Because the jumper
block uses a 0.1-inch connector, you may need to replace the current
connector. Use Seagate connector part number 10562-001 or equivalent.
The Disk Manager Online Manual
Disk Manager contains an extensive online manual. This manual includes
detailed installation instructions, troubleshooting and a list of master/
slave jumper settings for many popular hard drives. To view the Disk
Manager online manual, insert the Disk Manager diskette into drive A
and type A:\DM /H. Then press
ENTER
. You can also view the online manual
from within Disk Manager by selecting
(V)iew/Print Online Manual
in the
main menu.
Booting from a Diskette
If Disk Manager installs the dynamic drive overlay (DDO) to access the full
capacity of your drive, the DDO must load into memory before the
operating system loads. This occurs automatically when you boot from
your drive. However, if you boot from a diskette, the DDO will not be
loaded and you will not be able to access your hard drive. The following
procedure allows you to boot from a diskette and still access your hard
drive.
1
Boot the computer from the hard disc (with no diskette in the
diskette drive).
2
When the Disk Manager banner appears on the screen, immediately
press the
SPACEBAR
(you have about 2 seconds).
3 Insert your boot diskette and press the
SPACEBAR
again.
If you boot from a diskette regularly, you can create a Dynamic Drive
Overlay boot diskette. It loads DDO into memory, then loads the
operating system. See the Disk Manager online manual for more
information about creating a dynamic drive overlay boot diskette.
Supported Operating Systems
The Disk Manager dynamic drive overlay provides support for drives
Basic Troubleshooting
If you have installed your drive and it does not function properly, perform
the following basic checks:
Warning. Always turn off the computer before
changing jumpers or unplugging cables and cards.
Wear a ground strap or take other antistatic
precautions while working on your computer or
handling your drive.
•
Verify compatibility. Verify that the host adapter and drive are
appropriately matched to each other and to your computer. Refer to the
relevant documentation for details.
•
Check all cards. Verify that all cards are seated in their slots on the
motherboard and secured with mounting screws.
•
Check all connectors and cables. Make sure all ribbon and power cables
are securely connected. Ribbon cables are easily damaged, especially at
the connector. Try a new cable known to be good. Make sure no
connector pins are bent. Verify that pin 1 on the interface cable is aligned
with pin 1 on the drive and host adapter (see figures and instructions on
the front of this sheet).
•
Verify jumper settings. Review the instructions on this sheet and in your
host adapter installation guide. Make sure all appropriate jumpers are
installed or removed as necessary.
•
Check your power-supply specifications. Each time you add a new
device to your computer, make sure your computer’s internal power
supply can support the total power demand. If necessary, consult your
dealer for a new power supply.
•
Verify the drive-type settings in the system setup program. The drive-
type settings in the system BIOS must not exceed the physical
specifications of your drive. Also, the settings must not exceed the
limitations set by the operating system and BIOS.
•
Check for viruses. Before you use someone else’s diskette in your system
for the first time, scan the diskette for viruses.
Advanced Troubleshooting
If you have performed the preceding basic checks but the problem persists,
follow these guidelines for troubleshooting specific cases.
After you install your new drive, your computer will not boot, and no
error message shows on the screen.
•
Check your computer manual or BIOS manufacturer to determine
whether your BIOS supports drives that have more than 4,096 cylinders.
If your system has this limitation, use the following procedure to
configure your computer:
1 Turn off your computer, open the case, and remove your new
Seagate drive.
!
Caution. To avoid electrostatic discharge damage to
your computer or hard drive, make sure you are
well-grounded before touching the drive, cable,
connector or jumpers.
2 Place a jumper on pins A and B on the master/slave jumper block as
shown below. This enables the alternate capacity option that causes the
drive to appear to your BIOS as having a 2.1-Gbyte capacity (4,092
Master/slave
jumper block
Enable Cable Select
Remote LED connection
B D F
A C E G
H
+


