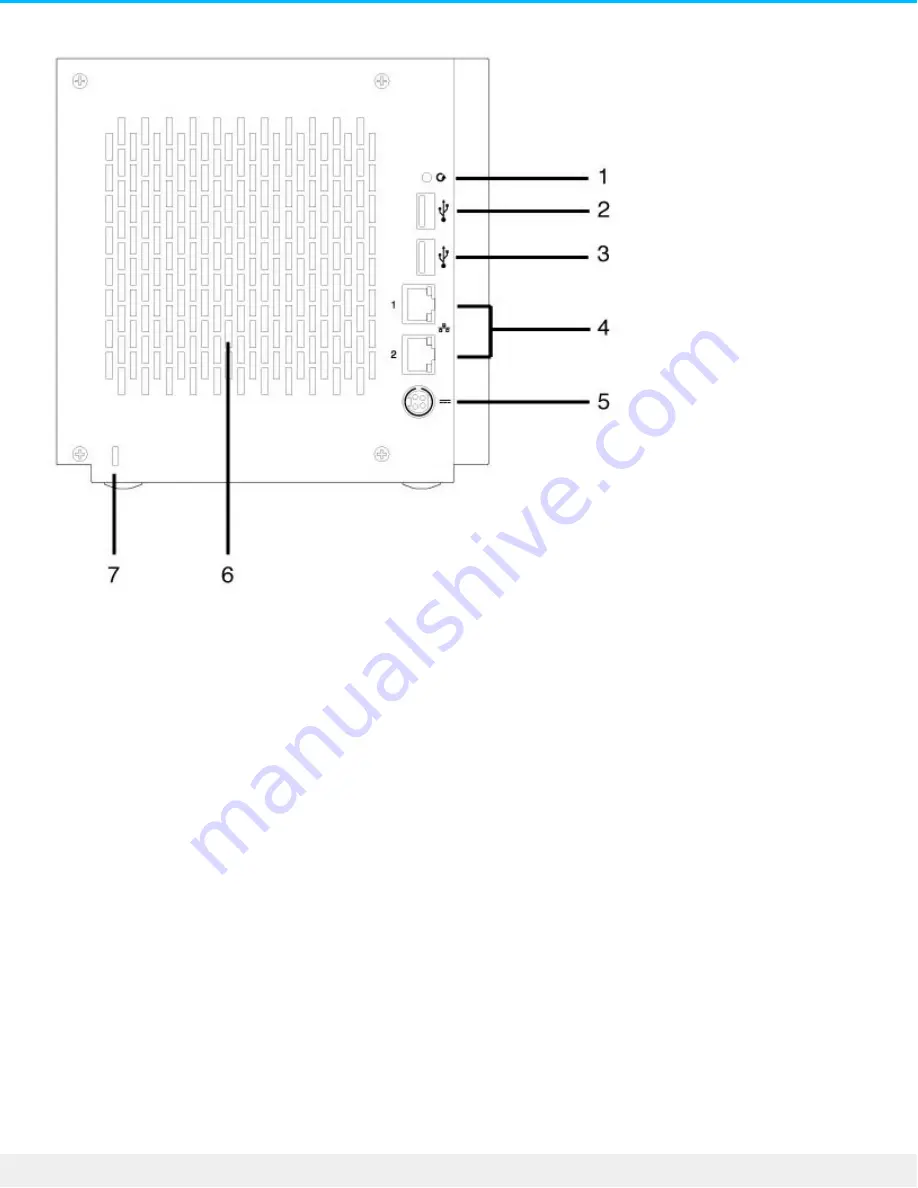
1. Recovery button: The recovery button is used to perform a NAS OS Rescue (see
NAS OS Rescue
) or
when first configuring a diskless NAS Pro (see
Setup
). Use a pointed instrument to gently push the button
within the cavity.
2. SuperSpeed USB 3.0 port: Connect a compatible USB storage device to the port.
3. Hi-Speed USB 2.0 port: Connect a compatible USB storage device to the port.
4. Gigabit Ethernet ports (x2): Connect the Ethernet cable from the device to your network. See
Setup
.
5. Power input: Plug in the AC adapter supplied with the NAS. See
Setup
.
6. Ventilation: Keeps your NAS Pro's power supply unit cool during operation. Be sure not to block the fan
exhaust when using the product.
7. Kensington lock: Secure the NAS Pro to a desk using a compatible cable.
NAS Pro 6-Bay
28
Seagate NAS Pro 2-Bay | 4-Bay | 6-Bay
4/28/15
Summary of Contents for NAS Pro 2-Bay
Page 16: ...16 Seagate NAS Pro 2 Bay 4 Bay 6 Bay 4 28 15 ...
Page 17: ...NAS Pro 4 Bay 17 Seagate NAS Pro 2 Bay 4 Bay 6 Bay 4 28 15 ...
Page 18: ...18 Seagate NAS Pro 2 Bay 4 Bay 6 Bay 4 28 15 ...
Page 19: ...NAS Pro 6 Bay 19 Seagate NAS Pro 2 Bay 4 Bay 6 Bay 4 28 15 ...
Page 20: ...20 Seagate NAS Pro 2 Bay 4 Bay 6 Bay 4 28 15 ...
Page 30: ...30 Seagate NAS Pro 2 Bay 4 Bay 6 Bay 4 28 15 ...
Page 39: ...Step 3 First login 39 Seagate NAS Pro 2 Bay 4 Bay 6 Bay 4 28 15 ...
Page 52: ...52 Seagate NAS Pro 2 Bay 4 Bay 6 Bay 4 28 15 ...
Page 61: ...6 Insert the hard drive tray into the empty slot 61 Seagate NAS Pro 2 Bay 4 Bay 6 Bay 4 28 15 ...
Page 67: ...5 Wait for the LED to turn solid 67 Seagate NAS Pro 2 Bay 4 Bay 6 Bay 4 28 15 ...


